
Want to unwrap UV in Blender, want to open them as I want, and arrange them nicely.
That's all I want to do... but I don't know how!
This is usually what happens when you first start working with Blender's UVs, especially if you came to Blender from Maya.
Toha still does this from time to time, but now I can deploy UV more smoothly and stress-free than before. So...
In this article, I will summarize "How to manually do Blender's UV unwrap the way you want.
I think it is useful for hand-drawn textures and models with a certain degree of low poly.
If you are having trouble with Blender's UV unwrap being messed up, please read this :)
By the way, "What is UV? How do I open it?" I will not discuss this in this article. I will write about it in another article when I have a chance, but for now, please refer to this article.

UV Unwrap in Blender - Points to keep in mind!

Before you start unwrapping UVs in Blender, there are some points that you should keep in mind.
- Be careful "UV Sync Selection" when editing UVs
- Blender's UV editor does not allow "UV cut"
- Let's do Blender's UV unwrap after setting the "scale to 1"
I'll try to explain in order.
(1) Be careful "UV Sync Selection" when editing UVs!
First of all, here it is.
When editing UVs in Blender, watch out for the "UV Sync Selection" in the UV Editor!

For those familiar with Maya's UV editor, this is probably the most confusing part.
Blender'sUV editor has the The following behavior is normally used.
- Only the UVs corresponding to the selected vertex, edge, or face in the 3D Viewport is displayed in the UV Editor.
- Selecting a UV in the UV editor does not make the corresponding vertex selected in the 3D viewport.
It is difficult to understand in writing, so please see the figure below.


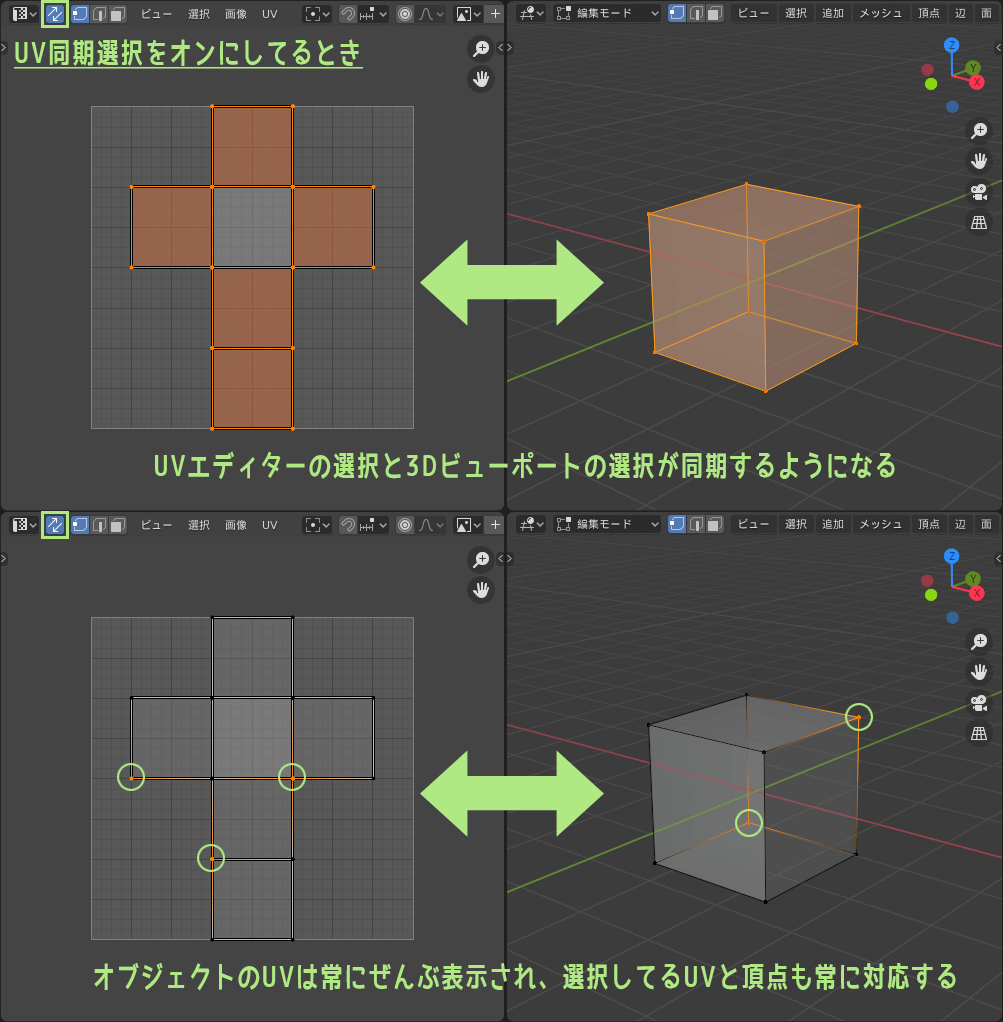
Thus, in normal mode, the UV editor and 3D viewport selection are asynchronous, and only when "UV Sync Selection" is enabled are the UV editor and 3D viewport selection synchronized.
However, when "UV Synchronous Selection" is ON, if there are multiple UV points corresponding to a single vertex, it is not possible to select only a specific UV point among them. This causes various inconveniences when working with UV editing.
For this reason, Blender requires switching the UV sync selection ON/OFF in the UV editor as appropriate and skillfully working through the UV development and editing process.
If you don't know that "Blender's UV editor has this kind of specification", you will be in a situation like Toha used to be! I'll be in a state like Toha used to be!
Seeing is believing, so please feel and see for yourself!
(2) Blender's UV editor does not allow "UV cut"
Next is this.
There is no "Cut UV" menu in Blender's UV editor.
Instead of cutting, "Mark Seam -> Unwrap" or "Select the surface you want to separate UVs from -> Unwrap".
*The following two functions are similar to UV Cut.
- For Blender standard keymaps, select UV and use the shortcut V "UV Lip Move"
- For Blender standard or other keymaps, "Select face with UV sync selection ON -> Move UV".
"Seam" is "Nui-me" in Japanese, and its meaning is almost the same as that of UV cut.
However, in the case of BlenderSimply seaming the edges does not separate the UVs.By doing the seam -> deployment as a set, UV is cut and deployed at the seam, which is the same as UV cutting.
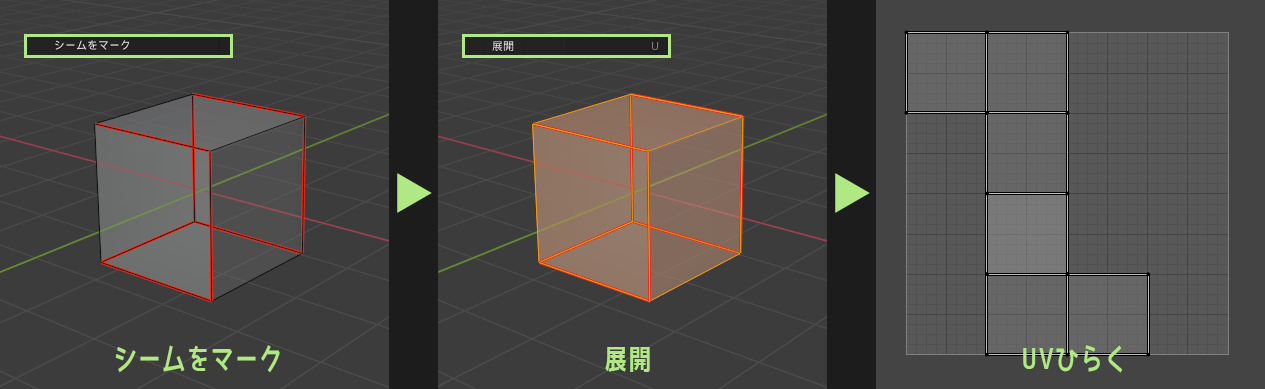
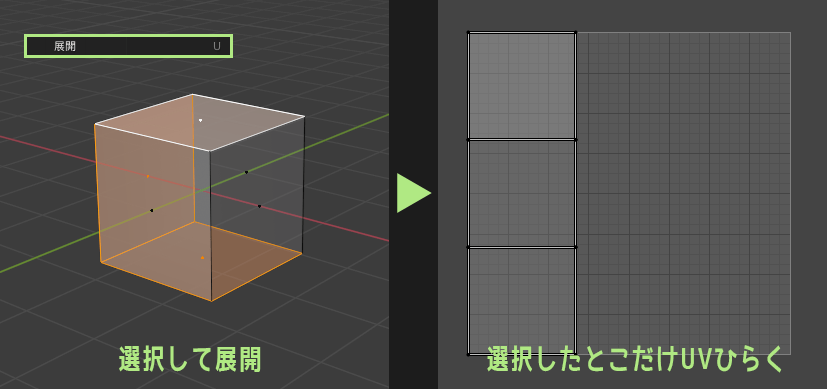
Alternatively, select the surface whose UVs you want to separate and click Unwrap to separate and expand only the UVs of the selected area.
When editing UVs in Maya, I sometimes use the flow of "first open the UV map appropriately and then cut UVs at the edges I want to cut", but it takes a little time to do the same thing in Blender.
Write in dskjal site, I think it is easier to use one of the following two workflows for UV unwrap in Blender.
- Manually seam where you want to cut the UV and then expand the whole thing.
- Automatic unfolding to disassemble, then seaming, then removing unnecessary seams.
Since Toha also uses a method similar to (1) for UV development in Maya, many of the useful functions, etc. introduced in this article may be suitable for the method (1).
(3) Let's do Blender's UV unwrap after setting the "scale to 1"
Finally, there is this.
Blender's UV expansion should be done "after setting the object's scale to 1 in Apply"!

Blender UV unwrap will be strange if you do it with the object's scale value set to something other than 1.
If the polygon size and the UV unwrap surface size is strangely different, the cause is almost always the scale value.
So before we unwrap the UVs, let's check the object's scale value!
Now, let's move on to the recommended method of UV development in Blender~
UV Unwrap in Blender - Recommend method

The following is Toha's recommended method to develop UV as you wish with Blender.
- Use the paid add-on UVToolKit 2.0
- Use the free add-on TexTools
- MagicUV, a standard add-on, is also nice to have
- Some of Blender's standard features are also useful
Currently, the main add-on that Toha use is UVToolKit 2.0, but I also use MagicUV and TexTools as the occasion demands. Blender's standard UV functions are also very useful.
The following is a step-by-step explanation of what each add-on can do and the most frequently used and useful functions.
Please refer to the add-on introduction. Aim for the UV Unwrap you want!
(1) Use the paid add-on UVToolKit 2.0
The paid add-on UVToolKit 2.0 is available for Gumroad and Blender Market for $19.
UVToolKit 1.0, which was originally a free add-on, has been upgraded to the paid version 2.0 with various new features.
Unfortunately, the free version of UVToolKit is not available in Blender 3.3, but the free version has enough useful features you can check out the official video here for more information about the features. ↓
*The paid version 2.0 is upwardly compatible with the free version. There is an official introduction video for the features of the paid version as well, but the add-on creator has temporarily made the video private at this time.
Here are some of the features that Toha finds particularly useful and likes.
Let's start with the features that are available in both the free and paid versions.
Optional feature added for UV sync selection
It is very useful in a humble way.
I wrote Be careful with UV sync selection. Blender's UV editor normally only displays the UVs corresponding to the currently selected vertex in the 3D view.
So, you may have inadvertently forgotten to select a vertex and the UVs are not displayed in the editor.
UVToolKit has the "Automatically select all vertices when switching to normal mode" option to avoid missing some UVs in the editor due to selection errors! This prevents the problem of missing UVs in the editor due to selection omissions.

Toha has registered this Toggle UV Sync button as a shortcut on the TAB key and works while switching the UV sync selection with the TAB key as appropriate during UV development.
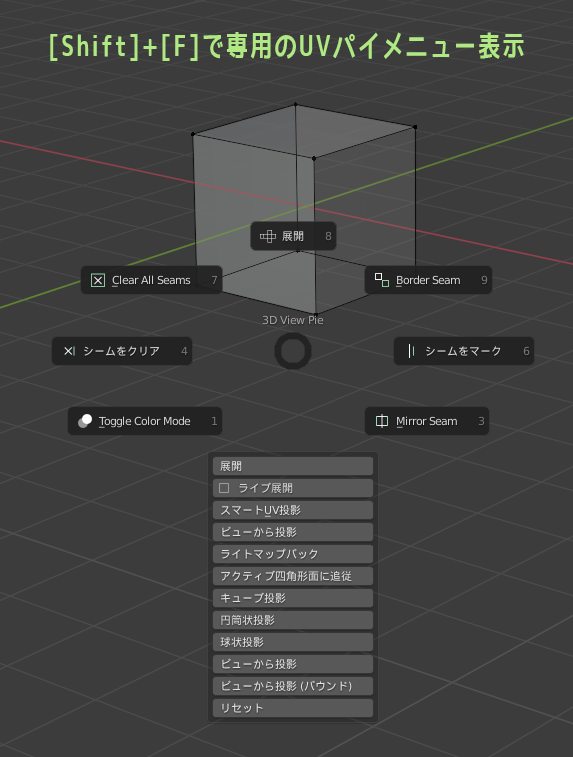
Shift+F to display UV-specific pie menu
Press Sfiht + F to display the UV-specific pie menu.
It's convenient because it has all the functions I often use, and I actually use it a lot.
Automatic expansion of only selected UVs
This is such an essential feature for Toha that we can say we started using UVToolKit because of it.
When manually expanding UVs, there are times when you want to adjust the UVs in detail to make it easier to draw textures. For example, you may want to align the UVs of a certain column in a straight line and open the rest of the UVs so that they are not distorted as much as possible.
In terms of Blender's standard functionality, it is like "pinning" certain UVs and expanding others, but "expanding and expanding only selected UVs" is simply easier to operate. A favorite feature that I would not want to be without.
This feature was not previously available in TexTools, but version 1.5 of TexTools now does this! With this, I think I can use TexTools as an alternative add-on to UVToolKit.
You can learn more about the features of TexTools here.
Split the selected surface
You can do something like a UV cut with a UV editor.
The F key can be used to select & move UV islands
Simple and convenient.
Pressing the F key on a UV island allows you to move the island while selecting it.
Apply checker map with one click
It is common practice in Maya to "apply a checkered material to an object" to check each UV island's UV distortion and size ratio.
UVToolKit provides a checkered map template from the start, so you can apply a checkered pattern to an object at the touch of a button. Various sizes of checkered patterns are also available, so it's easy!
Automatic grid unwrap of selected UVs
From this point forward, the functionality is limited to the paid version add-ons.
This automatic expansion of selected UVs into a grid function is a feature I would love to have when using manual UV expansion.
The paid version has happily added this functionality and UV alignment, which will be discussed later so that the add-ons for UV development can be consolidated into a single UVToolKit.
Align selected UVs while unwrapping other UVs
When manually developing UVs, you may want to develop them linearly so that they can be easily aligned in the UV space, but you also want to minimize UV distortion as much as possible.
In such cases, this function is very useful. It is a useful function that can be applied in various ways depending on how it is used.
Alignment of UV vertices / Alignment of UV islands
UV vertex alignment itself is a standard Blender feature.
There are, but it is by far easier to use if each alignment function is provided with its button.
The free version of UVToolKit does not have this feature, but TexTools has a similar button.
Stack or match similar UV islands
In my experience, these functions are a tremendous help.
When I do manual UV development, I usually plan to draw the textures by hand, and I often do it to make the texturing process as efficient as possible and to make it easier to draw beautiful textures.
So the ability to automatically align and overlap similar UV islands would be useful and nice to have.

*There is an actual video of UV unwrap using UVToolKit 2.0. check it!
(2) Use the free add-on TexTools
Although UVToolKit 2.0 is feature-rich, we sometimes hesitate to use paid add-ons out of the blue.
In such cases, we recommend TexTools, a free add-on.
TexTools is a well-known add-on for UVs in Blender, but it is officially supported only up to Blender 2.79. Volunteers have independently made it compatible with Blender 2.8 and later published it on GitHub..
The functions and usage of TexTools are explained on the official page. (It is in English, but you can almost understand the content with automatic translation.)

Since TexTools has changed add-on creators in the middle of the process, I am not without some concerns about the rights of the add-ons and the support system.
However, it is currently a convenient and free add-on that is used by many users.
Here are some of the features that I find useful when using TexTools for UV unwrapping.
Automatic expansion of only selected UVs
This feature was added in TexTools version 1.5!
I think the usability is almost the same as UVToolKit 2.0's - convenient.

Split the selected surface
Selecting UVs and pressing the Crop button will expand and detach only the selected UVs.
Crop it, the size of the UV island may change a little in the process of unfolding.
Blender's UV editor does not allow "UV cut"- As I wrote in the section, you can also detach UVs by "selecting a surface with UV Sync ON, then moving the UVs".
This method does not change the size of the UV island. (This can be done regardless of add-ons.)
Apply checker map with one click
This function was introduced in UVToolKit, but TexTools has a similar function.
Automatic grid unwrap of selected UVs
This function is still useful.
If you unwrap UVs in a grid pattern, it is easier to arrange UVs in space, and textures such as stripes are much easier to draw.
Align selected UVs while unwrapping other UVs
To use this feature in TexTools, the edit mode must be changed to Edge after selecting UVs.
After changing to edge mode, the Straight button can be pressed.
Alignment of UV vertices / Alignment of UV islands
When aligning UVs with the TexTools button, it will align UV points when UV vertices are selected in the UV editor and align UV islands when UV faces are selected.
Select and overlap similar UV islands
TexTools does not have the "stack similar UV islands" feature that UVToolKit had.
But instead, there is a "select similar UV islands" function, so you can do the same thing by selecting and then aligning the UV islands.
Textures can be baked
TexTools has a Texture Bake menu. The official page description shows You can see that you can do quite a variety of bakes.
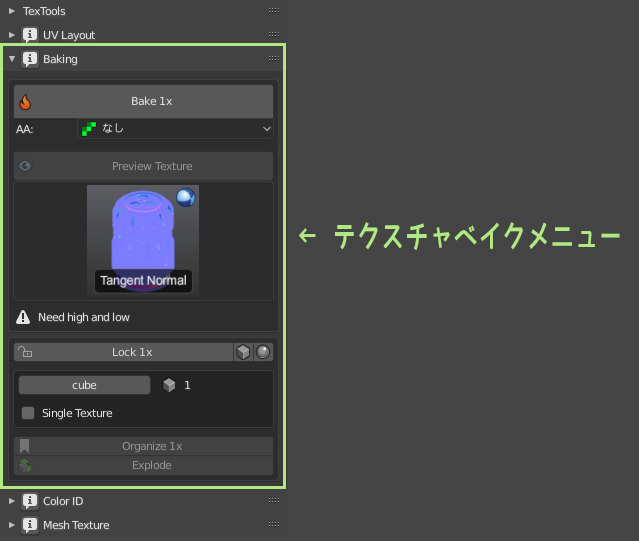
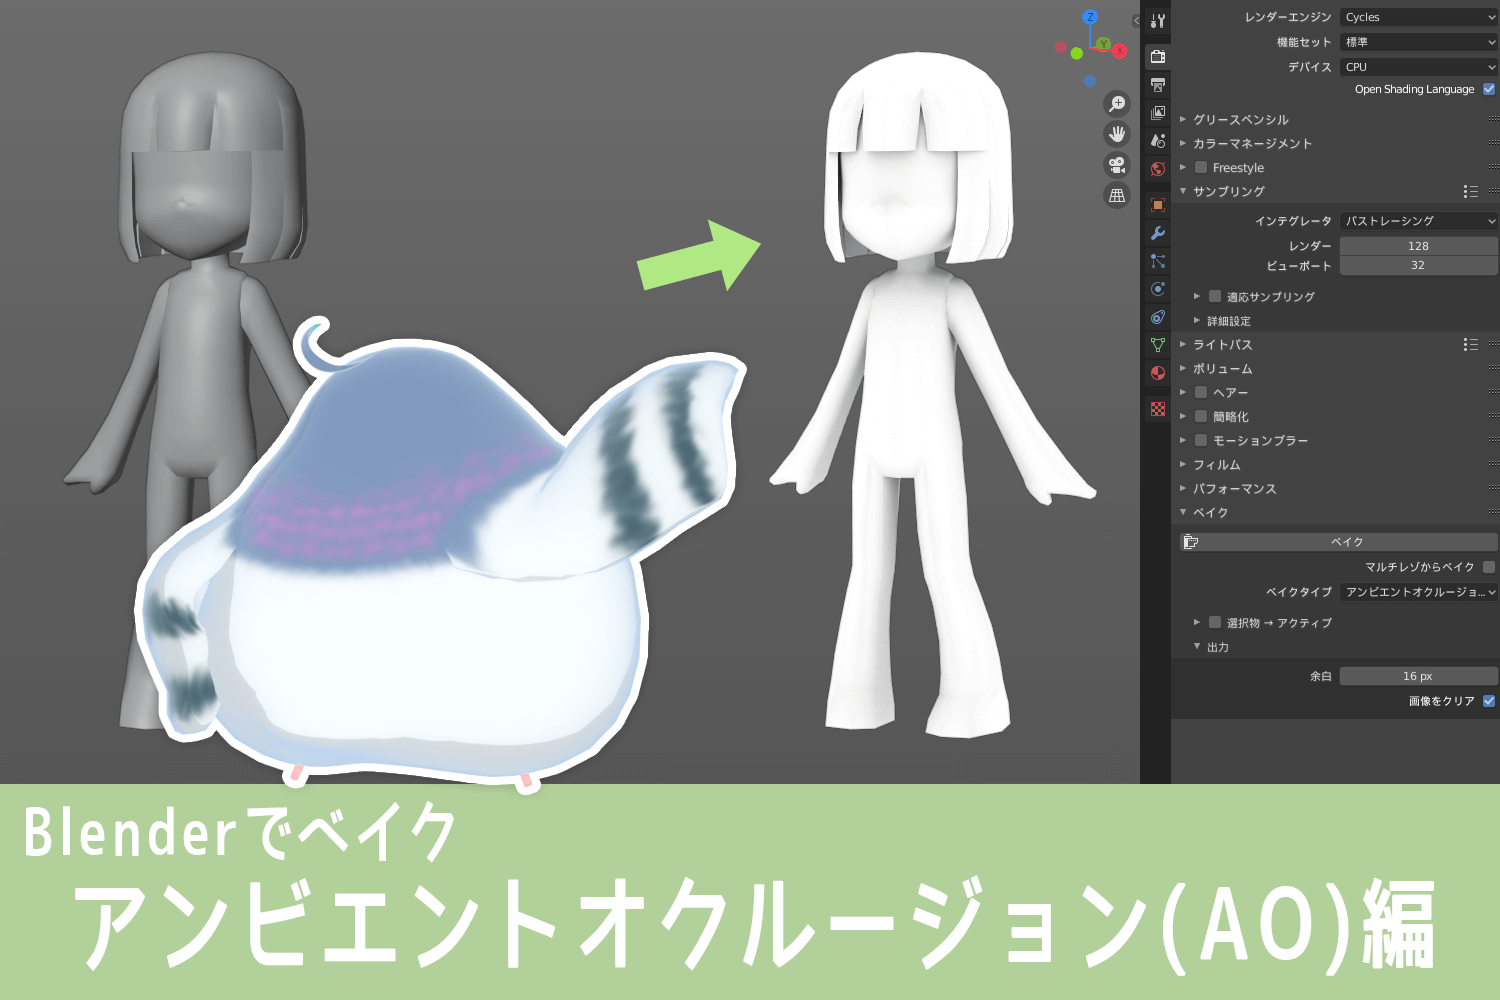
I actually used TexTools when baking AO (Ambient Occlusion)...
It was so convenient!
I wrote about AO baking in Blenderin another article, I think I'll be using TexTools again now!
(3) MagicUV, a standard add-on, is also nice to have

Next up is Standard Add-on MagicUV, which is included in Blender from the start.
*See here for how to enable the Standard Blender add-on.
MagicUV is not an add-on that you can do everything with, but it is a useful add-on that can do many things that other add-ons cannot do. It is included in the standard version, so there is no harm in enabling it.
It is in English only, but MagicUV's Tutorial page explains the functionality, and there are tutorial videos.
The best way to learn how to use MagicUV is to review these carefully, but following the example, I will introduce a feature that Toha particularly likes.
Texture lock
In Maya, it is "hold UVs and move vertices".
This is a little off the subject of UV unwrap, but there are times when, after applying a texture to a model, you want to move only a few vertices of the model without moving the apparent texture.
Normally, when you move a vertex, the texture moves with it, but "Texture lock" preserves the appearance of the texture and moves the UV vertices along with it as the vertex moves.
Sometimes it doesn't work and you get an error, or you can use Ctrl+Z to move the vertices back, but it doesn't move the UVs back. This function is available only in MagicUV.
By the way...
If you move an object's edges or vertices using the "Edge Slide/Vertex Slide" tool, the UV points will also move with the vertex movement, just as they do when locking textures. Trivia.
UV Inspection
This function displays inverted or overlapping UVs (overlap) on the UV editor.
It is difficult to tell at a glance whether UV is inverted or not, so it would be useful to have.
(4) Some of Blender's standard features are also useful
Now, finally, let's take a look at Standard Blender Features.
To be honest, I think it is quite difficult to develop UVs as you want with only the functions that Blender has from the beginning. It's a pain to pin every single time, and it's hard to do...
But don't be underestimated, there are many useful Blender standard features as well.
Some of the features that I consider essential in terms of Toha were not in the add-ons, so I looked for them and found that some of them were included in the standard features from the beginning.
So I'll introduce it to you~
Island size averaging
It's a must-have feature!
Based on the polygonal area of the object, the size of the UV island is automatically aligned so that the UV area ratio is approximately the same.
Since the size of each UV island becomes uneven when editing UVs, the ability to align the ratios is super useful.
There are some UV editing tricks, such as enlarging the area of certain UVs (e.g., faces) and drawing detailed textures, but it is easier to do this after averaging out the overall proportions.
Packing Island
It will arrange the selected UV islands within the UV coordinates 0 to 1.

So-called UV packing function. Various add-ons automatically do everything from UV expansion to packing, and Some of them are introduced on dskjal's site.
I am not a big fan of automatic packing, so I always lines up UVs by hand.
This is because it is easier to draw textures if you line up the UVs yourself. If you draw everything with 3D paint or use only Substance Painter, there is no problem at all with automatic packing.
It seems that standard UV packing tends to create wasted space, so please consider other add-ons if you want to line up nicely with automatic packing.
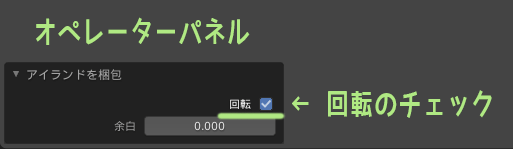
By the way, when packing UVs with the standard functions, you can set whether the UV islands are rotated or not in the settings that can be made in the operator panel. It's hard to tell when it's folded.
UV editor overlay display
Using Blender's standard features, the following can be displayed in the UV editor
- UV after modifier deformation
- UV distortion (stretch)
Click the icon in the upper right corner of the UV editor to open the menu.
Check the Edge After Modifier to see the UVs when the UVs are U-axis flipped with the Mirror Modifier or after applying texture projection with the UV Projection Modifier.
Check the stretch on the display to visually see how much the UV is distorted.
View to Projection and other projection menus
Projection is "UV mapping" in Maya. The following projection methods are available by default.
- Smart UV Projection
- cube projection
- cylindrical projection
- spherical projection
- Projection from view
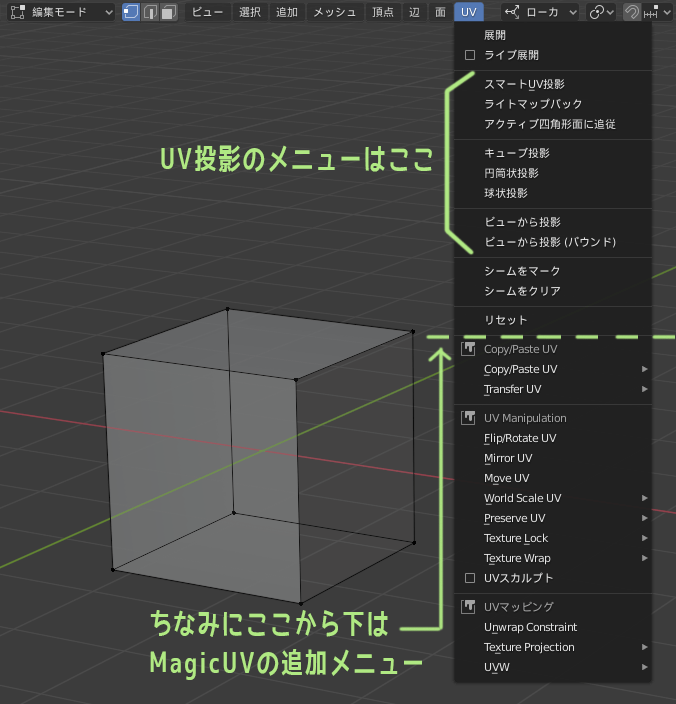
Toha often uses view to projection.
If you have installed UVToolKit, you can use the Shift+F, you can also run it from the UV-specific pie menu.
Summary: UV unwrap can be done as desired by using convenient functions
That's all for the explanation of manual UV development done in Blender, and Toha's recommended method.
As a basic premise, it is essential to keep the following three points in mind when developing UVs in Blender.
- Be careful "UV Sync Selection" when editing UVs
- Blender's UV editor does not allow "UV cut"
- Let's do Blender's UV unwrap after setting the "scale to 1"
Based on this point, as a Toha, I think it is difficult to unwrap UVs the way you want using only the standard Blender functions. It's not impossible, but it's a lot of work and a pain in the neck!
Therefore, we have introduced the following four recommended methods for stress-free UV unwrap in Blender.
At the moment, I think with the paid add-on UVToolKit 2.0, I can expand and edit UVs almost effortlessly. If something is missing, I can use MagicUV and the standard functions.
Also, you can use the free add-on TexTools instead of UVToolKit.
Since UV unwrapping and editing is a tedious process, we would like to automate as much as possible where it is possible to do so.
But if you do it all automatically without thinking, it can be difficult to draw textures later.
I want to make a good distinction between the parts I automate using Blender functions and add-ons and the parts I do manually so that I can unwrap the UVs the way I want them!
I am still learning, but I hope that the contents of this article will help those who are struggling with UV unwrap.
*For other add-ons that are useful to use, Blender Modeling [Addendum] article.
It's more comfortable, too!
List of comments
I had no idea what the UV deployment was, but I was having trouble figuring it out.
It was really easy to understand and helpful to be introduced to useful add-ons!
Thank you.
Thank you for your comment, NICO~!
I'm glad you found it useful! Please make use of it!
The UVToolKit video is no longer linked (private)!
Thank you very much for contacting us, KT~!
It seems that the UV Toolkit 2.0 introduction video has been temporarily made private by the add-on author. We've removed the video from the article!
There are reasons why the paid version 2.0 is not currently available on any platform.
In fact, the creator of this add-on is Russian, and currently it is impossible to make payments from the platform side because the methods of sending money to those living in Russia are frozen across the board.
For this reason, sales of paid add-ons and other products created by Russian-based creators seem to have been suspended.
I only hope that the situation in Ukraine will calm down as soon as possible.
So, although sales of UV Toolkit 2.0 have been temporarily suspended due to the unfortunate circumstances of the world, we will leave the introduction of add-ons and other information in this article as it is in order to support the resumption of sales.
It is a useful add-on and Toha himself loves using it, but we apologize that it is not available for purchase despite the article. Thank you for your understanding.
Thank you very much for your comment~!