![Blender Modeling [Knowledge] - Know Where Menu You Want To Do](https://tohawork.com/wp-content/uploads/2021/07/ec_b_modeling_know.jpg)
![Blender Modeling [Knowledge] - Know Where Menu You Want To Do](https://tohawork.com/wp-content/uploads/2021/07/ec_b_modeling_know-800x533.jpg)
Blender is a versatile 3DCG software.
There are various functions, most of which can also be operated with shortcuts.
But shortcuts differ from person to person in the keymap they use, and if you try to learn a lot of shortcuts from the beginning, you will have too many to learn and your head will be full of holes.
So, in modeling with Blender in this blog, I will first focus on the menus and buttons that are displayed.
In this article, I will present some useful things to know when modeling with Blender's menus.
Just knowing somewhat about it will make the rest of the modeling work easier to understand.
Before you actually start modeling, please take a look at the Knowledge section.
*If you want to take action rather than knowledge, please read Blender Modeling [Practice].
Blender's menu structure is straightforward

I feel that Blender's menu structure is arranged rather clearly when I use it.
I have the impression that the relevant functions are usually placed together. Therefore,
I want to do something like this -> I search for a possible menu location -> I find just the function I want -> I just found the function I want
There is a pattern.
Searching for items in menus takes more time than using shortcuts. But Blender is software with a lot of functions, so it is hard to learn all the shortcuts suddenly.
There is no need to focus on speed or efficiency when you are not used to it, so I would suggest using the menus at first to learn the functions and locations of the menus.
Once you have become familiar with Blender while using the menus, it is recommended that you learn shortcuts for frequently used functions or register them in your own personal shortcuts to make them more convenient.
The following is a brief introduction to the functions and locations of the menus. The main part will be an introduction to the functions frequently used in modeling.
*For more convenient use of Blender with shortcuts, see this Blender Modeling [Addendum].
How to use the header menu
The header is this area at the top of the 3D viewport.

The header menu is divided into clusters on the left, middle, and right. The menu is divided into clusters that seem to be somewhat related to each other.
- Clumps on the left... related to the mode
- Middle chunks...coordinate systems, pivots, snaps, proportional editing
- Clumps on the right...related to what is visible in the 3D viewport
There are two types of header menu display. When Tool Settings is checked in the menu item [View], the header menu will be displayed in two levels. (*Default setting is two-tier display)
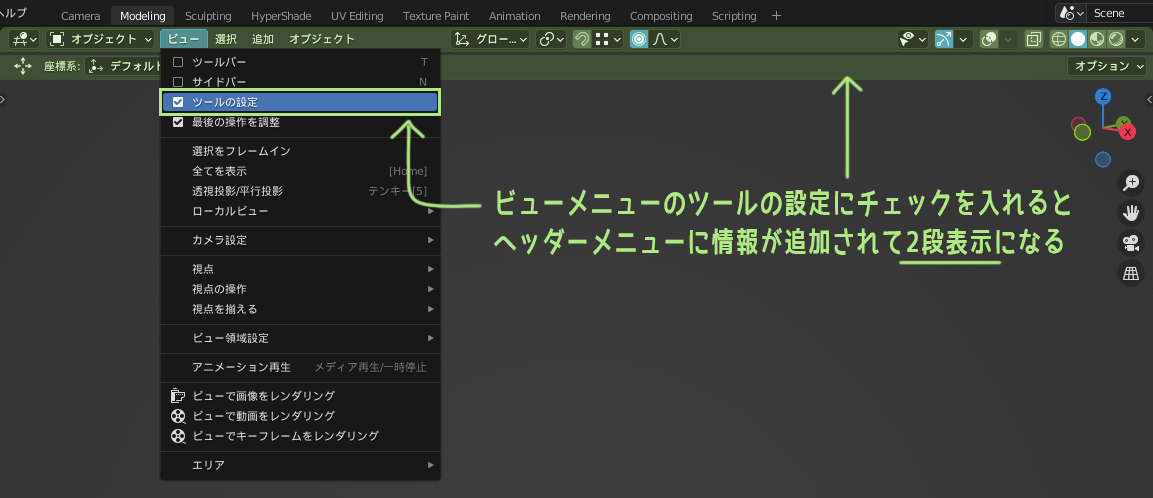
During edit mode, the two-levers header menu The top row of the two columns is a bit more useful, as it displays icons for X-, Y-, and Z-axis mirrors and duplicate vertex merging.
However, the same settings for tools can be found in Tools tab in the sidebar & The same is also displayed in the Tools panel of the Property Editor.

I'm sure you could use it in different situations and to your liking. The explanation in this article will be based on the header menu in the single-level display state.
Let us look at them in turn.
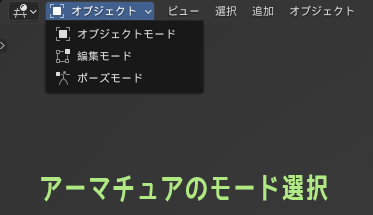
Mode Selection

This menu allows you to change the mode in which you are working.
You can select object mode, edit mode, weight paint mode, etc.
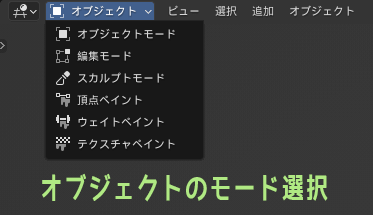
While selecting an armature, you can select object mode, edit mode, or pause mode.
Menu by mode

This is a list of menus available in the selected mode. The menu is mode-specific, so the menu contents will change depending on the mode you have selected.


The mode-specific menus offer every possible feature.
For example, while modeling, I wonder, "Is there a feature like this?" if you think...
- If you want to about vertex operation, the "Vertex" menu.
- If you want to about edge operation, the "Edge" menu.
- If you want to about face operation, the "Face" menu.
If you look carefully inside each one, you will likely find the feature you want.
[The Mesh menu contains functions for normal, showing/hiding selected polygons, and separating selected polygons.
Functions such as duplicating and merging objects can be found in the mode-specific menu [Objects] while the object mode is selected.
In this way, various functions are available for each mode in the mode-specific menu, so when you are wondering if there is a function you want, we recommend that you first take a look at the mode-specific menu.
In some cases, displayed shortcuts are also provided in the mode-specific menus, which is quite a helpful design.
Transform coordinate system

If you want to change the coordinate system you are working in, you can do so in the transform coordinate system.
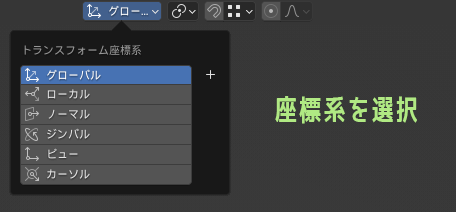
Switching between global and local coordinates is used rather often in modeling. (See Switch between global and local coordinates for details.)
There is also a mode called "view coordinates," which "always fixes the coordinate axes to the screen," which is sometimes useful in modeling.
Pivot Point

This menu allows you to change the pivot point to be used.
A pivot point is a reference point for operations such as moving, rotating, or scaling.
Each object has an origin, but the pivot point is separate from the origin.
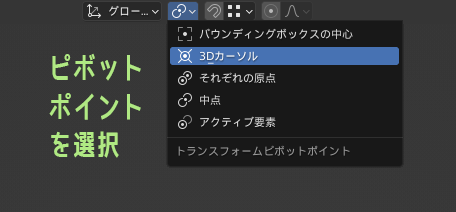
From the Pivot Point menu, you can change the position of the pivot point, which is the operation reference, to the object's origin or the object's midpoint.
One Blender-specific feature can use the 3D cursor position as a pivot point, which is quite useful if you know how to use it.
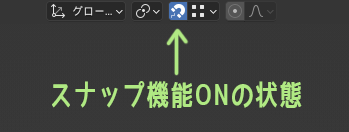
Snap

Snap function menu.
Snap is a very useful feature when used well.
Click the icon on the left side of the snap menu, and the icon will turn blue. This is the state in which the snap function is turned on; note that it will not snap unless it is turned on.
Click the icon to the right of the snap menu to bring up the snap settings menu.
The two most commonly used are snapping to grids marked "incremental" and snapping to "vertices".
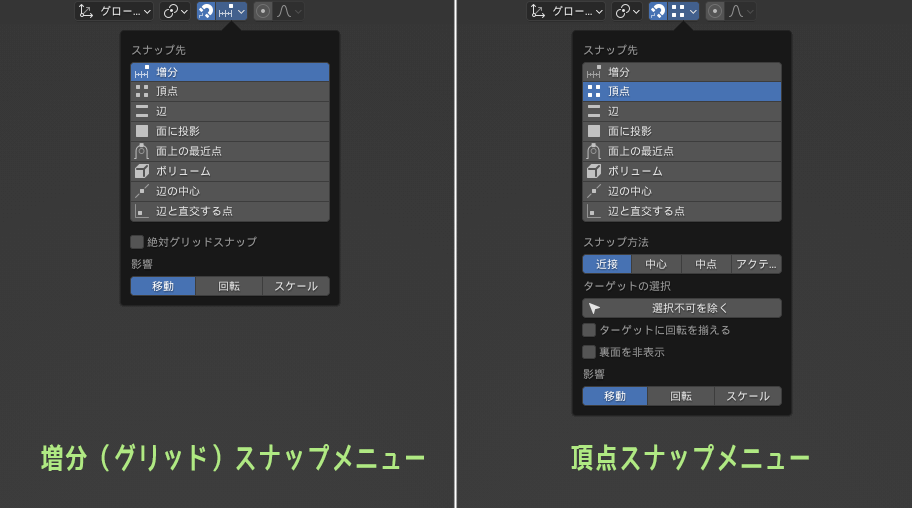
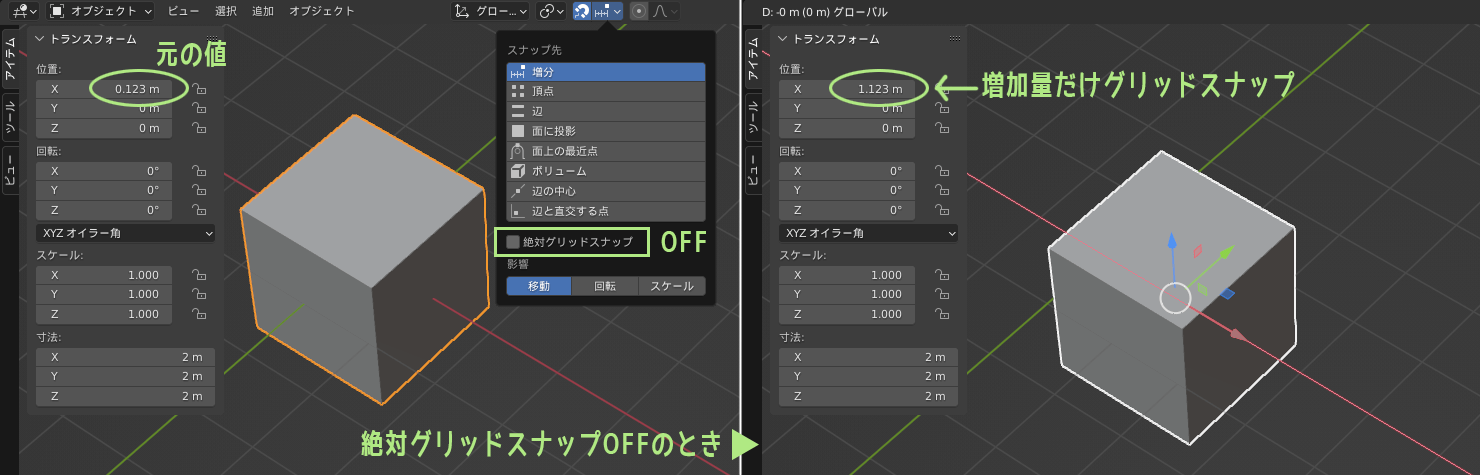
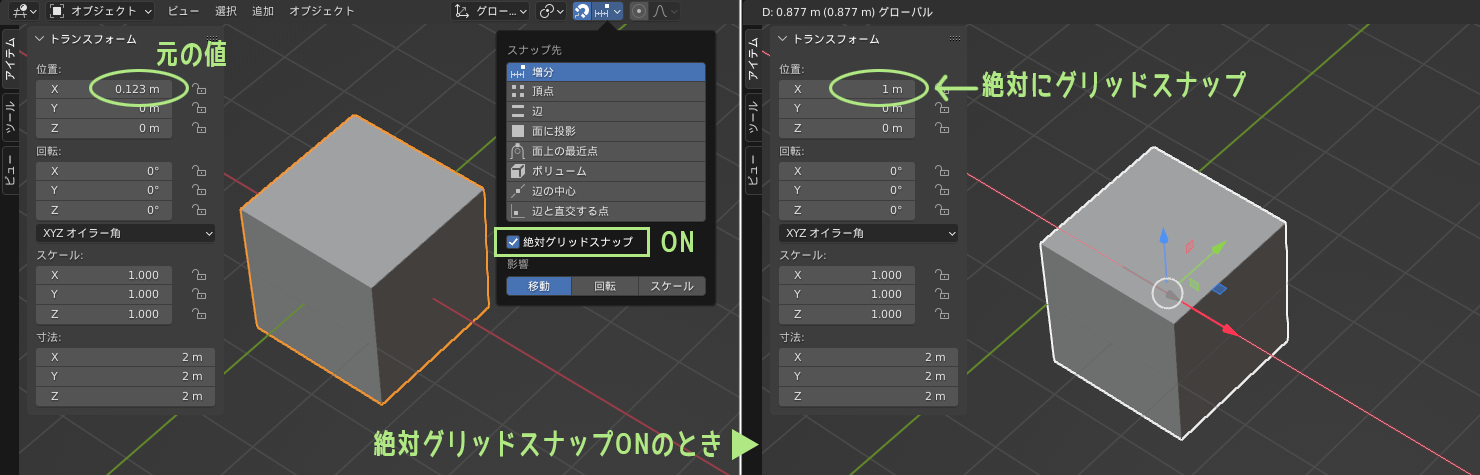
The "Absolute Grid Snap" in the Incremental menu allows different snapping depending on whether it is turned on or off. For example, when moving, the difference in snapping is as follows.
When absolute grid snap is OFF ↓
When absolute grid snap is turned on ↓
Also, in the "Influence" item of the snap settings menu, there are buttons for movement, rotation, and scaling (scale), but even if the snap function is turned on, those with the influence turned off will not snap.
If you want to snap the image in terms of movement, rotation, and scaling, turn on all the influence items.
Proportional editing (Soft selection)

Proportional editing is a feature similar to Maya's soft selection.
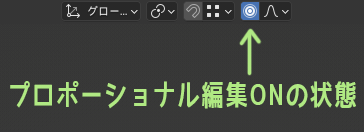
Click on the icon to the left of proportional editing, and the icon will turn blue and proportional editing ON.
Unlike Maya's soft selection, the area of influence is not visible until it is actually moved, but the area and shape of the influence can be adjusted after it has been moved.

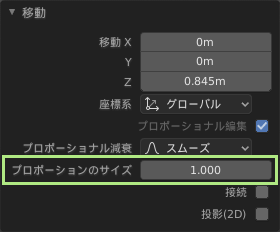
The area affected by proportional editing can be changed by scrolling the mouse wheel while grabbing the gizmo.
Even after you have determined the area of influence, you can change the area of influence as many times as you like from the size of proportion size area while the operator panel is out.
Object Type View

Elements in the 3D viewport can be shown/hidden and selectable/unselectable by object type.
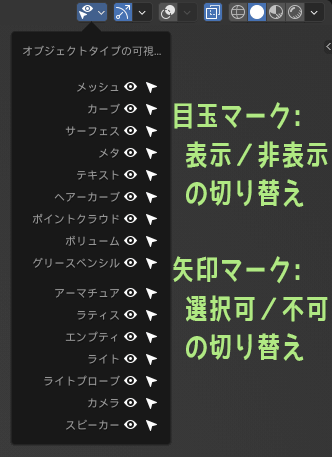
Clicking on the eyeball symbol to close it hides the target object in the 3D viewport.
Clicking on the arrow symbol makes the target object unselectable in the 3D viewport.
Whereas the outliner's eyeball mark allows a fine selection of target objects, the object type view is for all objects of the same type.
Viewport Gizmo

Gizmo-related menu.
Click on the blue icon to turn it OFF, and the gizmo-related display in the 3D viewport will disappear. Click again to display it again.
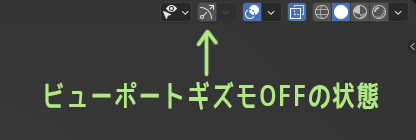
When you open the menu, it looks like this, but I have not yet mastered the contents of this menu.
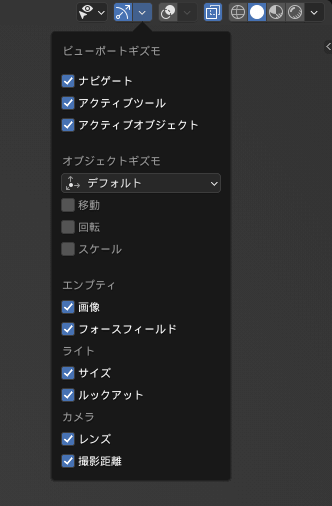
*The arrows (gizmos) that move objects have disappeared! They don't show up! - In this case, the cause may be this button is off. Click the icon to turn it ON & the gizmo will appear.
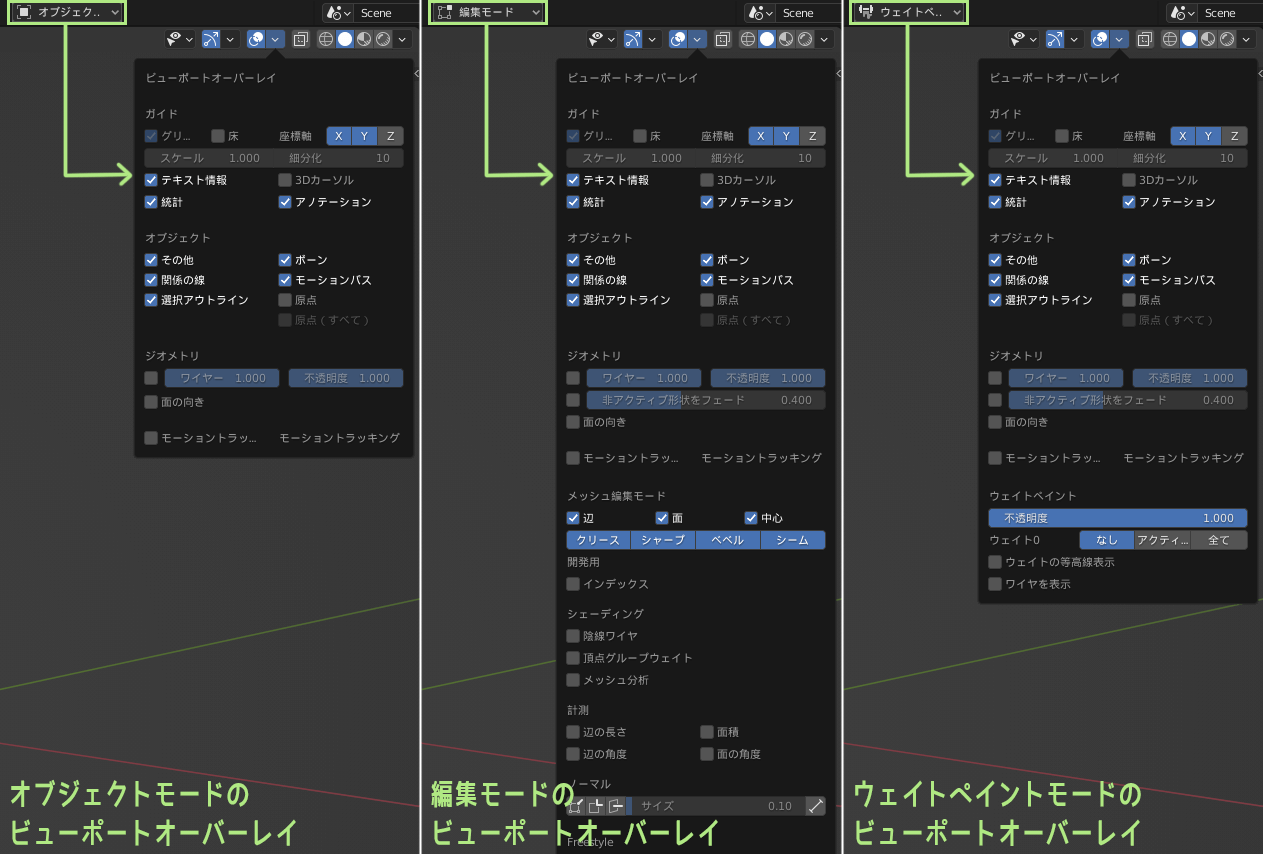
Viewport Overlay

The appearance of objects displayed in the 3D viewport can be almost managed with viewport overlays.
For example, you can show/hide grid floor planes, show/hide XYZ axes, overlay wireframes, and even show back-facing polygons.
And the content of the viewport overlay changes depending on the mode.
Note that the contents are displayed for each mode: object mode, edit mode, weight paint mode... and so on.
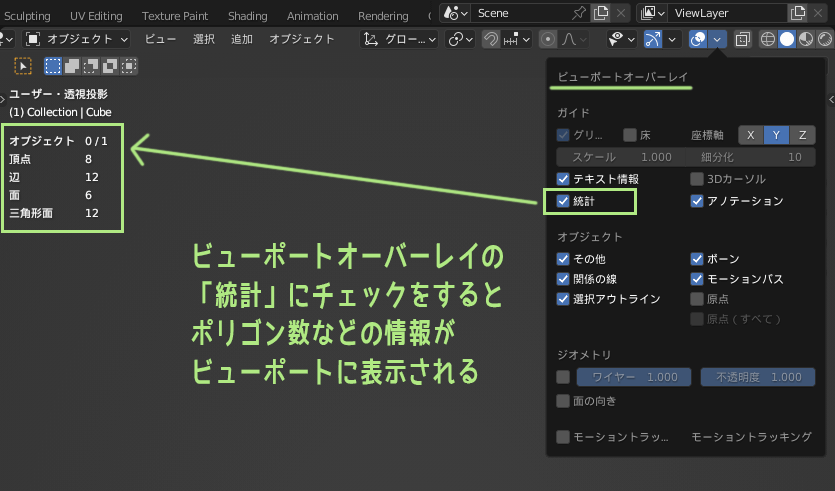
The Statistics section, which allows you to display polygon counts and other information in the 3D view, is also located in the viewport overlay.
Note that you can turn off all informative elements displayed in the 3D viewport by clicking on the blue icon in the viewport overlay itself.
If the information element is too much, you can try turning it off.
Transparent display

Toggles the transparent display of objects.
For more information, Use transparent display to select the back side as well. Please check.
Shading in 3D View

This menu is for shading objects in the 3D viewport.
Select a shading from the four icons and click the ▽ on the far right to open the options menu corresponding to the currently selected shading.
Wireframe display
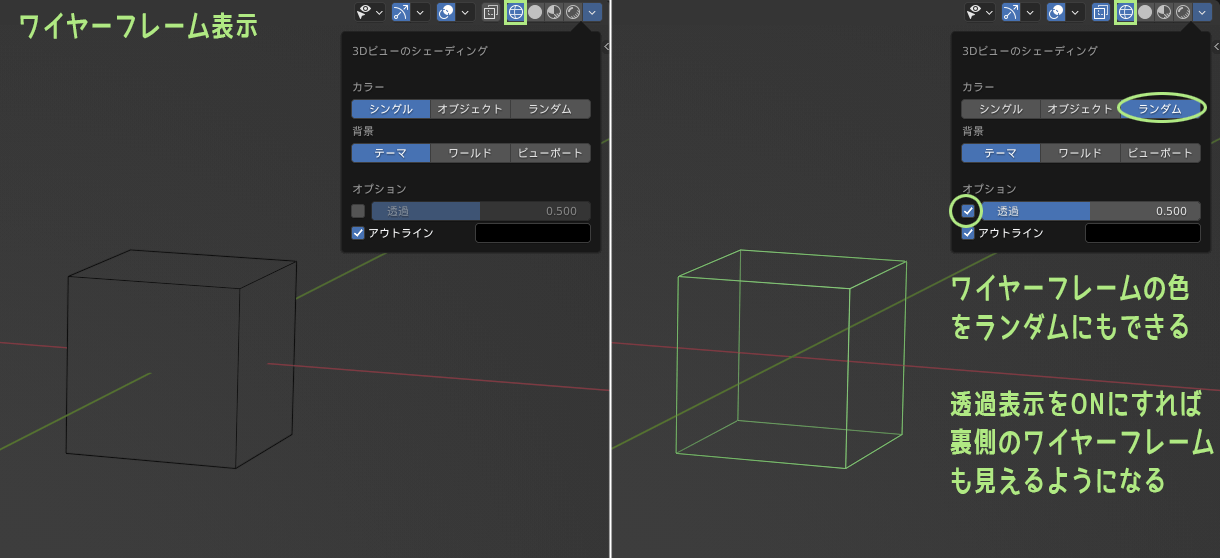
Solid display (flat and textured displays are also available here)
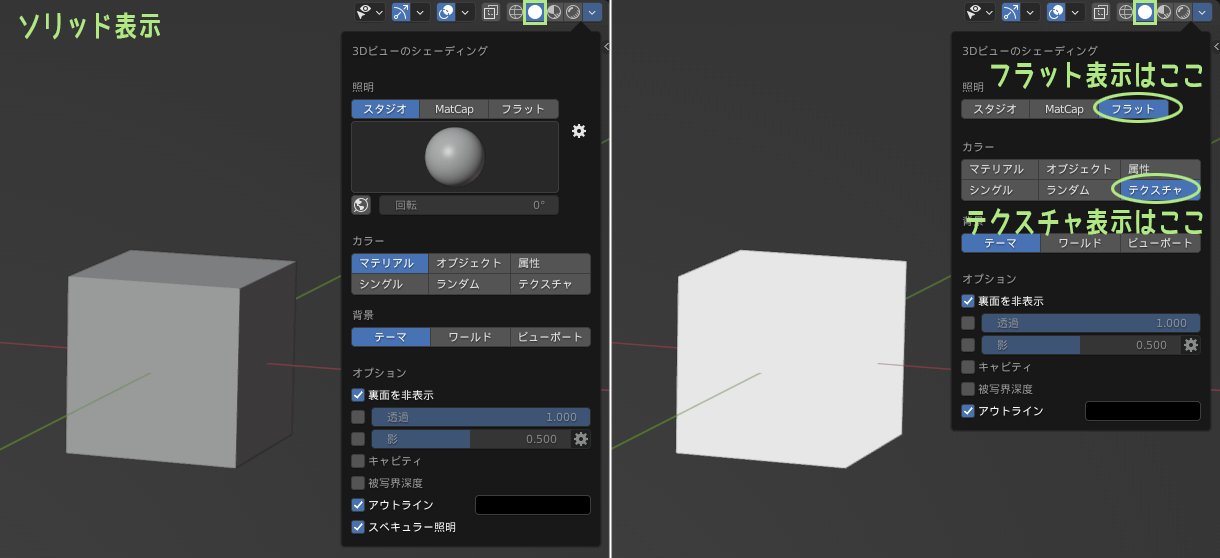
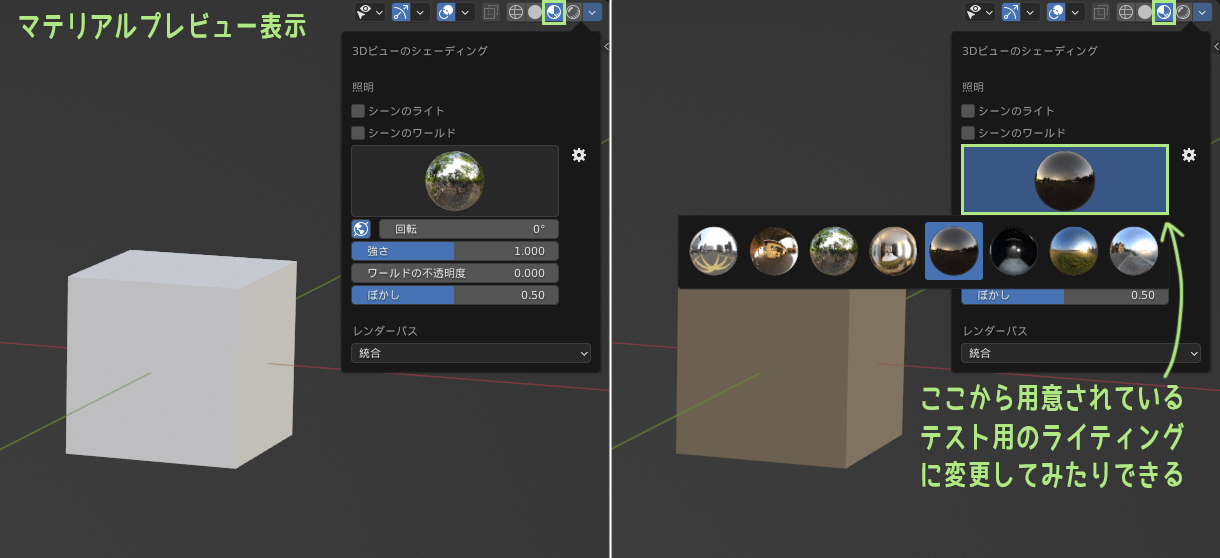
Material preview display
Render display
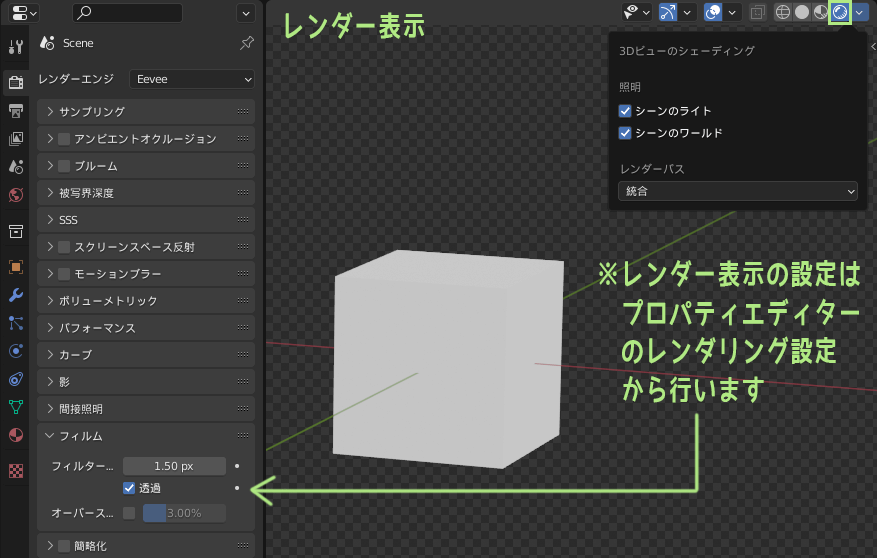
*Render display has to do with rendering settings, so advanced settings must be made property editor.
How to use the toolbar
The toolbar is this.
The position & appearance of the toolbar can be changed. *For details, see Customizing the Position & Appearance of the Toolbar (formerly Tool Shelf)
There are three things you should be knowledgeable about when using the toolbar.
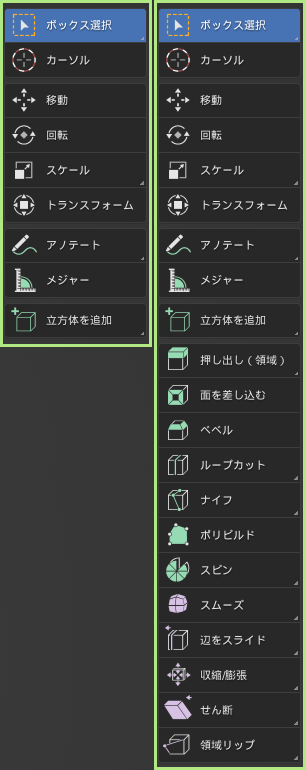
- Toolbar contents vary by mode.
- If a tool has a "▽" mark in the lower right corner, another tool can be selected by long-pressing it.
- After using the tool, The use of the operator panel is also important
It is easiest to understand this area by using it, so I want to see it in Blender Modeling [Practical].
How to use the sidebar
The sidebar is this one.
If it is not displayed, press N key to display it.
(If you are using an industry compatible keymap, press Ctrl+] to display)
*For details, see Toggle Show/Hide Sidebar (formerly Property Shelf).
The tabs you will see most often while modeling are "Items" and "Tools".
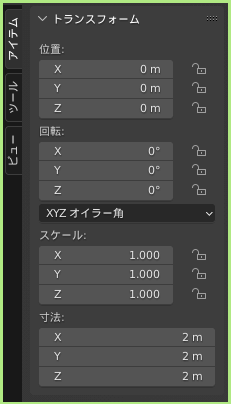
Item
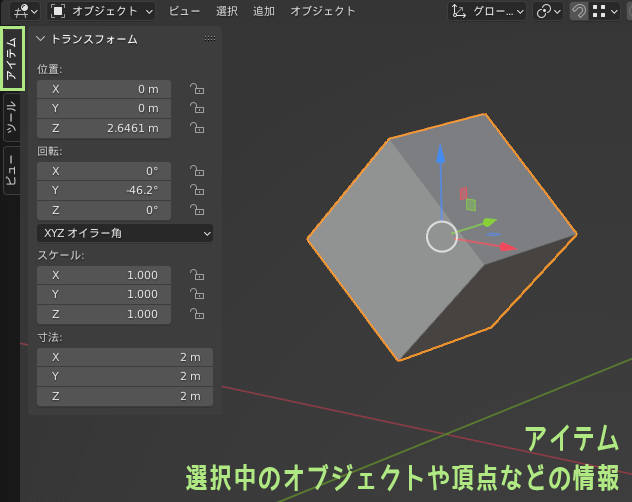
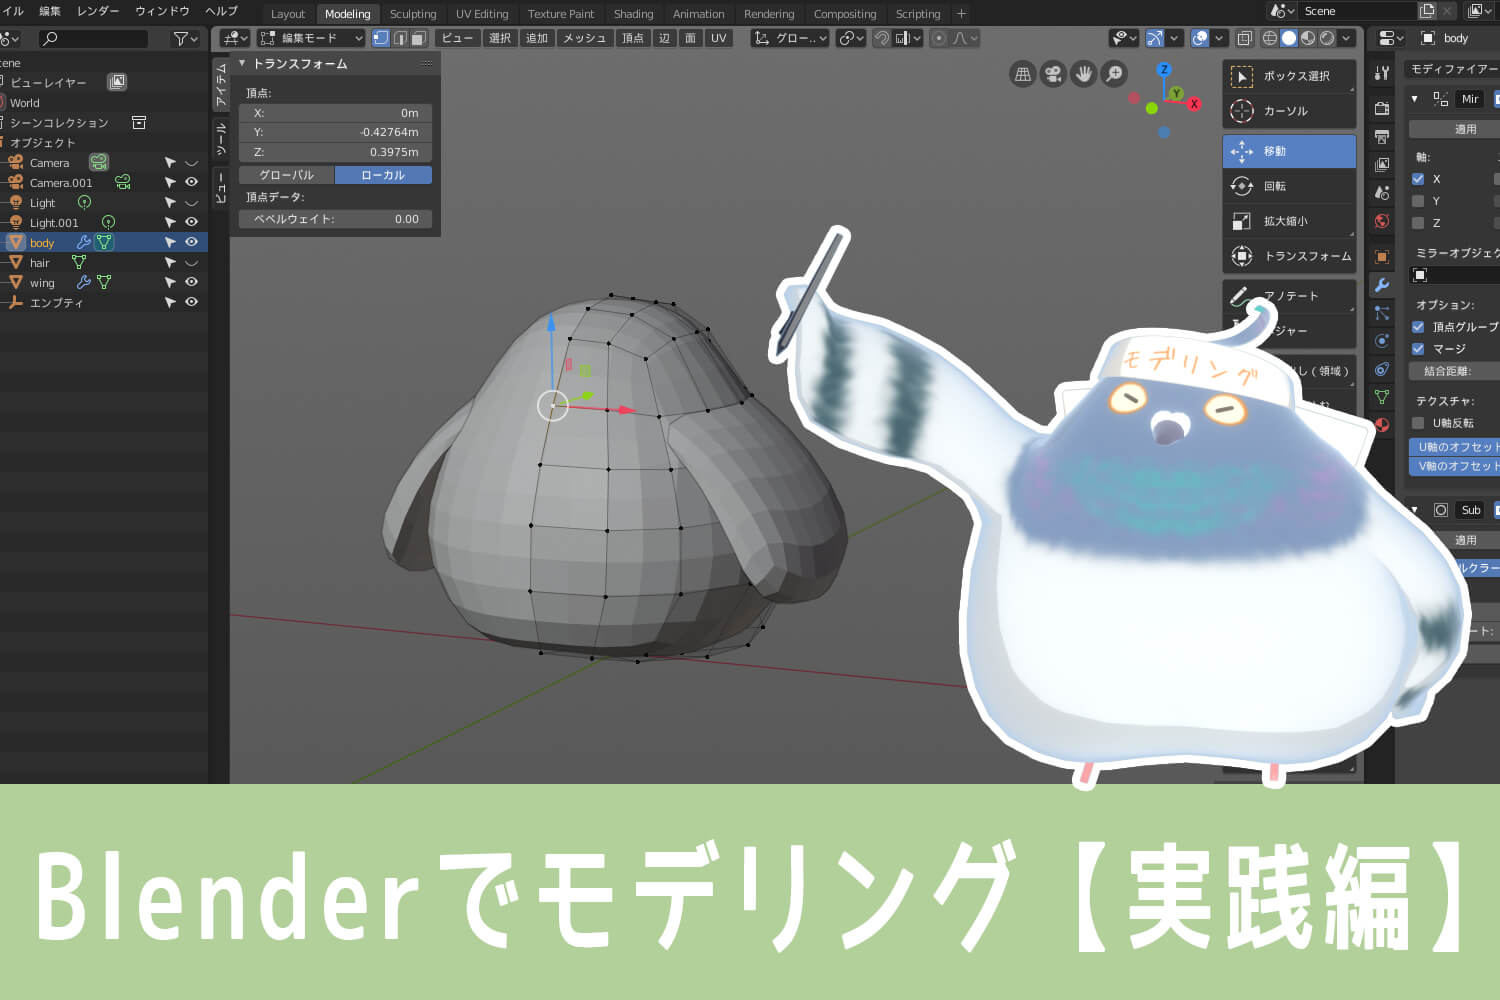
When in object mode, the item tab in the sidebar displays information about the object's position, rotation, scaling (scale), dimensions, etc. It is similar to Maya's channel box.
When manipulating objects, sometimes you want to specify movement or rotation numerically. In such cases, you can enter numerical values directly in the sidebar.
Also, unnecessary translation, rotation, and scaling values in the finalized 3D model can cause problems later on.
In particular, the final value of scaling should ideally be (1, 1, 1).
When the model is complete, check the sidebar to see if any values remain to be worked on.
Tools
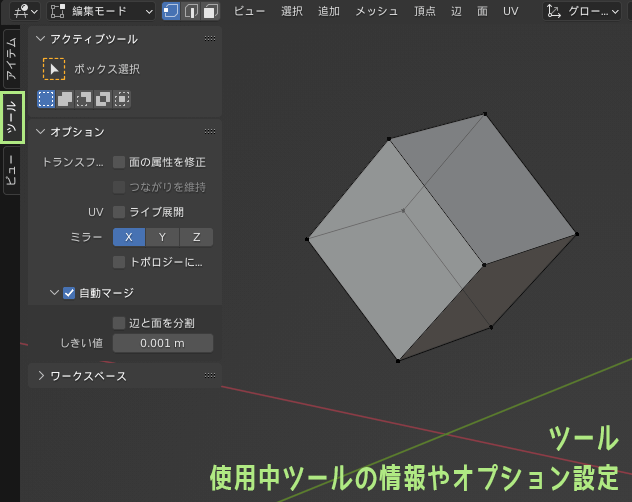
The Tools tab in the sidebar displays information about the tool in use.
Some tools allow you to set tool-specific options. When in edit mode, the ▽ option item will be displayed.
Turning on the X, Y, and Z buttons in the Mirror section allows you to move vertices based on the X, Y, and Z axes, respectively.
Check Automatic Merge to automatically merge overlapping vertices in the same location. Use with snap feature. You can snap the vertices together. You can sew vertices together.
In addition, information in the Tools tab of the sidebar can be found in the header menu, as well as the tool settings that appear in the It can also be viewed from the Tools tab of the Property Editor.
View
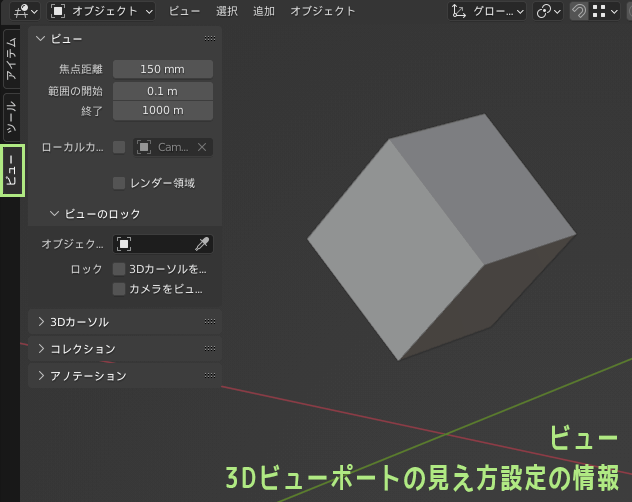
The views in the sidebar allow you to set the focal length and other settings for the 3D viewport.
For more information, see Changing the Focal Length of a 3D Viewport , Change the start of the 3D viewport range Please check.
How to use the operator panel
The operator panel appears in the lower-left corner when you add an object or use a tool.
The operator panel is a panel that allows detailed settings for the most recently performed operation.
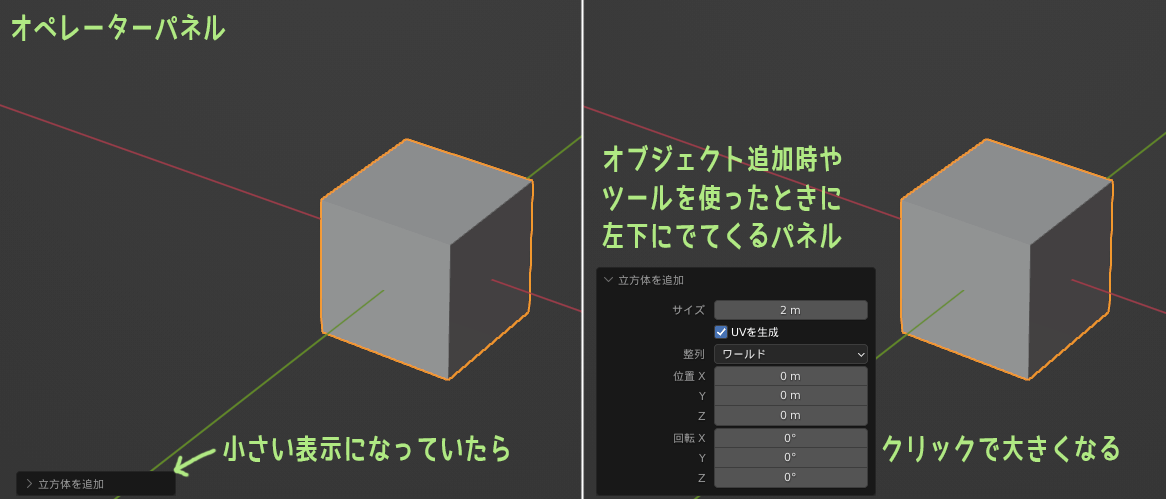
The contents of the operator panel will change according to the objects you add and the tools you use.
The operator panel allows you to change the size & number of vertices after adding a sphere cylinder etc object. For example, after cutting with the loop cut tool, you can change the number of divisions & smoothness.
We will look at specific usage in Blender Modeling [Practice].
Note that the operator panel is temporary and may inadvertently disappear.
In such a case, you can redisplay the last operator panel by going to the menu at the top of Blender and selecting Edit→Adjust last operation.
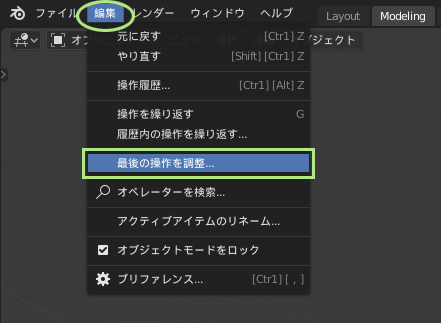
Some options, such as when using tools, may not be adjustable in the redisplayed operator panel.
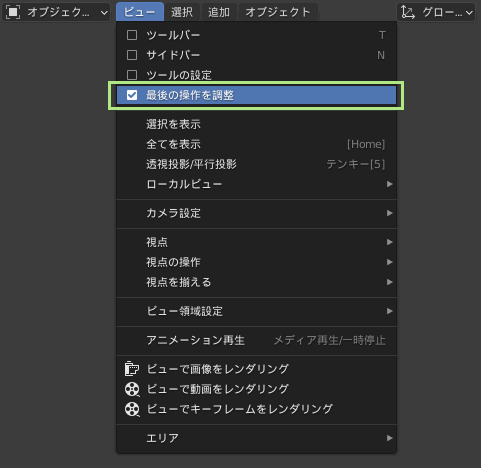
*If the operator panel does not appear, click on [View] in the header menu & check [Adjust last operation] to make it appear.
How to use the Property Editor
This is the Property Editor.
The property editor is an important editor that can be used for various settings anyway.
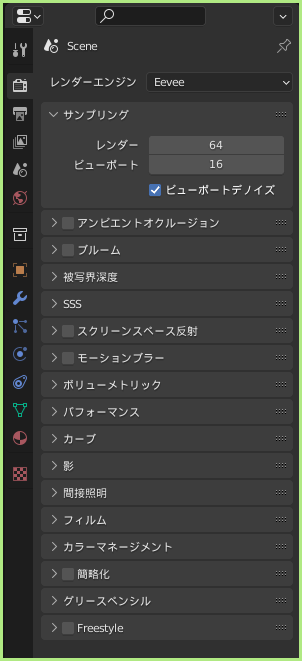
It is a bit like Maya's attribute editor.
Each of the vertical icon tabs allows for various settings such as to render, scene, material, and modifier.
Difficult to explain how to use the Property Editor in a few words, so we will start with the most commonly used parts through Blender Modeling [Practice], we would like to look at the most frequently used parts at them a little at a time.
Summary: Find the functions want from the menu quite helpful

In this article, we have tried to give a brief overview of the functions and locations of the menus that are often used when modeling.
If you have some knowledge of these things, I think it will be easier to understand when you actually do the modeling work.
Even though it may seem like you use many menus while modeling, it is a little bit if you categorize the most frequently used menus by location.
- Header
- Toolbar
- Sidebar
- Operator Panel
- Property Editor
In addition, in Blender, the "tooltip" explanation display function is turned on by default.
Tooltips can be turned on/off from Edit → Preferences → Interface
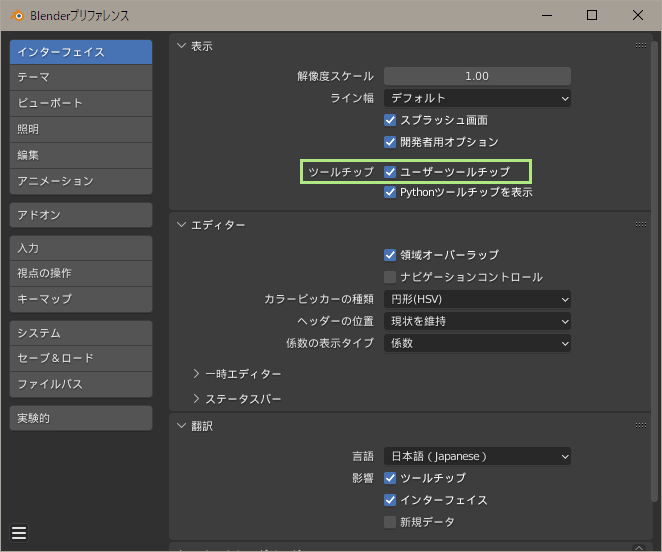
If you hover the cursor over a menu item and wait a moment, a tooltip will appear, so you can somewhat understand its function by looking at the menu item name and the tooltip.
Most of the descriptions in the tooltips are also displayed in Japanese, so if you read them, you can understand a little of what they say. If you can understand even a little, you will feel like you can use the tool.
Now that the knowledge section is over, I would like to show you how to actually try modeling with Blender in the Blender Modeling [Practice].
Go to Practical section!
If you want to use shortcuts & add-ons to improve your work efficiency, please Please also refer to the article Blender Modeling [Addendum].

List of comments