
Blender has a variety of windows, but you can freely set the type and arrangement of the windows to be displayed.
In this article, we will explain how to customize the various windows as you wish.
When using Maya, Toha often looks at the Outliner and Attribute Editor, etc. Since Blender has windows with similar functions, we would like to change those windows to an arrangement that feels right.
For more information on how to make Blender Japanese & how to make the main operations more Maya-like, see START Blender 1) – Customize UI and Make It Easy to Use I am writing this in If you haven’t seen it yet, here it is.
- Blender offers a freedom in window customization
- Select a workspace (you can also add, duplicate, and delete workspaces)
- Create a new area by dividing an area
- Display a window of your choice in a divided area
- About Outliner
- Area consolidation to eliminate unwanted areas
- About Property Editor
- Important! Save the startup file
- Summary: Customize the Blender window as you like
Blender offers a freedom in window customization

Blender’s windows are highly customizable. For almost all windows, you can “divide the area as you like and display any window you like.
Divide the area and select the window to be displayed.
Once you understand this concept, you will be able to customize the window as you wish. The method of customization is surprisingly simple, so please give it a try~!
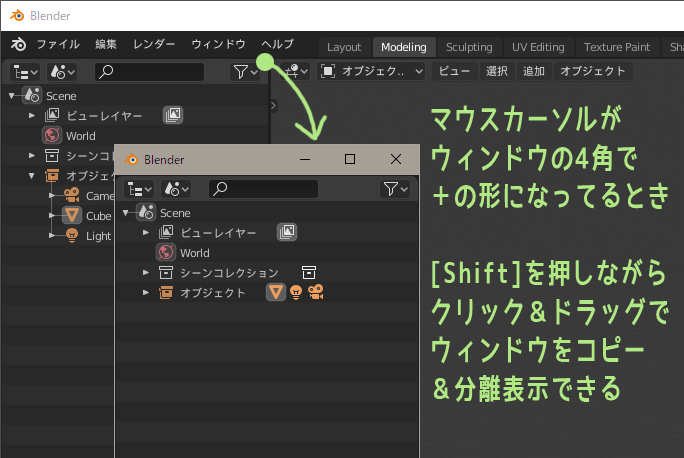
When you bring the mouse to the four corners of each window in Blender, the cursor takes the shape of a cross [+] .
Click and drag the mouse in this state to easily perform the area division/area integration described below, depending on the direction of the drag.
At this time, the Shift Separate copies of windows by holding down the key and clicking and dragging you can also do this.
If you are in a hurry, please know this~!
Select a workspace (you can also add, duplicate, and delete workspaces)

First, select “Workspace”.
Blender has several workspaces available from the start.
At the top of the Blender screen, you will see a series of tabs. Left-clicking on any of these tabs will switch to the Modeling, UV Editing, or other workspaces.

These workspaces are kindly provided by Blender, and modeling is not necessarily possible without using the Modeling workspace.
You can also create a new workspace of your own by pressing [+] on the far right of the Workspaces tab. You can also customize an existing workspace to your liking.
Right-click on the Workspace tab to open the menu.
From there, workspaces can be duplicated or deleted.
In this article, we will customize the Modeling workspace, which is provided from the beginning for modeling, to make it easier to use.
From the Workspace Switching tab, left-click on Modeling.
Create a new area by dividing an area
When you open the Modeling workspace, you will see a layout that looks somewhat like this.

We want to display a window on the left side of this workspace as well, so we create a new window display area with “Area Division”.
If you move the mouse to the bottom of the Blender screen, around the border of the window, the cursor will take the shape of a double arrow (↕), so right-click there.
Select Area Division from the menu that opens. The division line will be displayed, and left-click where you want to divide the area. (To cancel, right-click).
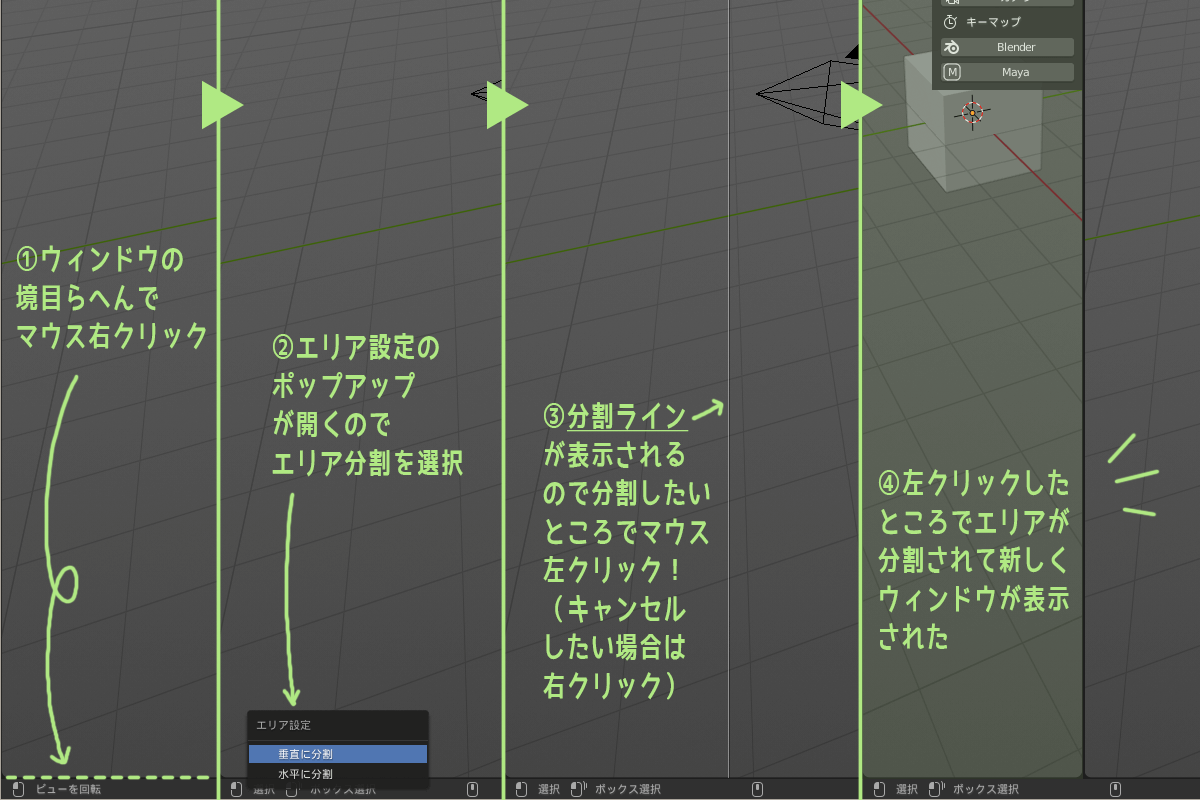
The area will now be divided and a new window can be displayed.
Display a window of your choice in a divided area
You can display any window of your choice in the newly created area by area division.
Here, as a test, we will display the outliner on the right side of the workspace, as well as in the left area.

First, click on the icon in the upper left corner of the viewport displayed in the left area. (*If the upper left icon is hidden and cannot be seen, expand the window frame until it becomes visible.)
A pop-up window will then open to select the window type, find the outliner in it and select it.
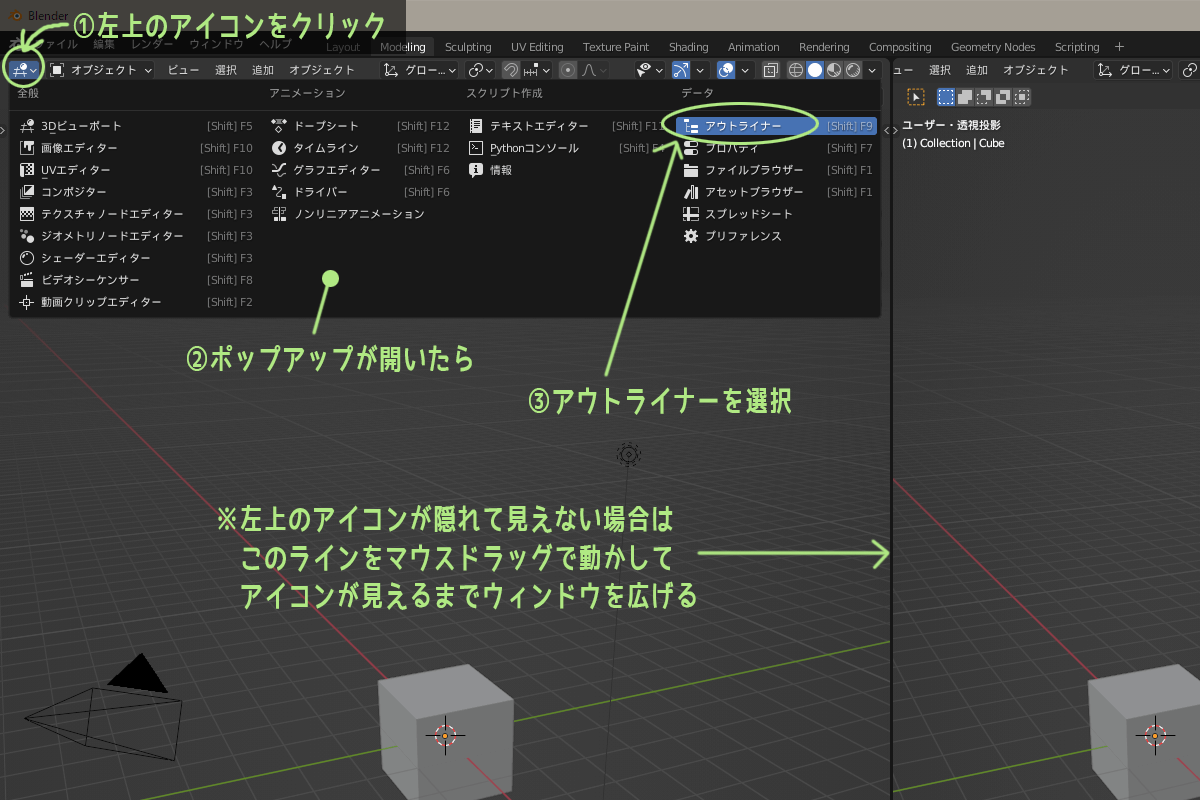
The outliner will now appear on the left side of the workspace as well.
Also, any window can display whatever you like by selecting it from the pop-up.
About Outliner
Outliner is a window that lists the objects, lights, cameras, etc. present in a Blender scene.
Outliner settings can be changed from the icon that looks like an upside-down flask in the upper portion.

- Sort alphabetically
The function is exactly as its name implies. But, turning it off does not mean that the objects can be rearranged freely.
- Synchronize selections
This setting synchronizes the selection state of objects in the outliner and the 3D viewport. It is easier to use if the selection state is synchronized. ON by default.
- Mode column display
Objects and other objects in edit mode will display an icon on the left side indicating the current mode. ON by default.
If you want to rearrange the order of objects in the outliner, “add 01, 02… to the beginning of object names to sort alphabetically” seems to work for now.
You can also create an additional “Collection” by clicking on the icon to the right of the upside-down flask.
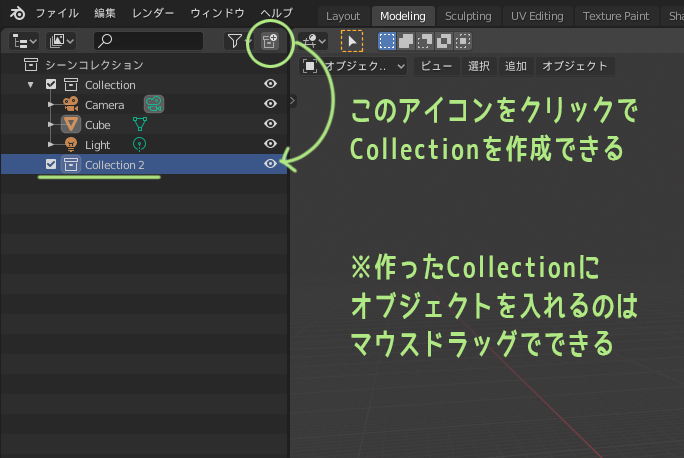
The collection is like a box, a bit like the layer function in Maya.
You can show/hide objects in the 3D viewport and include/exclude them in rendering on a per-collection basis.
To insert an object into a collection you have created, select the object you wish to insert in the Outliner and drag it into the collection.
For now, just keep the basics in mind that outliners are windows that help you manage objects in a scene.
Area consolidation to eliminate unwanted areas
Now, I have two outliners showing on my workspace and I want to delete one.
To delete an unwanted window, “merge area” the display area of that window.
The method is simple.
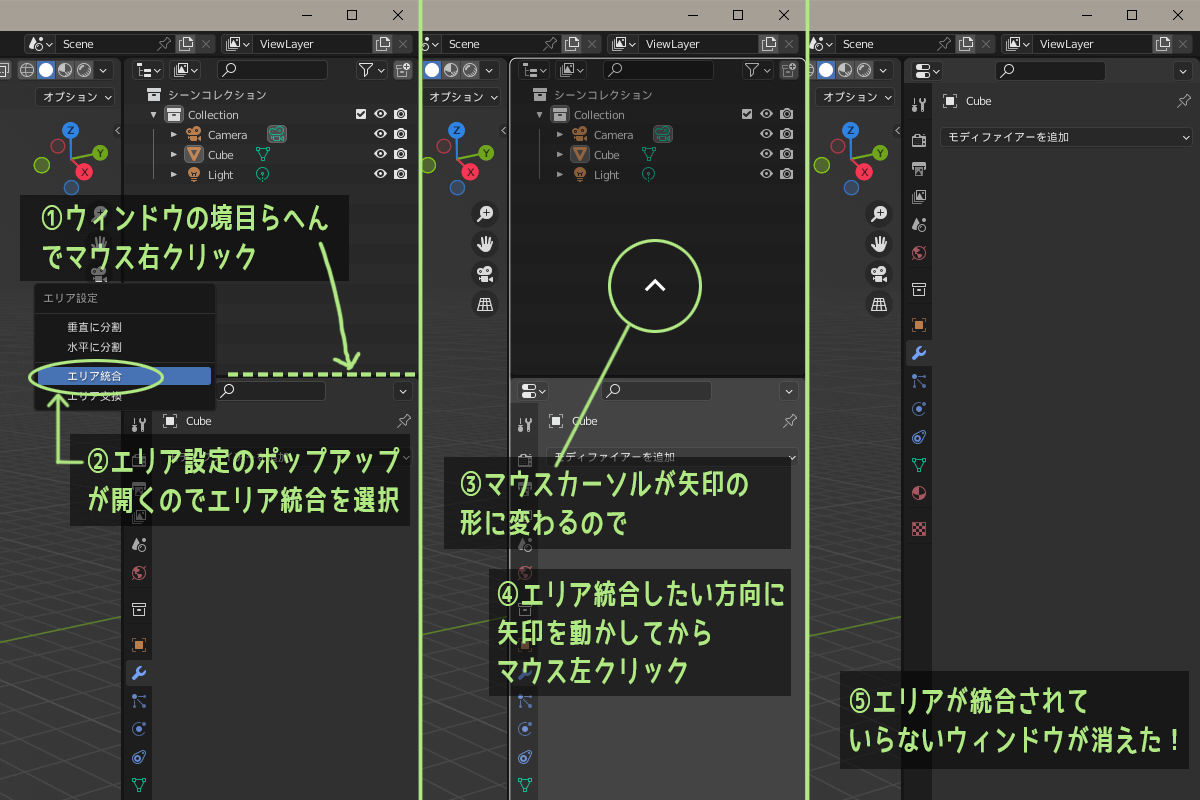
First, place the mouse cursor on the border of the window you want to merge. When the mouse cursor takes the shape of a double arrow (↕), right-click. From the pop-up that opens, select Area Merge.
The mouse cursor will then change to an arrow shape. Point the arrow in the direction you wish to merge the windows and left-click the mouse. (Right-click to cancel.)
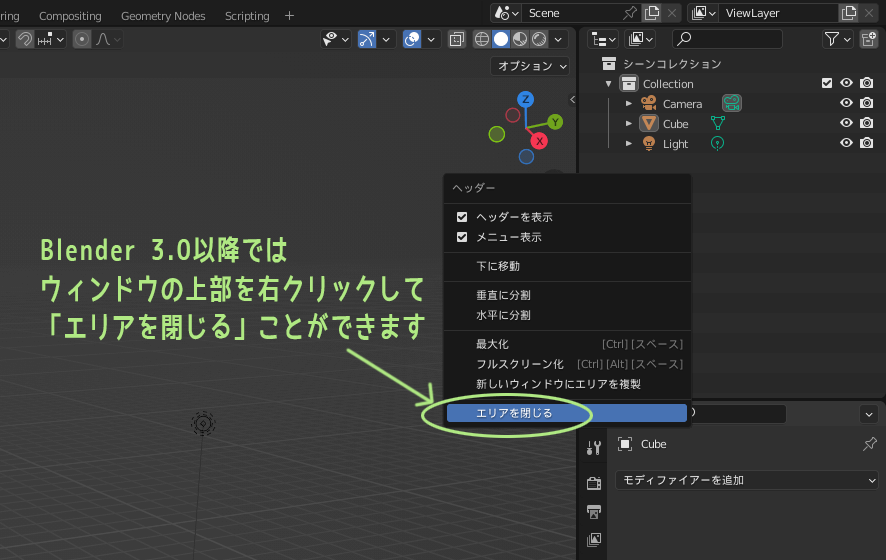
Also, in Blender 3.0 or later, you can close the window by right-clicking on the top of the window and selecting “Close Area”.
Now the unwanted window is gone.
About Property Editor

Since the outliner on the right side was erased in the area merge, I believe only the property editor is now displayed on the right side of the workspace.
The Property Editor is similar to the attribute editor in Maya. Various settings for 3DCG created in Blender are packed in the Property Editor.
The Property Editor has a row of vertical tabs, and when working in Blender, you will often open these tabs to look inside.
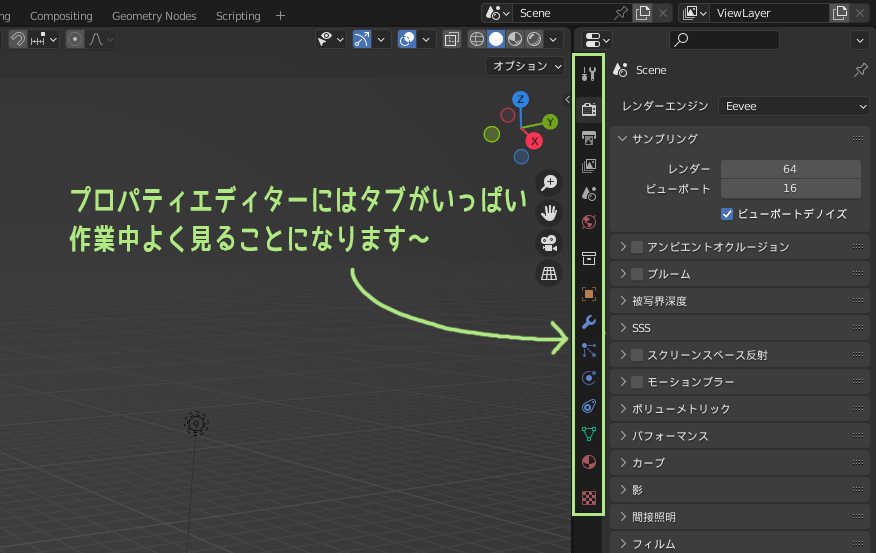
For now, it is good to remember that property editors are quite important.
Important! Save the startup file

I customized the window in various ways, so it looks quite comfortable.
Be sure to save the startup file after customizing it to your liking!
If you exit Blender without doing this, all your customizations will be lost.
How to save the startup file is also explained in START Blender 1) – Customize UI and Make It Easy to Use, but we will explain it here as well.
Click on File→Default→Save Startup File from the top menu, then click “Overwrite” when the confirmation window asks if you want to overwrite the file.

This way, the next time you start Blender, you can work with the window arrangement of your choice.
Summary: Customize the Blender window as you like

In this article, we showed you how to customize the Blender window. When the software looks the way you like, it makes you feel a little better when you touch it.
Blender’s window customization can be done using the
- Split the area as you like and display any window you like.
Once you have this concept in mind, you can freely customize the rest of the system by using the following operation methods.
- Right-click on a window boundary→Select Area Split / Area Merge
- From the icon in the upper left corner of the window → Select the display window by editor type
The following operations can be used to easily perform area splitting/area merging or to copy windows displayed in an area and display them separately.
- When the mouse cursor is on the corner of the window and the shape is a cross.
- Click and drag to split/merge areas depending on the direction of the drag.
- Click and drag while holding down Shift to copy and separate windows
In addition, window customization is retained on a workspace-by-workspace basis. When customizing windows, do the following as needed
- Select an existing workspace
- Create a new dedicated workspace
Blender at Toha has become much easier to use.
But we want to make it even easier to use, so the series on customizing Blender will continue for a while longer.
Next is the recommended initial setup~
Recommended initial settings for Blender ↓
Basic operation of Blender ↓
Blender UI customization ↓

- Coments - コメント一覧