
I have been a Maya user for 15 years, but I mainly use Blender for my productions.
When I start using new software, the first thing that Toha does is “customize the UI to your liking”.
When you don’t know how to read or operate a software program, it becomes frustrating and you lose the desire to learn new software and learn how to use it…
So, the first step is to customize the UI to your liking and learn to operate it comfortably.
This article will show you how to customize the initial Blender UI to your liking.
What we are doing is “customizing the UI to the UI of your choice”, but we will write the UI with explanations so that you can apply it to your “own taste”.
I’d rather know how to operate Blender than customize the UI! If you want to know how to operate Blender, jump to START Blender 4) – Basic Operations! Please jump to.
Download Blender

First, download Blender from the official website.
There are various versions of Blender, but 4.2 LTS is recommended for use now.
LTS stands for Long Term Support, a version that promises two years of long-term support.
4.2 was released in July 2024 and can continue to be used safely until July 2026.
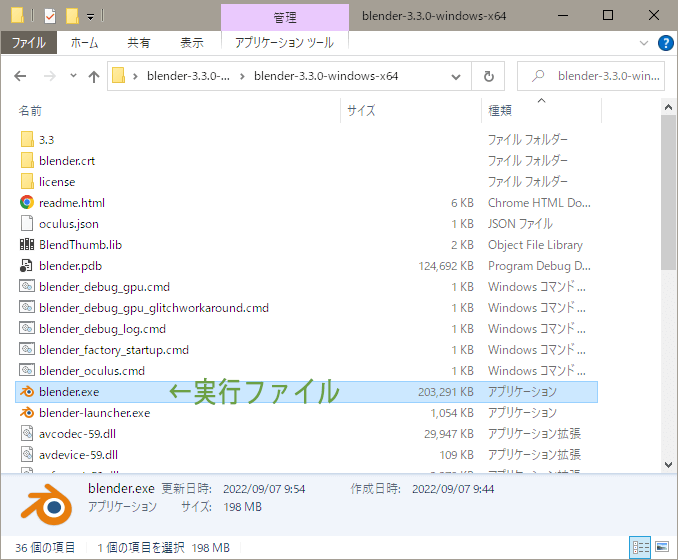
each version has a Linux version, a MacOS version, a Windows installer version, and a portable version, so click on the Blender file you want and download it.

The portable version (zip format) can be used without installing it on your computer; unzip the zip file and run “blender.exe” in the folder to start Blender.
When trying a new version of Blender, there is a way to carry over the preferences of the previous version. For more information, Take over Blender preferences to summarize.

Change Blender Menu to Japanese

When I start Blender after installation, the menu display is all in English.
After all, Japanese is easier to understand than English. Therefore, we will change the display to Japanese.
From Blender’s top menu, select
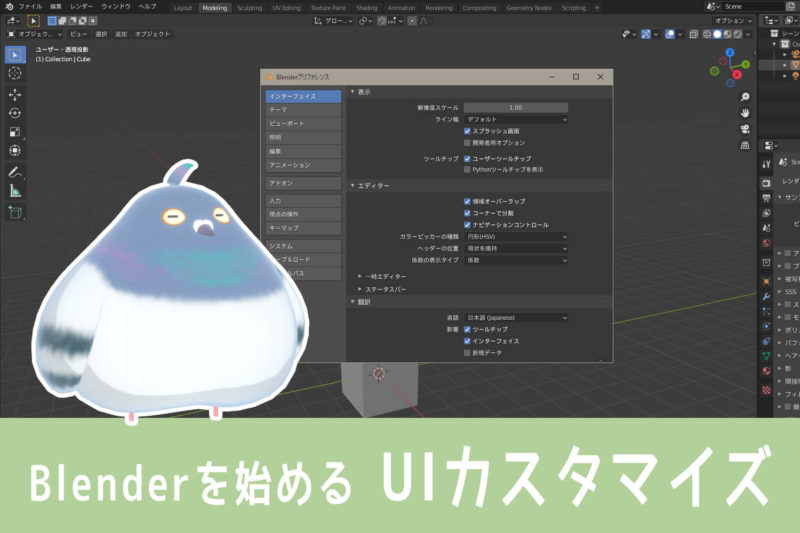
Click on Edit→Preferences→Interface and go to Language.

A further click on Language opens a window in which you can select a language.
Select “Japanese” from the list.

If you select “Japanese”, all items below will be automatically checked and the menu will be displayed in Japanese.
However, it is safer if additional objects are not created in Japanese, so Uncheck [New Data] and leave only [Tooltip] [Interface] [Report] checked.

If you press a button like ≡ in the lower left corner of the settings window and Auto Save Preferences is checked, your changed settings are automatically saved.
Now you’ve got Blender in Japanese!
At this rate, I will continue to customize the UI to my liking.
Make Blender feel like Maya

As I have been using Maya for a long time, I would like to use Blender in the same way as Maya if possible. Therefore, I will customize it to a Maya-like operation feel.
Here are two ways to make Blender feel like Maya.
- Use Industry Compatible Keymap
- Use the add-on Maya Config Addon For Blender
Look at them in turn.
1) Use Industry Compatible Keymap
Blender has a keymap setting called “Industry Compatible”.
Industry compatible keymaps are keymaps that are tailored to the way other 3DCG software, such as Maya and 3dsMax, operate.
The keymap can be set from the top menu by selecting Edit→Preferences→Keymap→Industry Compatibility.

You can find more information about this keymap here on the 3D person’s website.

However, these shortcuts described below will not work while using the industry-compatible keymap.
- T: Toggles between showing and hiding the toolbar
- Shift + Space: pop up toolbar
- N: Toggles the sidebar on and off
While using the Industry compatible keymap, the toolbar, and sidebar show/hide will change to the following shortcuts
- Ctrl+[: Toggle toolbar display/hide
- Ctrl+]: to show/hide the sidebar
You can easily get a Maya-like feel by using industry-compatible keymaps, but please note that some shortcut registrations may change.
2) Use the add-on Maya Config Addon For Blender
The “Maya Config Addon For Blender” can be installed to make Blender feel more Maya-like.
I have written an article introducing this add-on with a summary of its features, installation method, and notes. For more information, see Introduction Add-on – Maya Config Addon For Blender.
I love this add-on.
I especially like the fact that you can easily switch between [ Maya-like operation / Blender / Industry compatible ] keymaps with the button.
Unfortunately, MacOS is not supported at this time, but if you want to operate Blender with a Maya-like feel, give it a try!
Customize the position and appearance of the toolbar
The next step is to customize the “toolbar” in a nice way.
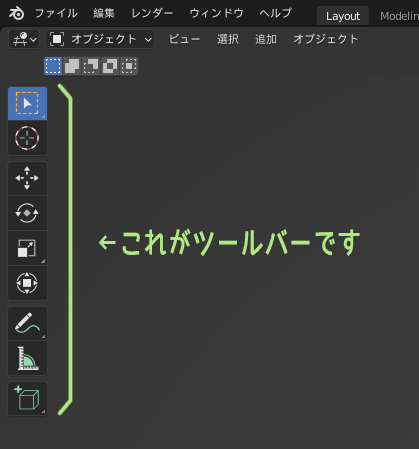
I am somewhat of a proponent of placing the tool-based menu on the right-hand side. In the default configuration, the toolbar is on the left side, so we will move it to the right side.
You can swap Toolbar positions using Blender 2.7 keymap.
Boukyakuno’s website also introduces How to swap positions in Blender 2.9 or later. However, it is a bit of a hassle for me, so I will do it the old-fashioned way. The method is as follows.
First, from Blender’s top menu, select Edit→Preferences→Keymaps→Blender 2.7x

With the keymap changed to the Blender 2.7 keymap, bring the mouse cursor over the toolbar and press F5 on the keyboard. The toolbar will then move to the right.
(*To return to the original location, place the mouse cursor over the toolbar again and press F5).

Once the position has been changed, the keymap settings should be restored.
Finally, change the look of the toolbar to make it a little more obvious.
Click and drag around the side of the toolbar and pull it horizontally. The width of the toolbar will then change and the name of the tool will be displayed.
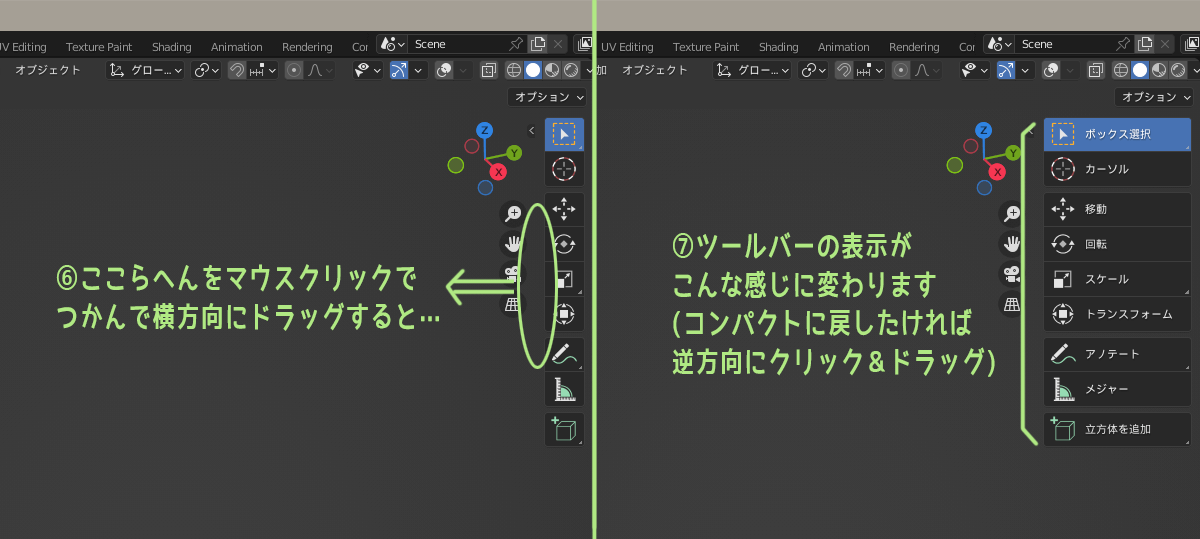
It is hard to understand what kind of tool it is if it is just a mark, but this is a little easier to understand.
Incidentally, there are some useful shortcuts to remember regarding toolbars.
- T: Toggles between showing and hiding the toolbar
- Shift+Spase: pop up toolbar
(*Industry compatible keymap is Ctrl + [ to show/hide toolbar)
If you are looking at the Blender work screen and feel that the toolbar is in the way, you can comfortably hide it with the T key.
Show/Hide the sidebar

There is a “sidebar” that is usually hidden but is quite important when working in Blender: try pressing the N key on your keyboard within Blender.
You will see something new on the right side of the Blender screen. This is the sidebar.
![Blender [N]キーでサイドバー(旧プロパティシェルフ)を表示/非表示](https://tohawork.com/wp-content/uploads/2022/09/ui-customize_09.png)
Normally, there is no problem if this is hidden, but, when you are using Blender, the information you want to see is often in the sidebar.
I would like to remember the N key shortcut and be able to use the sidebar.
- N: Toggles the sidebar on and off
(*Industry compatible keymap is Ctrl + ] to show/hide sidebar)
Incidentally, the position of the sidebar, like the toolbar, can be swapped left and right.
In the same way as customizing the position and appearance of the toolbar, The sidebar, which is on the right side of the screen by default, can be moved to the left side of the screen.
This is what it looks like with the sidebar swapped to the left and the toolbar to the right.

Important! Save the startup file

Now, for now, I want to save my customized UI settings so far.
If you exit Blender without saving your settings, all your customizations will be lost.
After changing the UI or initial settings in Blender, be sure to “save the startup file”.
To do this, click on File→Default→Save Startup File from the top menu, then click “Overwrite” when the confirmation window asks if you want to overwrite the file.

Blender’s UI settings are stored in each saved Blender scene data.
If you change the UI and save the scene, when you open the scene, the UI will be replaced with the settings stored in the scene. (* There is another way to open data without loading the scene’s UI settings. )
So what this “Save Startup File” is doing is saving the data of the first scene that is opened when Blender is launched.
When you start Blender, a scene with a square object in the middle opens, but that was the startup file.
If you save your preferred initial settings in this startup file, it will be easier to work with Blender in various ways.
Once you have customized Blender to your liking, remember to “Save the startup file”.
If you do not want the UI to be loaded when opening a Blender scene, press the gear setting symbol in the file open window and uncheck “Load UI” before opening the file.

Summary: Customize Blender’s UI to your liking!
In this article, in preparation for getting started with Blender, we first customized the UI like this.
- The menu display changed from English to Japanese
- Blender operation changed to a Maya-like feel.
- Change the position and appearance of the toolbar
- Check the sidebar display/hide toggle
- Save startup file
It looks a bit easier to use than when I first opened Blender.
But we want to make it easier to use, so the series on customizing Blender will continue for a while longer.
Please stay with us if you’d like.
Customize Blender window placement ↓
Recommended initial settings for Blender ↓
Basic operation of Blender ↓
- Coments - コメント一覧