
For modeling in Blender, we have
I wrote about the basics in two articles, Modeling with Blender [Practical] and [Knowledge].
However, if you are going to do serious modeling using Blender, you will find it difficult to do some of the basic things alone.
Therefore, this article is an addendum to Modeling in Blender, which introduces that for more comfortable modeling.
This is a summary of what Toha found inconvenient and improved upon when modeling with Blender, so I think it has a fair amount of practicality.
If you have become accustomed to Blender operation and want to model more efficiently, please refer to this page.
- Using shortcuts for frequently used functions is still convenient
- Also convenient to register it in your favorite tools
- Add-ons are also recommended to be used as needed
- It is also useful to adjust Blender’s display settings to make it easier to work with
- Summary: Creating an environment where you can concentrate only on modeling will help you work better
Using shortcuts for frequently used functions is still convenient

In our Blender articles, we have always used the “no shortcut method” as our basic style.
Knowing how to avoid using shortcuts is helpful because it allows you to deal with the situation when you accidentally forget a shortcut, or to find the function you want from the menu.
However, shortcuts are convenient and efficient when you are modeling hard.
So, here we are.
- Look up shortcuts for frequently used functions
- Register frequently used functions as shortcuts
I will look at how to do this.
(1) How to check for existing shortcuts
First, let’s look at how to find out about existing shortcuts.
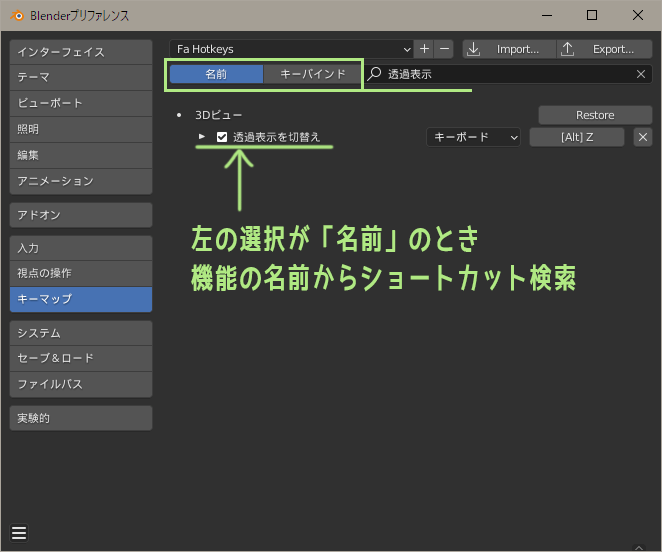
From the menu at the top of Blender, go to Edit->Preferences->Keymap, then use the search box in the upper right corner to look up shortcuts.
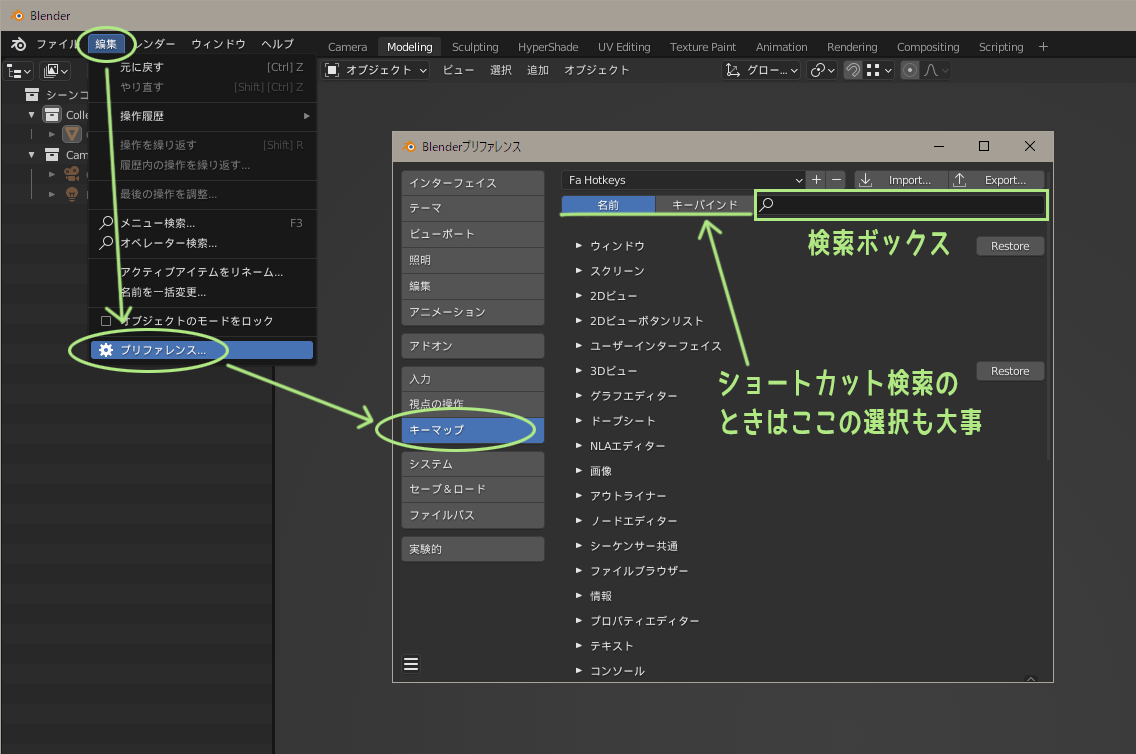
At this time, also note the selection to the left of the search box.
When “Name” is selected on the left side of the search box, it searches for shortcuts by menu or function name.
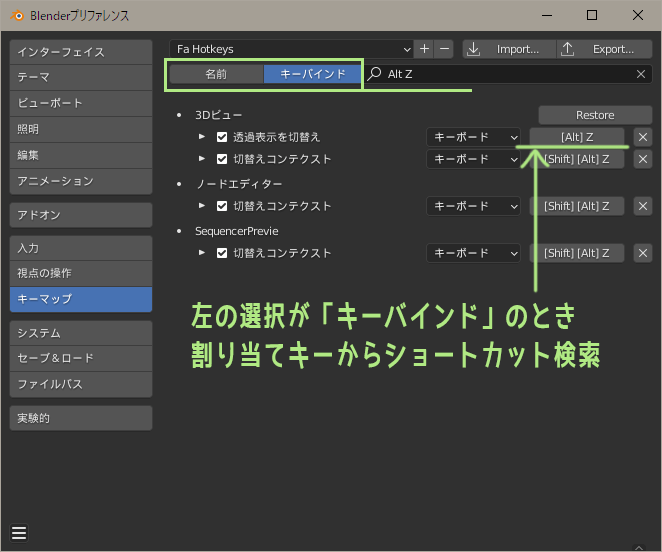
Change the selection on the left side of the search box to “Key Bindings” to search for shortcuts from assigned keys.
When a new shortcut is registered to a key, it will overwrite any other shortcut already assigned to that key.
Therefore, when changing a shortcut or registering a new shortcut, it is recommended to check the shortcut assigned to the key with a search, just to be sure.
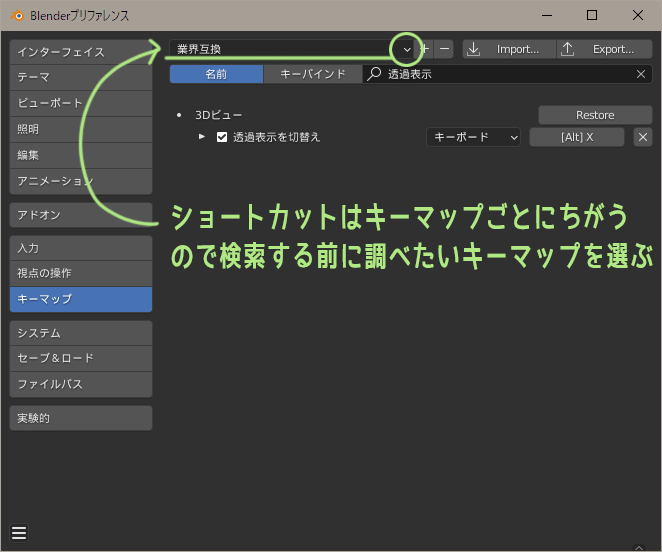
Shortcuts also vary depending on the keymap in use.
You can check/change the keymap to be used in the field above the Name & Key Bindings column. Don’t forget to check the keymap before searching for shortcuts.
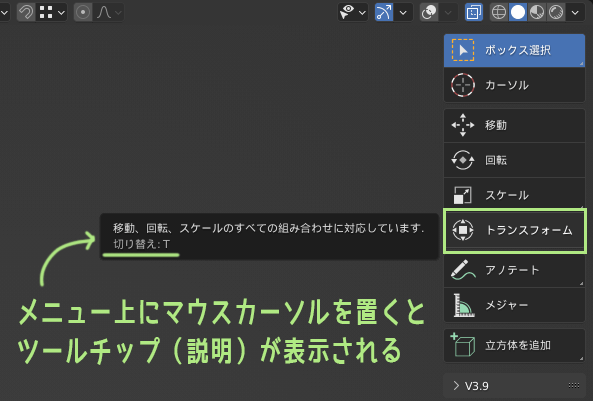
When Blender’s tooltip (description display) is enabled, hover the mouse cursor over a menu item and wait a moment, and a shortcut will appear with a brief description.
In some cases, shortcuts are listed from the beginning next to menu items. If you want to know which shortcut is assigned to a function, you can look it up from the menu.
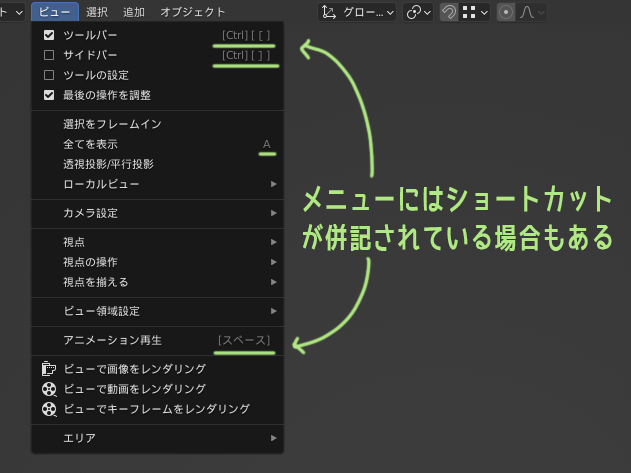
*The display/hide of tooltips can be changed by checking the “Tooltips” checkbox in the Preferences interface.
(2) How to register a new shortcut
Next, I will discuss how to register a new shortcut.
There are two ways to register a new shortcut.
- Open the menu and register with a right mouse click
- Register from the keymap settings in Preferences
First, open the function you want to assign a shortcut to from the menu and register it with a right mouse click.
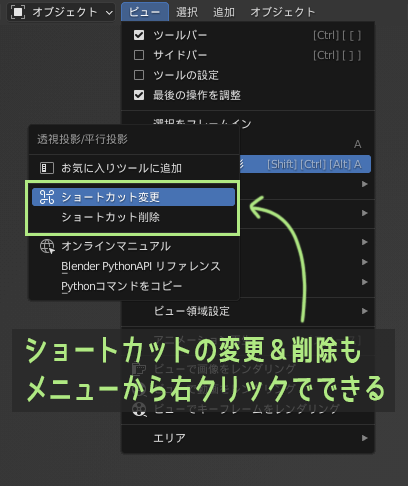
Right mouse click on a menu item opens a window.
Clicking on “Assign Shortcut” will open a small window where you can enter the key to be assigned. Enter the key you want to assign or operate the mouse to register it.

When right-clicking on a menu that already has a shortcut assigned, the “Change Shortcut” and “Delete Shortcut” items will appear.
Another way is to register from the preference’s keymap settings.
How to check for existing shortcuts, Using the method described above, go to Preferences→Keymap & find the item to which you want to assign a shortcut.
You can enter the assigned key directly by clicking where the shortcut key is written.

Shortcut settings are saved for each keymap. If you wish to keep the shortcut settings for the original keymap, you can export the keymap file from Export in the upper right corner.

When you register a new shortcut yourself, it sometimes conflicts with an already existing shortcut for the same key and does not work properly.
in such a case, How to check for existing shortcuts I think it will work better if you find the conflicting shortcuts and uncheck the shortcuts you don’t use using the method in the following section.

(3) Shortcuts that I personally use in modeling

As an example of shortcuts, here are some shortcuts that Toha often uses in modeling.
During modeling, Toha’s left hand is always around the Alt key on the keyboard. Therefore, we would like to assign a key that is easy to press with the left hand, somewhere around the lower-left corner of the keyboard, to a frequently used menu shortcut.
For this reason, some functions that have shortcuts assigned to them by default are changed to easier shortcuts.
| Menu item | Assignment Shortcuts | Remarks |
|---|---|---|
| Undo | Ctrl+Z | Keep the default shortcut |
| Redo | Shift+Z | Ctrl+Shift+Z is hard to press, so change it |
| Transparency | D | Changed from Alt+Z for easier pressing since it is used often |
| Vertex Marge | Alt+Q | Changed because M is hard to press with left hand |
| Vertex Slide | V | Shift+V is hard to press, so change it |
| Crop (fill) | Alt+V | Keep the default shortcut |
| Ring Selection | Ctrl+Alt+Left Click | Keep the default shortcut |
| Favorite Tools | Shift+Q | There were no shortcuts, so register a new one |
| Super Smart Create | S | Interactive Tools add-on: Register for the convenience function |
| Smart Delete | Z | Interactive Tools add-on: Register delete function |
| Edge Subdivision | C | For edge splitting not possible with Super Smart Create |
| Edge Flow | Alt+F | EdgeFlow Add-on: Register for Set Flow |
Also convenient to register it in your favorite tools
Apart from shortcuts, Blender also has a feature called Favorite Tools.
As the name suggests, this function allows you to register the tools you like and use frequently in a dedicated window.
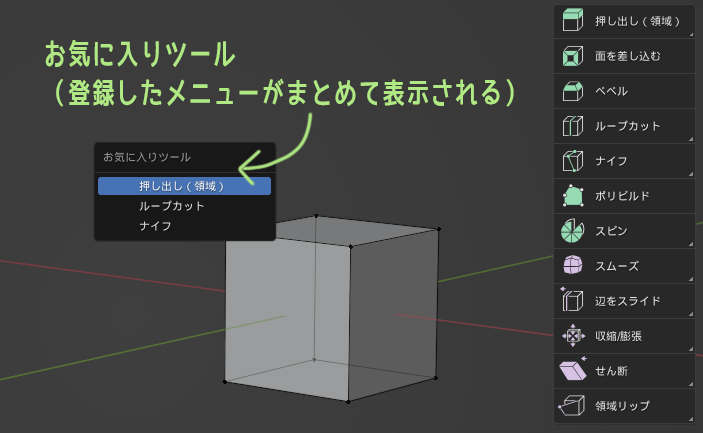
The nice thing about the favorite tools is that
you can use various functions just by learning the shortcuts for the favorite tools.
Shortcuts are convenient, but if you want to use various functions conveniently, you need to learn as many different shortcuts as possible.
On the other hand, if you register a variety of frequently used functions in your favorite tools, you can use all registered functions with a single shortcut.
Favorite Tool Shortcuts
Blender Keymap: Q
Industry compatible keymap: Shift+TAB
Maya Config Addon For Blender: None (register yourself)
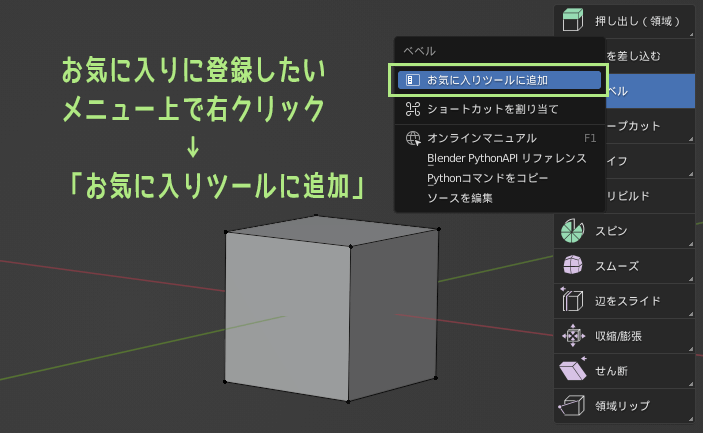
The method of registering a shortcut to a Favorite Tool is the same as assigning a shortcut by right-clicking on the menu. Right-click on the menu item you wish to register and select “Add to Favorite Tools”.
Add-ons are also recommended to be used as needed

Blender has something called an add-on. Add-ons are what Maya calls plug-ins.
Various add-ons for Blender have been developed, and they can greatly increase the usability and convenience of Blender.
You can become a true Blender master by using the standard Blender functions or become an extended Blender user by adding add-ons that you find useful.
As for Toha, I think it is better to be able to work comfortably with add-ons than to be stressed out by tolerating inconvenient parts.
So next, we will look at Blender add-ons that are useful when modeling.
(1) Blender Extensions Platform (Standard Add-ons)
Blender used to include a standard add-on from the beginning, but Standard add-ons have been offered as extensions since Blender 4.2.
Extensions are available for free download at Blender Extensions.

Anyone with an online connection can download and install publicly available extensions to Blender.
The following four, previously introduced as useful standard add-ons, are also available as extensions.
To install extensions, go to Edit -> Preferences -> Get Extensions.
If you “Allow online access” here only once the first time, a list of extensions that can be installed will be displayed thereafter.
*If the list is not displayed due to an error, restarting Blender may fix the problem.

Find the extension you want in the search box in the list of extensions displayed, and press the Install button next to it to complete the extension installation.

Let me introduce the four recommended extensions in order.
– Auto Mirror
Auto Mirror is an extension that removes half of an object and applies a mirror modifier.
In other words, it is an add-on that does everything up to the preparation of symmetry with mirrors with a single click of a button, as described in the article Blender Modeling [Practical], Actual modeling 1).
Once the Auto Mirror extension is enabled, a side bar with an “Edit” tab.
Open the Edit tab and inside you will find ▽Auto Mirror. (If it is closed, click to expand.)

Just click on the “Auto Mirror” button with the default settings. Half of the object will be automatically deleted and the mirror modifier will be applied.
Note that pressing the [Auto Mirror] button multiple times will add several mirror modifiers.
– LoopTools
LoopTools is an extension that allows 8 functions such as bridging and lofting with easy operation.
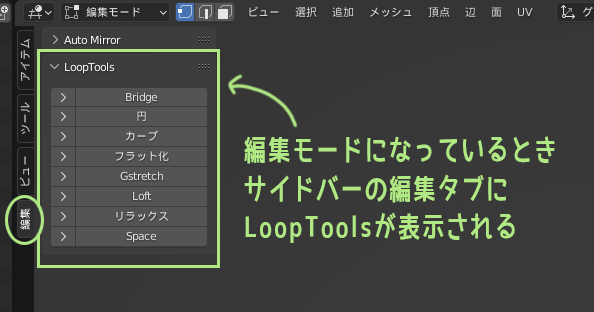
It includes some features that are a bit difficult to use, but it is an easy-to-use extension, so you should try it out at least once.
Like Auto Mirror, LoopTools, when enabled, is added within the “Edit” tab of the sidebar. However, LoopTools notes that they are only displayed when in edit mode.
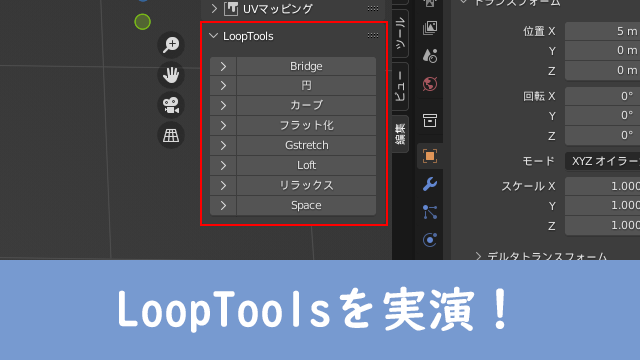
The eight features of LoopTools are explained here.
– Snap Utilities Line
Snap Utilities Line is an extension that can be used as a replacement for the knife tool.
When enabled, the tool “Make Line” is added to the toolbar while in edit mode.
It is simple to see and use: select the Make Line tool and a black dot will appear at the cursor, then left-click the mouse where the dot is to cut the polygon.
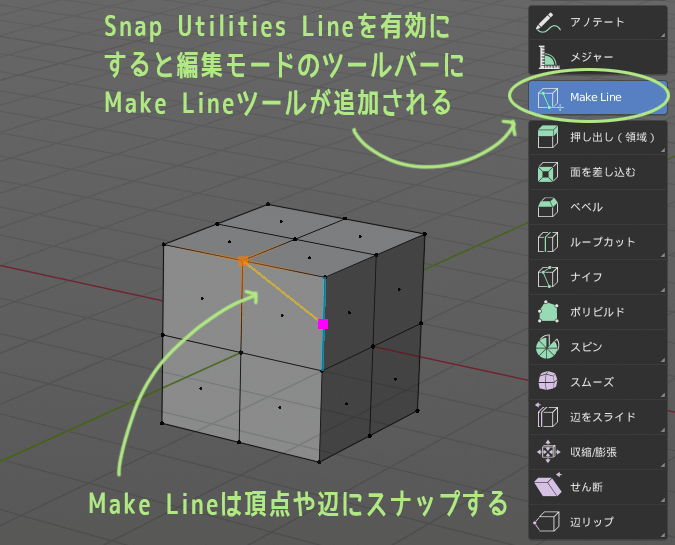
This black dot automatically snaps a bit, and becomes orange when a vertex is snapped, light blue when an edge is snapped, and pink while snapping to the midpoint of an edge.
However, the Make Line tool is similar to but different from, the Knife tool; as the name implies, the Make Line tool creates a new edge when clicked on an empty space.
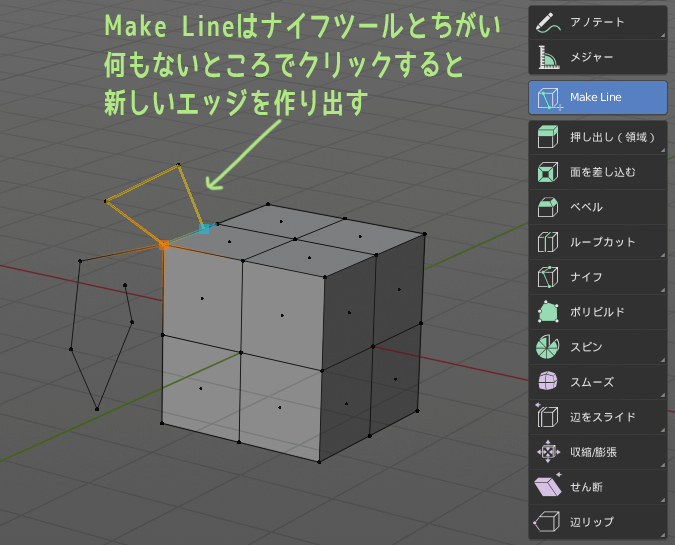
Note that a left mouse click with no snap anywhere will create strange edges in strange places. make Line and Knife Tool, it’s worth a try to see which is easier to use, as it’s a preference.
– Copy Attributes Menu
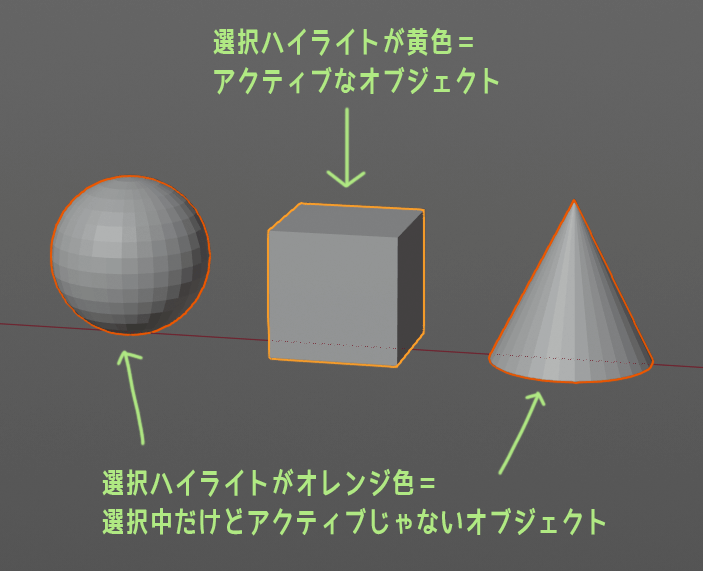
Copy Attributes Menu is an extension that allows you to copy various elements of the active object for multiple objects.
When you select an object in Blender’s object mode, the selection highlight yellow is the “active” object.
The last selected object becomes active. Objects that are not active have an orange selection highlight.
In Blender, when multiple objects are selected, the only object information that appears in the Property Editor and sidebar is that of the active object.
Even if multiple objects are selected and their values are changed from properties, etc., in principle, only the active object will have its value changed.
When the Copy Attributes Menu is enabled, the Copy Attributes Menu will appear when Ctrl+C is pressed The Copy Attributes menu will be displayed when you press.
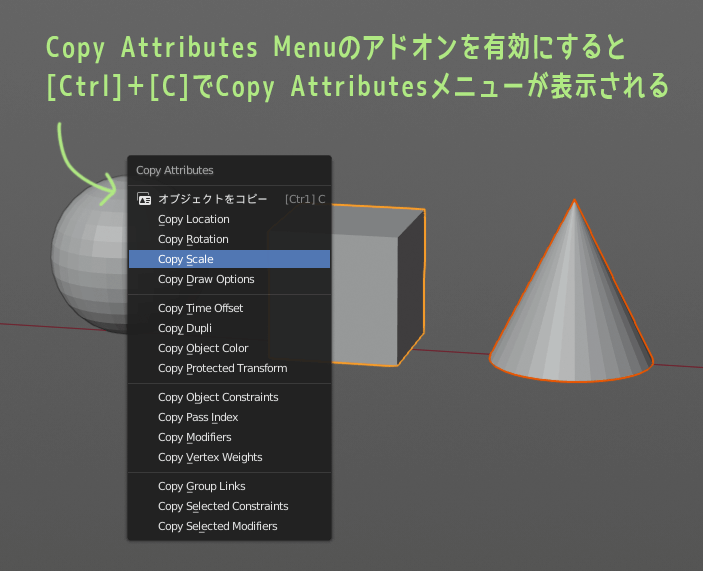
Copy Object” at the top of the menu is the usual Ctrl+a little more than usual C function, and the items below it are functions added by extensions.
For example, by selecting multiple objects and choosing “Copy Scale” from the Ctrl+C menu, the scale values of the active object can be copied to all other objects except the active one.
Modifiers and vertex weights can also be copied, so I think it is a useful add-on depending on how it is used
(2) Interactive Tools, an add-on that is too useful for certain functions
The next add-on is called Interactive Tools.
Interactive Tools has a very useful feature called Super Smart Create.
Interactive Tools can be downloaded from Gumroad.
*Downloads from Gumroad are available at Maya Config Addon For Blender you can do this in the same way as the “How to download” section, so please refer to that section for specific download instructions.
Once you have downloaded the add-on zip file, go to Edit -> Preferences -> Add-ons and “Install from disk” Interactive Tools will be added to the sidebar and ready for use.


So, let’s talk about Super Smart Create, which Toha finds very useful.
This function is a greedily designed function that does everything in one.
Here are some of the main things you can do with Super Smart Create (hereafter referred to as SSC).
(1) When vertex and vertex are selected and SSC is performed, an edge connecting the vertices is drawn.

(2) If there is an edge between the vertices you have SSC’d, draw an edge across the vertex.
(3) Select an edge and an edge and SSC to subtract an edge through the midpoint of the edge.
(4) Select only one edge to do SSC performed, a vertex is created in the middle of the edge.
(5) Selecting edges and edges that are far apart and SSC creates polygons between the edges.
(6) Selecting the edge of the hole around the hole and SSCing it will cover the hole with polygons.
(7) Selecting and SSCing the fitted polygons splits the polygons in a good way according to the surrounding conditions.

(8) When multiple vertices are selected on a polygonal polygon and SSC is performed, an edge is drawn to the last selected vertex.
…Did I convey something amazing?
The tool will automatically determine what to do according to the elements you have selected.
Well, sometimes there are errors because of the complexity of what it is doing, but even with that, I think it is a useful feature.
Register Super Smart Create as an easy-to-press shortcut and your modeling work will progress.
Interactive Tools has various functions other than Super Smart Create and Smart Delete, which are the two functions that Toha often uses. Smart Delete.
To learn more about the full functionality of the Interactive Tools add-on, please visit Interactive Tools official documentation or visit the website below~!

(3) EdgeFlow, a convenient modeling companion
EdgeFlow is a free Blender add-on available on GitHub.
When modeling in Maya, Toha often uses the Edge Flow function of the Multi-Cut tool. Edge flow is a function that adjusts the position of the target edge so that it becomes a smooth curve by looking at both adjacent edges.
Example: Edge flow function of Maya.
The EdgeFlow add-on enables Blender to do something similar to EdgeFlow in Maya.
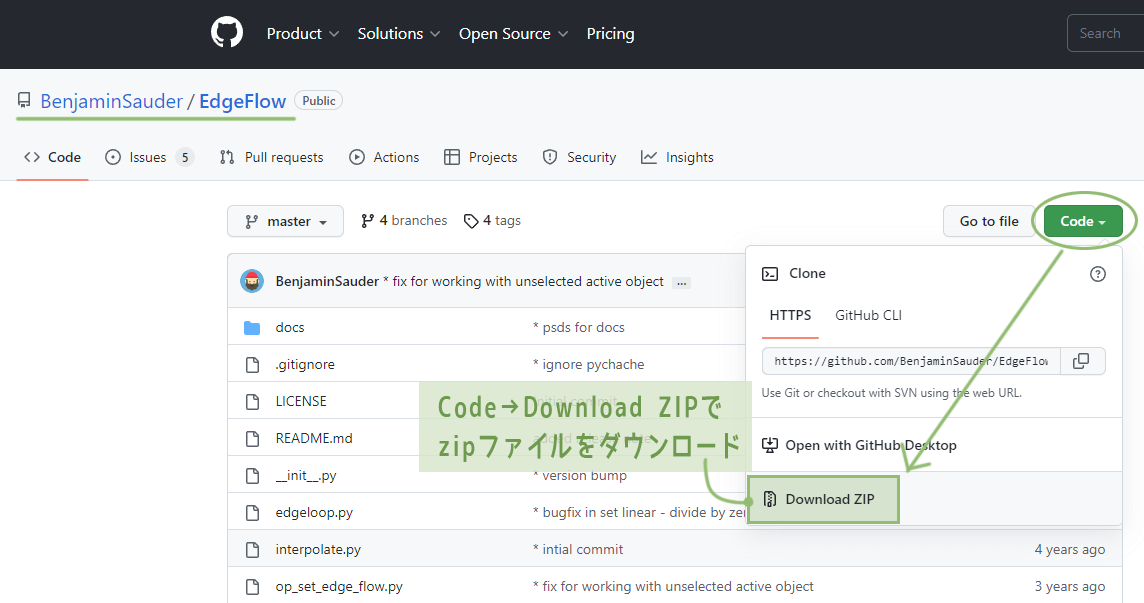
You can download it from this page.
From the download page, go to Code->Download ZIP to download the zip file. The zip file can be installed in the same way as Interactive Tools.
After installing EdgeFlow, “Set Flow” is added to the edge menu in edit mode.

Set Flow is also can registered as a shortcut and use it in combination with Loop Cut and Super Smart Create for a quick edge flow.
Example: Edge flow in Blender.
Blender also seems to have other add-ons that are useful and standard.
If you want to know about add-ons, please refer to Boukyakuno’s site, which introduces many useful ones!

It is also useful to adjust Blender’s display settings to make it easier to work with

We have introduced shortcuts and add-ons, but to model comfortably and efficiently, it is also useful to adjust Blender’s display settings well.
Let me introduce some of the adjustments that Toha made as he proceeded with the modeling.
(1) Adjust transparency of transparent display
Blender’s Transparency is a frequently used feature, but the degree of transparency can be changed according to one’s own preferences and circumstances.
The transparency can be changed when the 3D View Shading can be done when in solid view. When in solid view, click on the ▽ on the far right to open the options and you will see a “Transparency” bar.

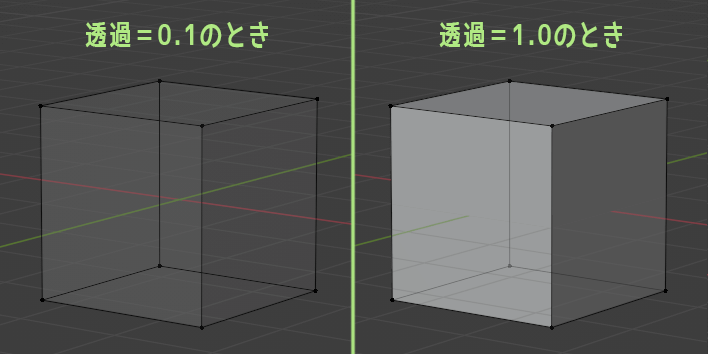
The default transparency value is 0.5, but you can make it extremely transparent by setting it to 0.1, for example, or just a little transparent by setting it to 0.9.
While modeling, Toha often uses a transparency display to edit the vertices on the backside, and when it is troublesome to make the object translucent each time, he sets the value to “1.0”.
When the transparency display is 1.0, the object is not translucent and only the vertices on the backside are visible.
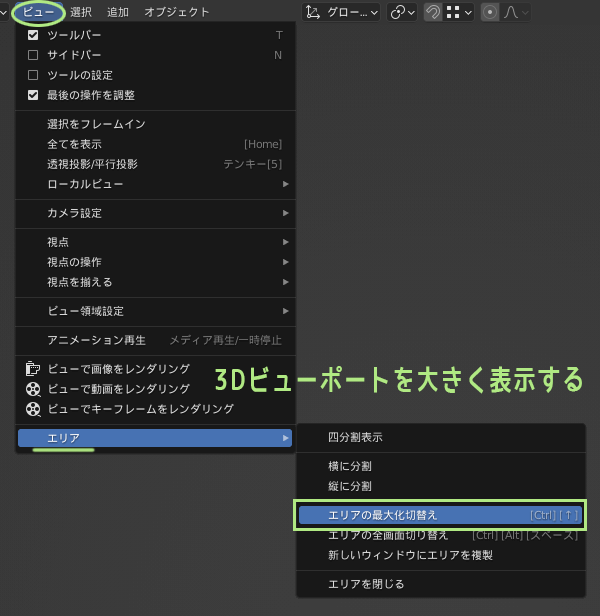
(2) Viewport is enlarged by switching to maximize area
During the modeling process, the Property Editor and the outliner is sometimes not particularly necessary.
In such cases, use “Maximize Area” to make only the 3D viewport larger to use more screen space and make modeling This allows you to use a wider screen and makes modeling work easier.
To maximize an area, select View→Area→Maximize Area Header Menu.
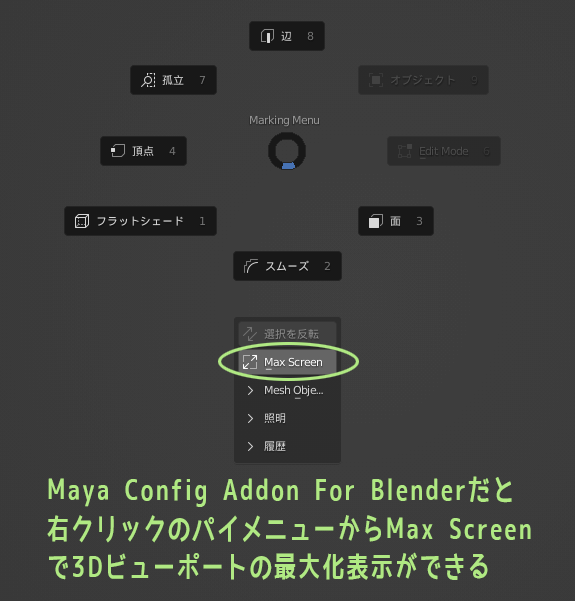
It is more convenient to maximize an area quickly with a shortcut, so you can existing shortcuts and use them, or register a new shortcut.
Incidentally Maya Config Addon For Blender, if you are using the “Max Screen” menu, you can also do this by right-clicking and selecting “Max Screen” from the pie menu that appears when you right-click.。
(3) Semi-transparent/wireframe display of specific objects only
When you are creating a 3D model with many parts, you may want to display only certain objects in a “semi-transparent” or “wireframe” view.
For example, you can edit the face model by making only the hair semi-transparent, or edit the body model by displaying a wireframe of the clothing model.
You can hide objects that are not being edited if they are in the way, but you may want to keep them as guides for position and volume.
We will take a closer look at how to make only specific objects semi-transparent/wireframed.
When displaying specific objects in semi-transparent/wireframe view as guides, it is recommended to make them “unselectable” from the outliner as well.
For more information on specific methods, see Object Management with Outliner, please refer to the following.
– Make the material translucent in the viewport display
The first step is to make a specific object translucent in the 3D viewport.
The way to do it is to create a translucent material and assign it to the object.
It is easy to create a material that appears translucent in the 3D viewport during modeling.
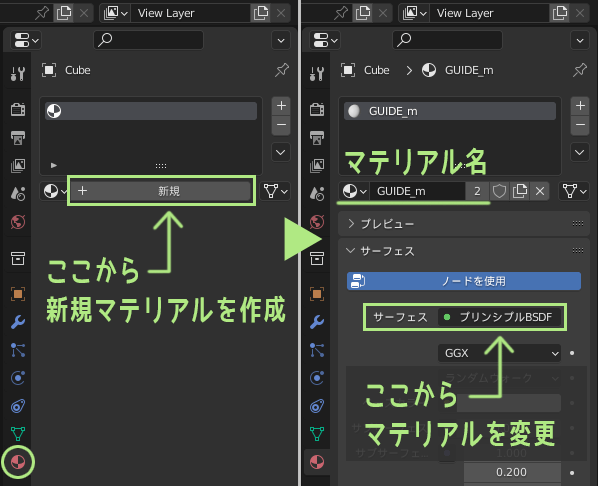
First, select the object you want to make translucent, then click Property Editor open the material properties of Create a new material by pressing “+ New” and give it an appropriate name.
If you look at the surface, you will see that it is set to “Principle BSDF,” but you can use a simpler material, so click here and change it to “Diffuse BSDF” or something similar.
One note here is to set the translucency from the color palette of Diffuse BSDF.
The color palette below the surface column is the material color setting for rendering. The settings here do not affect the appearance of the 3D viewport in solid view.
Settings that affect the appearance of the solid display in the 3D viewport can be found in Viewport Display.
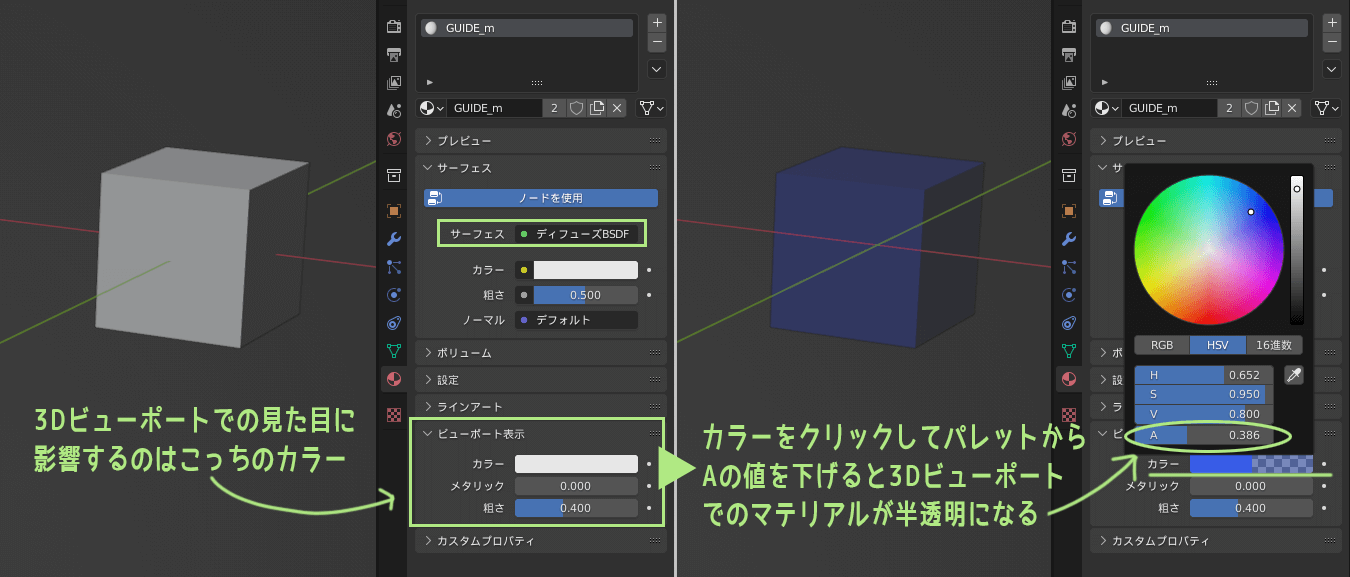
Click on the color in the viewport display & lower the value of the A bar from the window that opens to make the object translucent in the 3D viewport in solid mode.
Incidentally, no matter how much you change the color or transparency in the viewport display, it will not be reflected in the material preview display or rendering results. Please think of it as a working material setting.

We received a comment about How to make guide images easier to see with semi-transparent objects.
If you do it as is, it will look strange, but with a little effort, you can make both semi-transparent objects and guide images easier to see. For more information, please refer to the comments section.
– Wireframe in viewport display of objects
The next step is to make a specific object in the 3D viewport appear in wireframe view.
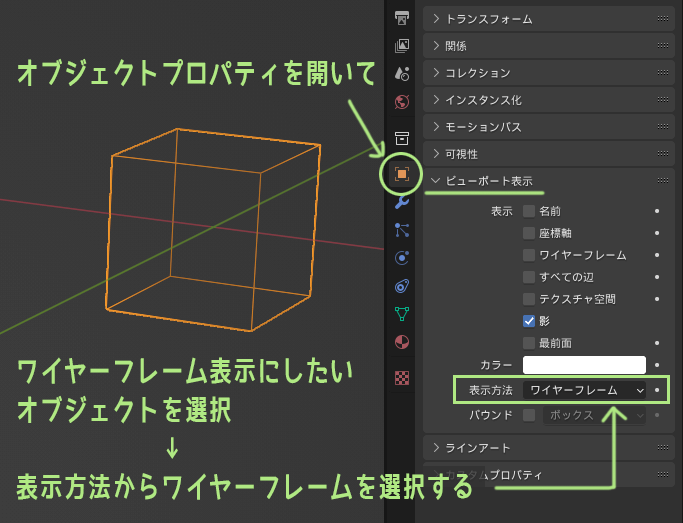
First, select the object you want to display in the wireframe and open the object properties from the Property Editor.
If you open the viewport display section of the viewport, you will find two places where you can set up wireframes.
- Change the display method to “wireframe” and the object is displayed in wireframe
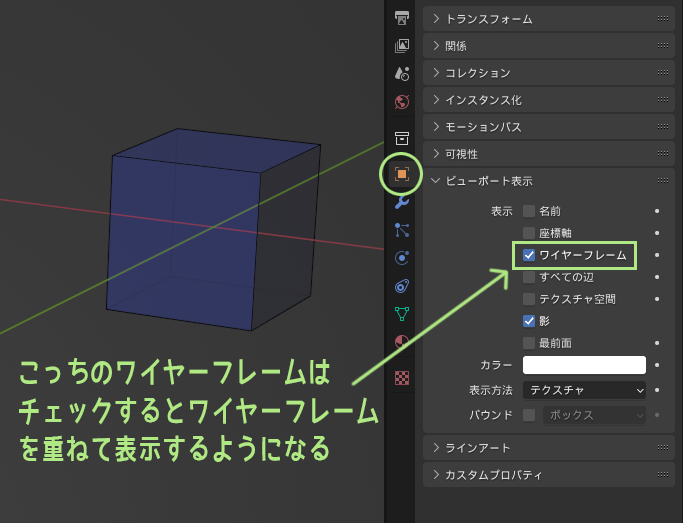
- “Wireframe” check box is turned on to superimpose a wireframe on the original state.
Because of these differences, I think it’s a good idea to use it for different purposes – I’m sure you can find the right one for your application.
If you want to apply this wireframe display, etc. to multiple objects at once, use the
Hold down the Alt key to turn on a check box or select an item!
In Blender, “hold down the Alt key while typing” seems to be the key when you want to apply to multiple objects at once. If you hold down the Alt key while typing in a move or rotation value, it will also work on multiple objects.
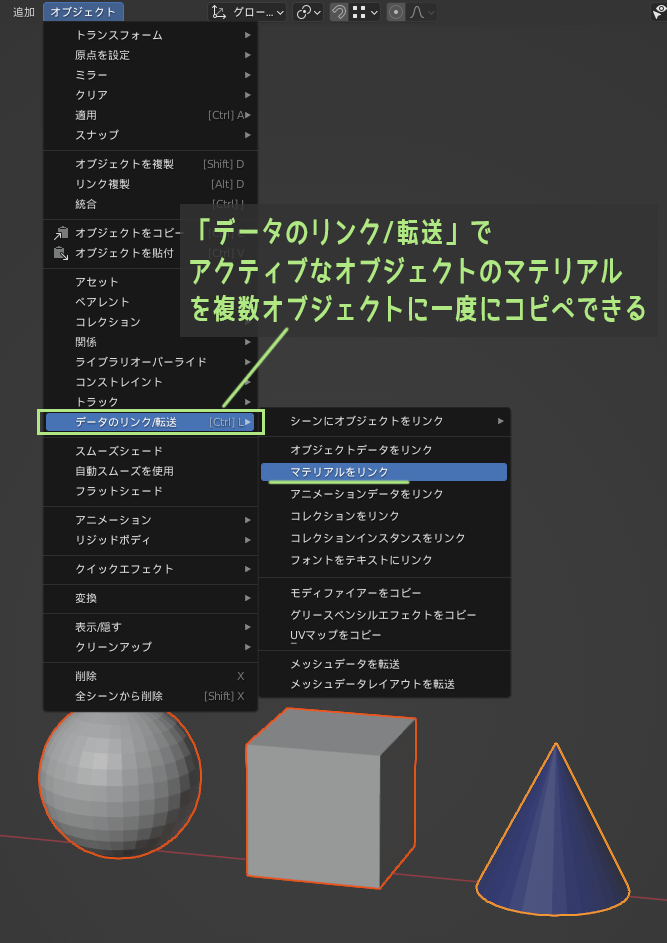
– Copying materials to multiple objects
If you want to copy a material applied to one object to several other objects at once, you can use Data Link/Transfer.
From the object mode menu in the header, Object→Data Link/Transfer→Material. The shortcut is Ctrl+L.
Data link/transfer shortcut
Blender keymap: Ctrl + L
Industry compatible keymap: None?
Maya Config Addon For Blender: Ctrl + L
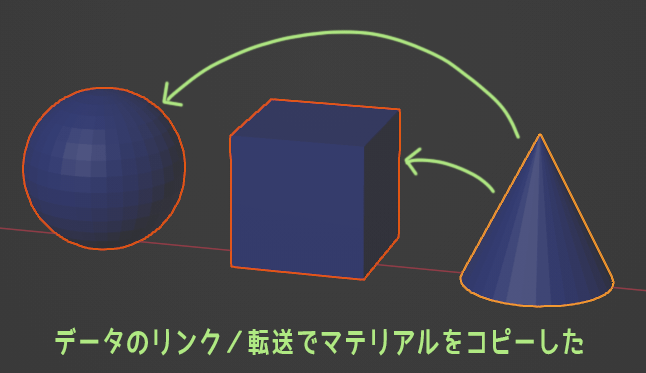
Data Link/Transfer allows you to copy and paste materials and modifiers from the active object to all other objects in the selection.
Summary: Creating an environment where you can concentrate only on modeling will help you work better

In this article, we have introduced a few things to help you work more comfortably and efficiently when modeling.
I believe that the key to an efficient and comfortable modeling process is
how to reduce the stress felt outside of modeling.
If you find yourself thinking, “I have to do this several times,” or “It’s hard to press this shortcut,” we recommend that you actively improve it, even if it is only a little at a time.
As you do this, you will gradually become less and less concerned about the “operation” part, and you will be able to concentrate on the pure “modeling” part of your work.
What I wrote in this article is only an example of an environmental improvement that I have tried, but I hope it will be helpful for each of you to improve it to your liking.
The minimum requirements for modeling in Blender can be found here [Practical] article summarizes the following.
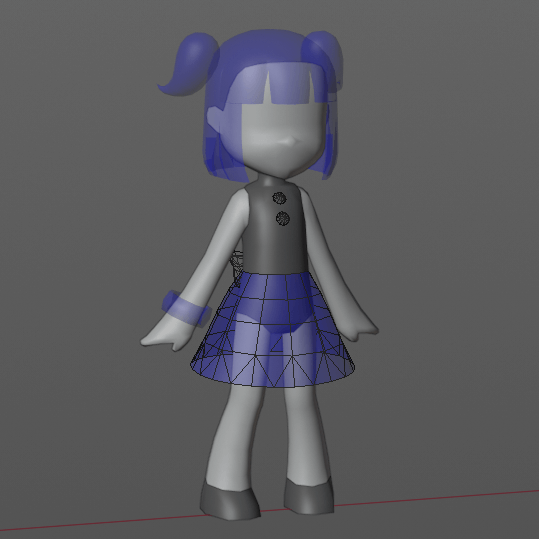
By the way, here is the model that Toha was working hard on modeling while improving the Blender environment.
地味にちまちまモデリングしてたキャラがやっとこさ見られる感じになりました〜
— トハ@3DCG暮らし (@tohawork) November 19, 2019
BlenderとUnity勉強しながらなので時間かかった!勉強した色々はそのうちブログに書きたい
作るゲームはデフォルメ系の予定なのでこのモデルまんま使うわけじゃないす^^
デフォルメやる前に作っときたかったのだ〜 pic.twitter.com/Xq1K08t9D9
I could write a little bit about everything I learned!

- Coments - コメント一覧