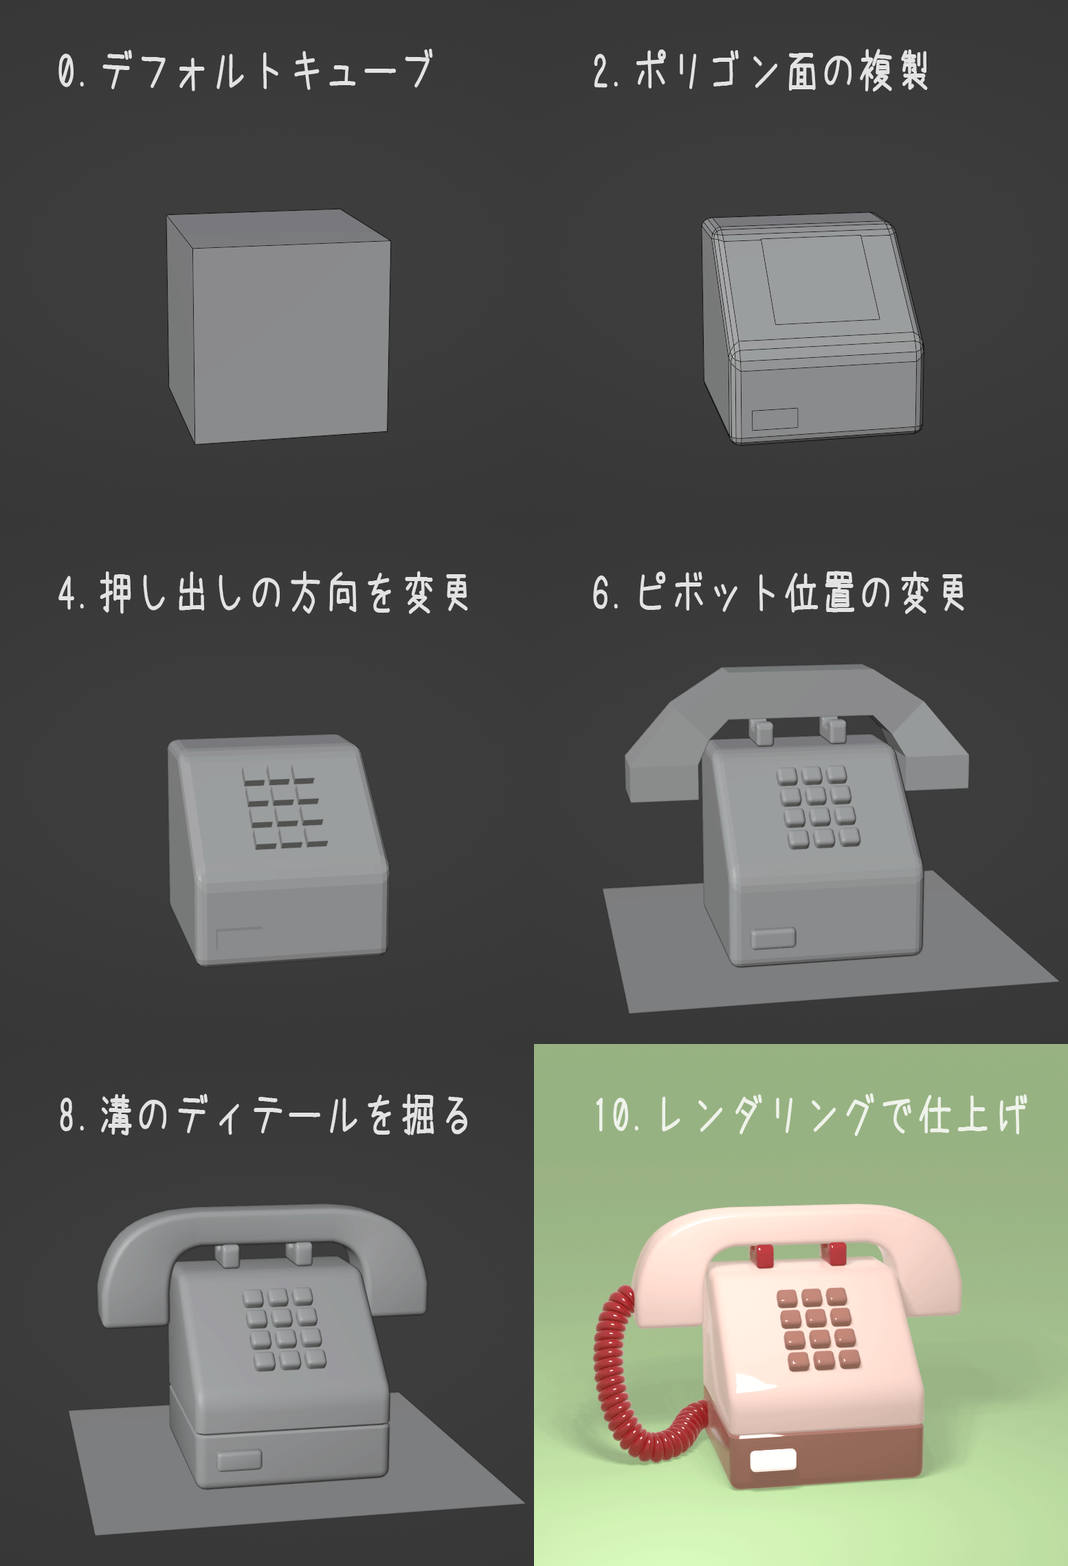
This article is a summary of a video series on YouTube.
Telephone Model Creation in 10 Steps
The 10 steps are summarized.
In this video, a telephone model is created in Blender while explaining 10 tricks that are useful to know when creating background models, etc.
I usually create mainly character models, but recently I have had the opportunity to create various models other than characters, and I am learning more and more about Blender’s useful functions.
The model is designed to be made quickly, so please feel free to try making it.
Phone model made in 10 steps Summary animation↓

YouTube video: Telephone Model Creation in 10 Steps
1) Bevel weighting
Blender has two types of bevels.
- Tool bevels
- Modifier bevels
This section shows how to use the modifier bevel to apply bevels only to specific edges and how to set the size of the bevels individually for each edge.
2) Duplicate polygon surface
In Blender, you can duplicate an object by pressing [Shift+D], but you can also duplicate a polygon surface by selecting the polygon and pressing [Shift+D].
Duplicating polygon surfaces is useful for creating details along the surface of an object, for example. This is used to create detail on the telephone model.
3) Insert polygon surface
The “Insert” tool can be used to create polygon surfaces within polygon surfaces.
In the video, I use it to create a phone button from a board poly. It is a useful tool for creating details on polygon surfaces – even better if you use the operator panel together.
4) Change the direction of extrusion
The “Extrude” tool is often used in modeling, but the direction of extrusion can be changed from the tool’s options.
“Normal” if you want to push the polygon surface toward the direction it faces.
“XYZ” if you want to move in the direction of the XYZ axis regardless of the direction of the plane
Switching between the two as needed makes the extrusion tool much easier to use.
5) Placement with snap
For example, when creating a background model, it is often desirable to place an object flush against a floor or wall. The snap function is useful in such cases.
In the video, the placement is done using vertex snapping. By switching the snapping method between “proximity,” “center,” and “active,” the result changes even with the same vertex snapping – you want to make good use of it.
6) Pivot position change
When rotating or scaling object vertices together in edit mode, the position that serves as the reference point for rotation/scaling is called the “pivot”.
When you are creating a 3D model of a background or small object, you often want to change the position of this pivot. The video shows how to pivot the position of the 3D cursor and how to pivot the position of the active vertex.
7) How to bend the handset
Step 7 shows three ways to bend the handset.
- How to use Subdivision Surfaces
- How to use spin
- How to use the Loop Tools bridge
When modeling artificial objects such as furniture and appliances, you want to create rounded corners and curves as nicely as possible. Learning the three methods shown in the video will surely help you to create various 3D models, such as curved pipes and gently rounded objects!
8) Digging trench details
Dig a trench in the telephone body where the colors are separated.
There are various ways to dig grooves depending on the shape of the object, but in this case, we will create grooves by using the Edge Subdivide -> Bevel Tool -> Scale to Reduce. Smooth shading will be applied to the entire model to improve its appearance.
9) Create code with curves
Make a cord to connect the telephone body to the handset.
- Creating the base of the screw code with the screw modifier
- Add a curve and position it to connect the main unit to the handset.
- Use the curve modifier to move the chord to the position of the curve
You can easily create a screw code by following the above three steps.
If you use an array modifier instead of a screw, you can create the kind of code that is not circled.
10) Finishing with rendering
The final step is to set up and finish the rendering.
Adjust the materials and lights to give the overall glossy and clean look – the phone model created in 10 steps is now complete!
In this video series, we use many useful tricks when making background models in Blender. After watching all the videos, I am sure you will be able to make various models other than phones.
Toha-channel is running slowly~
What did you think of the 10-part video series?
YouTube is a style of uploading again when I feel like it, but I am sure I will make some kind of video and upload it again sometime.
So, thank you for your continued support of Toha-channel!

Subscribe to my channel~


- Coments - コメント一覧