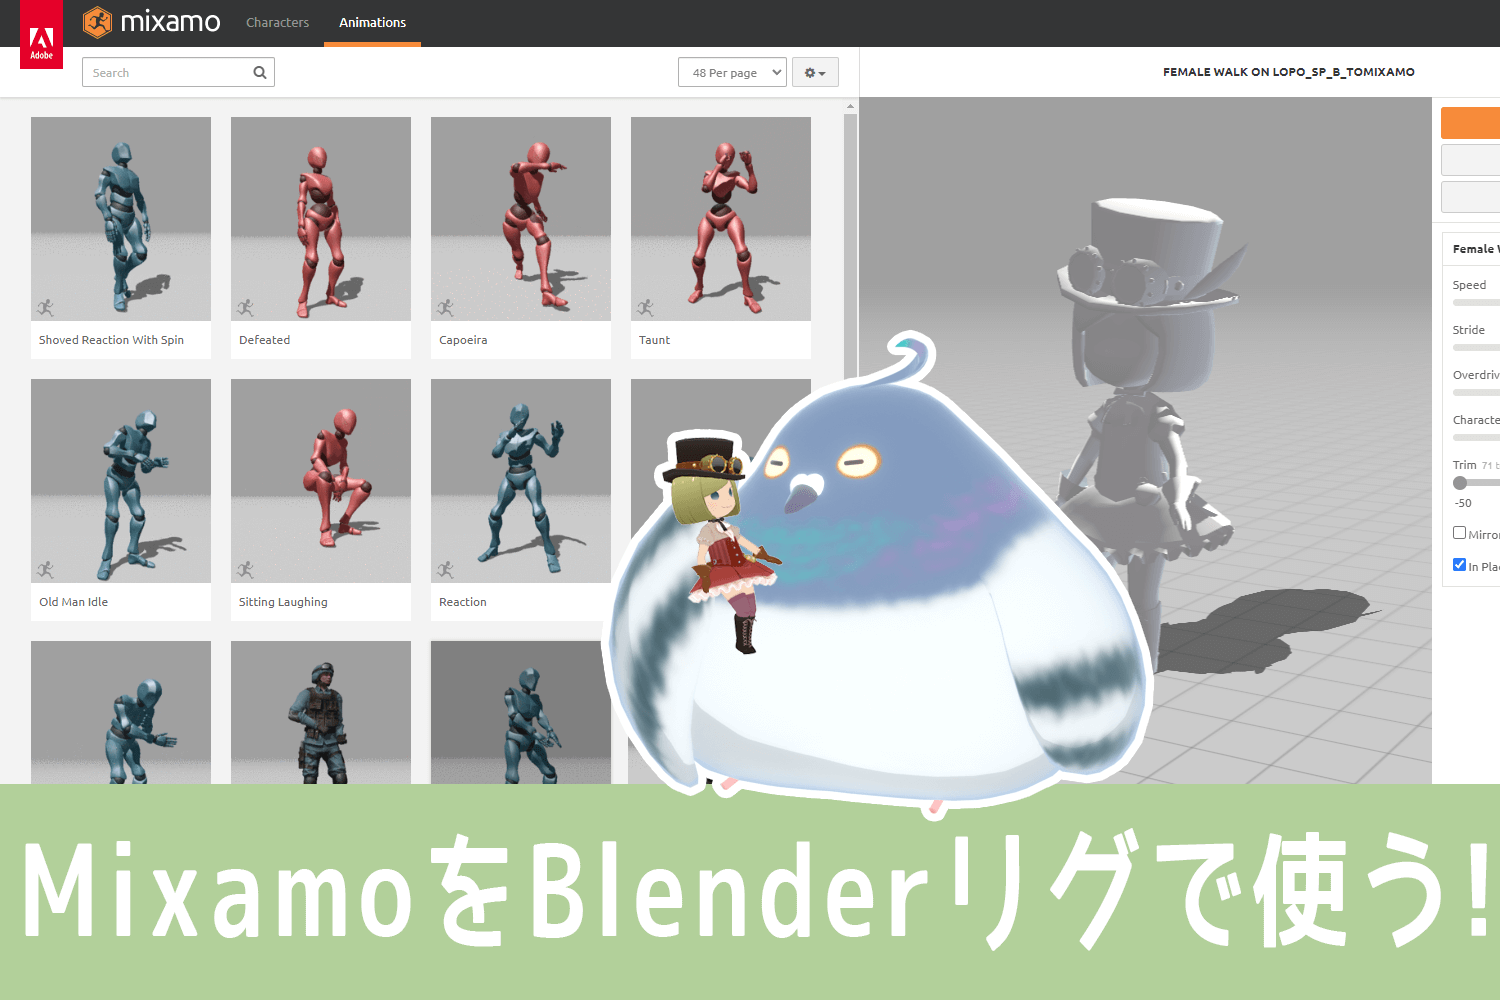

Mixamo is a web service that provides 3D character models and animation of the models.

It is operated by Adobe and is free to anyone with an Adobe ID.
And Mixamo Animation is available for commercial use. Wow.
In this article, we will summarize how to use these amazing Mixamo animations in a real way using Blender.
If you want to do the following, this article should help!
- Want to move my 3D character for now.
- Want to rig my 3D character models so that I can create animations in Blender.
- Want to use Mixamo animations on existing character models with Rigify rig.
- Want to adjust Mixamo’s animation to my liking and use it.
Let’s see what we can do!
- What does it mean to use Mixamo animation in earnest?
- 3 patterns for using Mixamo depending on the model setup situation
- Case.1: When there is only a character model without bones
- 1) Upload FBX of character model to Mixamo
- 2) Semi-automatic setting of bones & weights for character models with Mixamo tool
- 3) Apply your favorite animation to the character model with Mixamo
- 4) Download character models with animation from Mixamo
- 5) Obtain and install the Blender add-on from the official Mixamo
- 6) Add a Mixamo rig to a character model using an add-on in Blender
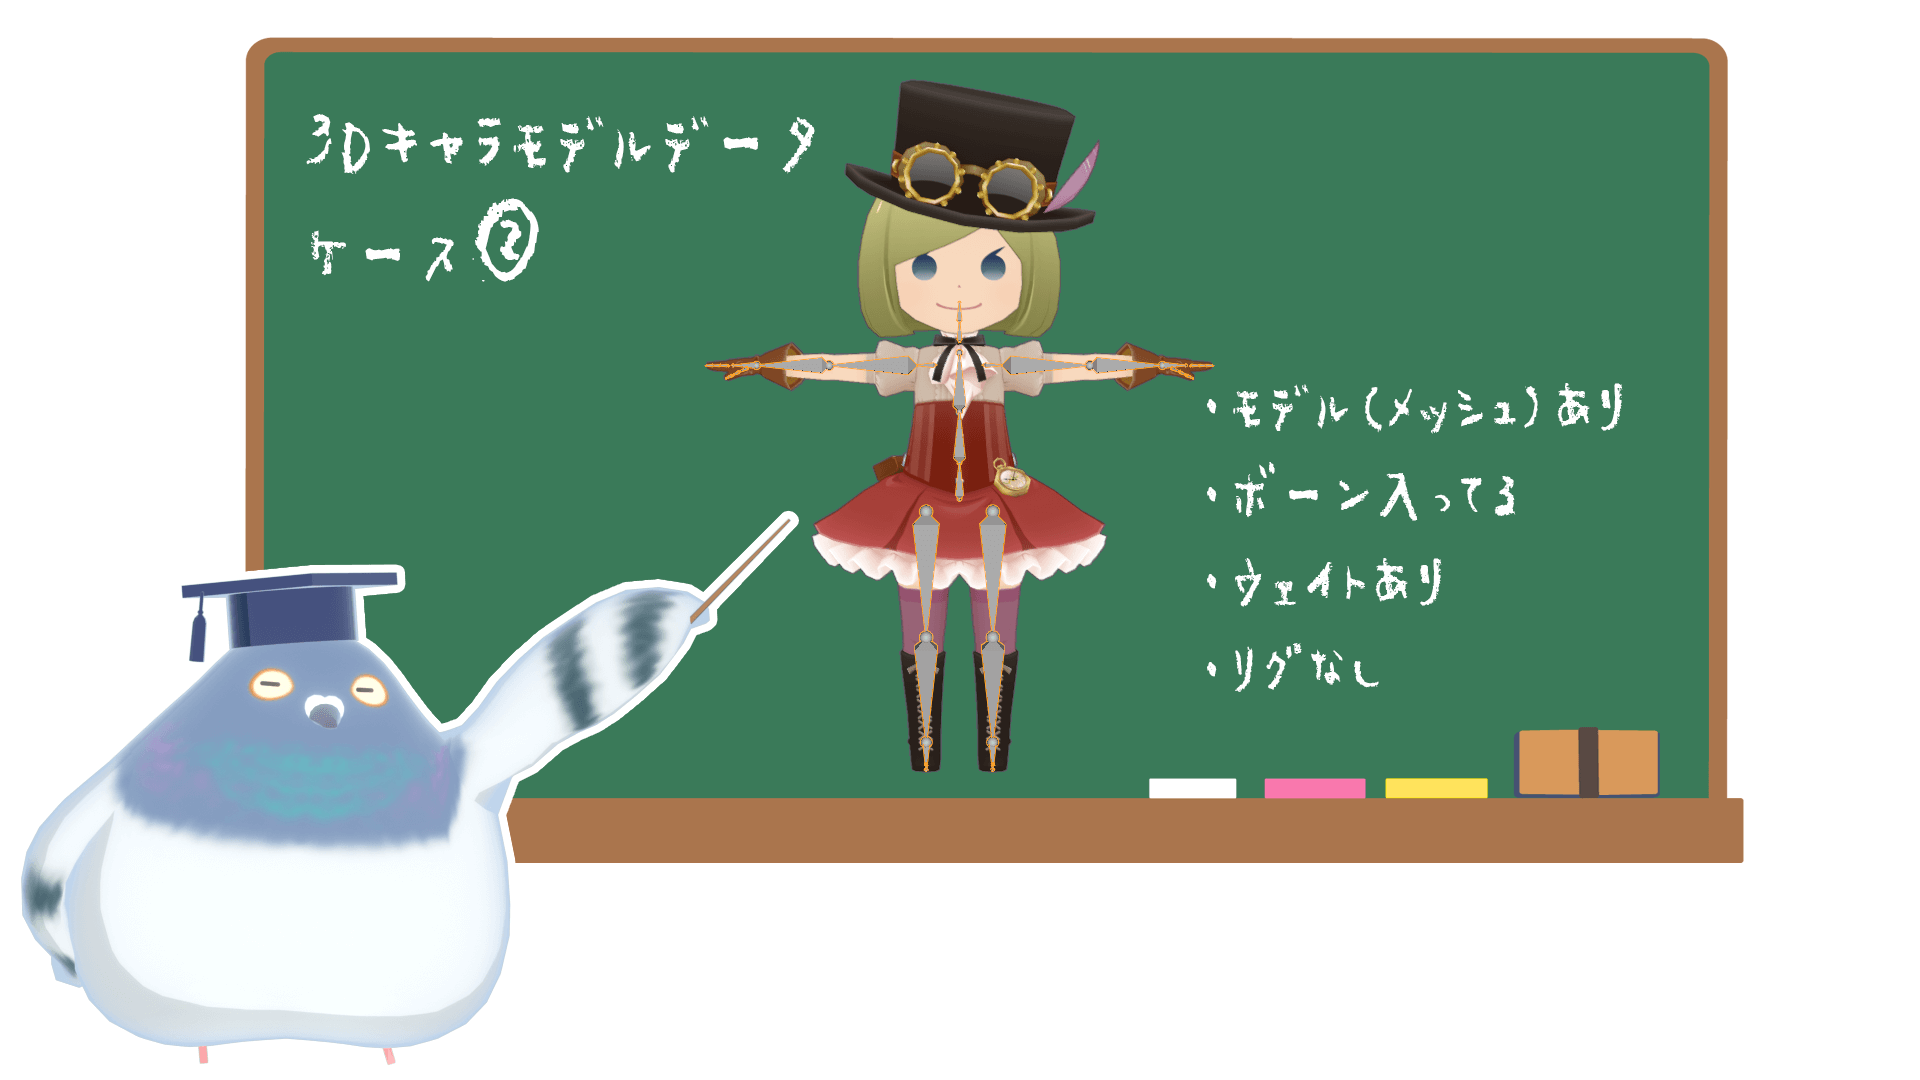
- Case.2: When you have a character model with bones and weights, but no rig
- 1) Change the bones (armature) of the character model to a Mixamo-compliant structure
- 2) Upload FBX of character model to Mixamo
- 3) Apply your favorite animation to the character model with Mixamo
- 4) Download character models with animation from Mixamo
- 5) Get the Mixamo to Rigify add-on and install it in Blender
- 6) Import FBX into Blender using Mixamo to Rigify
- Case.3: When you have a character model with bones & weights already set in the Rigify rig
- 1) Check if Mixamo animation can be used on existing Rigify models without modification
- 2) Change the bones (armature) of the character model to a Mixamo-compliant structure
- 3) Upload FBX of character model to Mixamo
- 4) Apply your favorite animation to the character model with Mixamo.
- 5) Download character models with animation from Mixamo
- 6) Get the Mixamo to Rigify add-on and install it in Blender
- 7) Import FBX into Blender using Mixamo to Rigify
- 8) Save the animation to Blender data and append the Rigify action to it.
- How to adjust Mixamo animations poured into a rig
- Caution! Redistribution of Mixamo models and animations is prohibited!
- Summary: Good use of Mixamo animation can save time and study!
What does it mean to use Mixamo animation in earnest?

This article is written for the “use in earnest” of Mixamo animation.
What does it mean to be a full-fledged user? Let me explain a little bit about
If you just want to use Mixamo’s animations “quick and easy,” the method is simple.
- Log in to Mixamo and upload FBX of your character model.
- Apply your favorite motion in Mixamo to the uploaded character model.
- Download the animated character model FBX from Mixamo.
This is all you need to do.
However, if you want to use Mixamo animation “in earnest” for character models in game production, for example, the above methods will not be sufficient.
Specifically, after downloading a Mixamo animation, you will want to do the following
- Want the animation to match the character’s head height, etc. exactly.
- Want to further adjust the downloaded Mixamo animation.
- Want to rig a Mixamo animation model for adjustment in Blender.
- Want to use Mixamo animations on existing rigged Blender models.
This is something that I wanted to do when using Mixamo animation during the creation of my game.
Then I looked up how to do it, and here’s what I did!
MagicaCloth2できた~
— トハ@3DCG暮らし (@tohawork) February 16, 2023
戦うゲームやと激しく動いても突き抜けとか布ぶっ壊れが極力でない揺れものにしたい
MC2はエッジ衝突判定とバックストップを設定できるのがありがたい~ローポリ&BoneClothでもイケる
2/25まで50%off/MC1持ちは80%off🏴https://t.co/ik2RiwXO50
モーションはMixamoでっす pic.twitter.com/smhd8FXcem
The characters in my game are deformed and have slightly low heads, so applying Mixamo’s animations as is often does not work well.
Also, since the model was already set up in Blender’s Rigify, it took some trial and error to get the Mixamo animation to work in Rigify.
After all the hard work, we are now able to use Mixamo in a good way, so I will summarize what I researched at the time + additional research I did for the article.
I am sure this will be helpful for those who want to do something similar to what I do!
3 patterns for using Mixamo depending on the model setup situation
Now, let’s get into the explanation of how to use Mixamo in concrete terms.
If you want to use Mixamo animation earnestly in Blender, the way you do it depends on the setup of the character model to which you want to apply the animation.
In this article, we will discuss the following three patterns.
Case.1 When there is only a character model without bones
Case.2 When you have a character model with bones and weights, but no rig
Case.3 When you have a character model with bones & weights already set in the Rigify rig
Please read this in the context of the situation of the character model you have at hand.
If you do not have an Adobe account, please refer to the following article for information on how to log in to Mixamo.

Case.1: When there is only a character model without bones
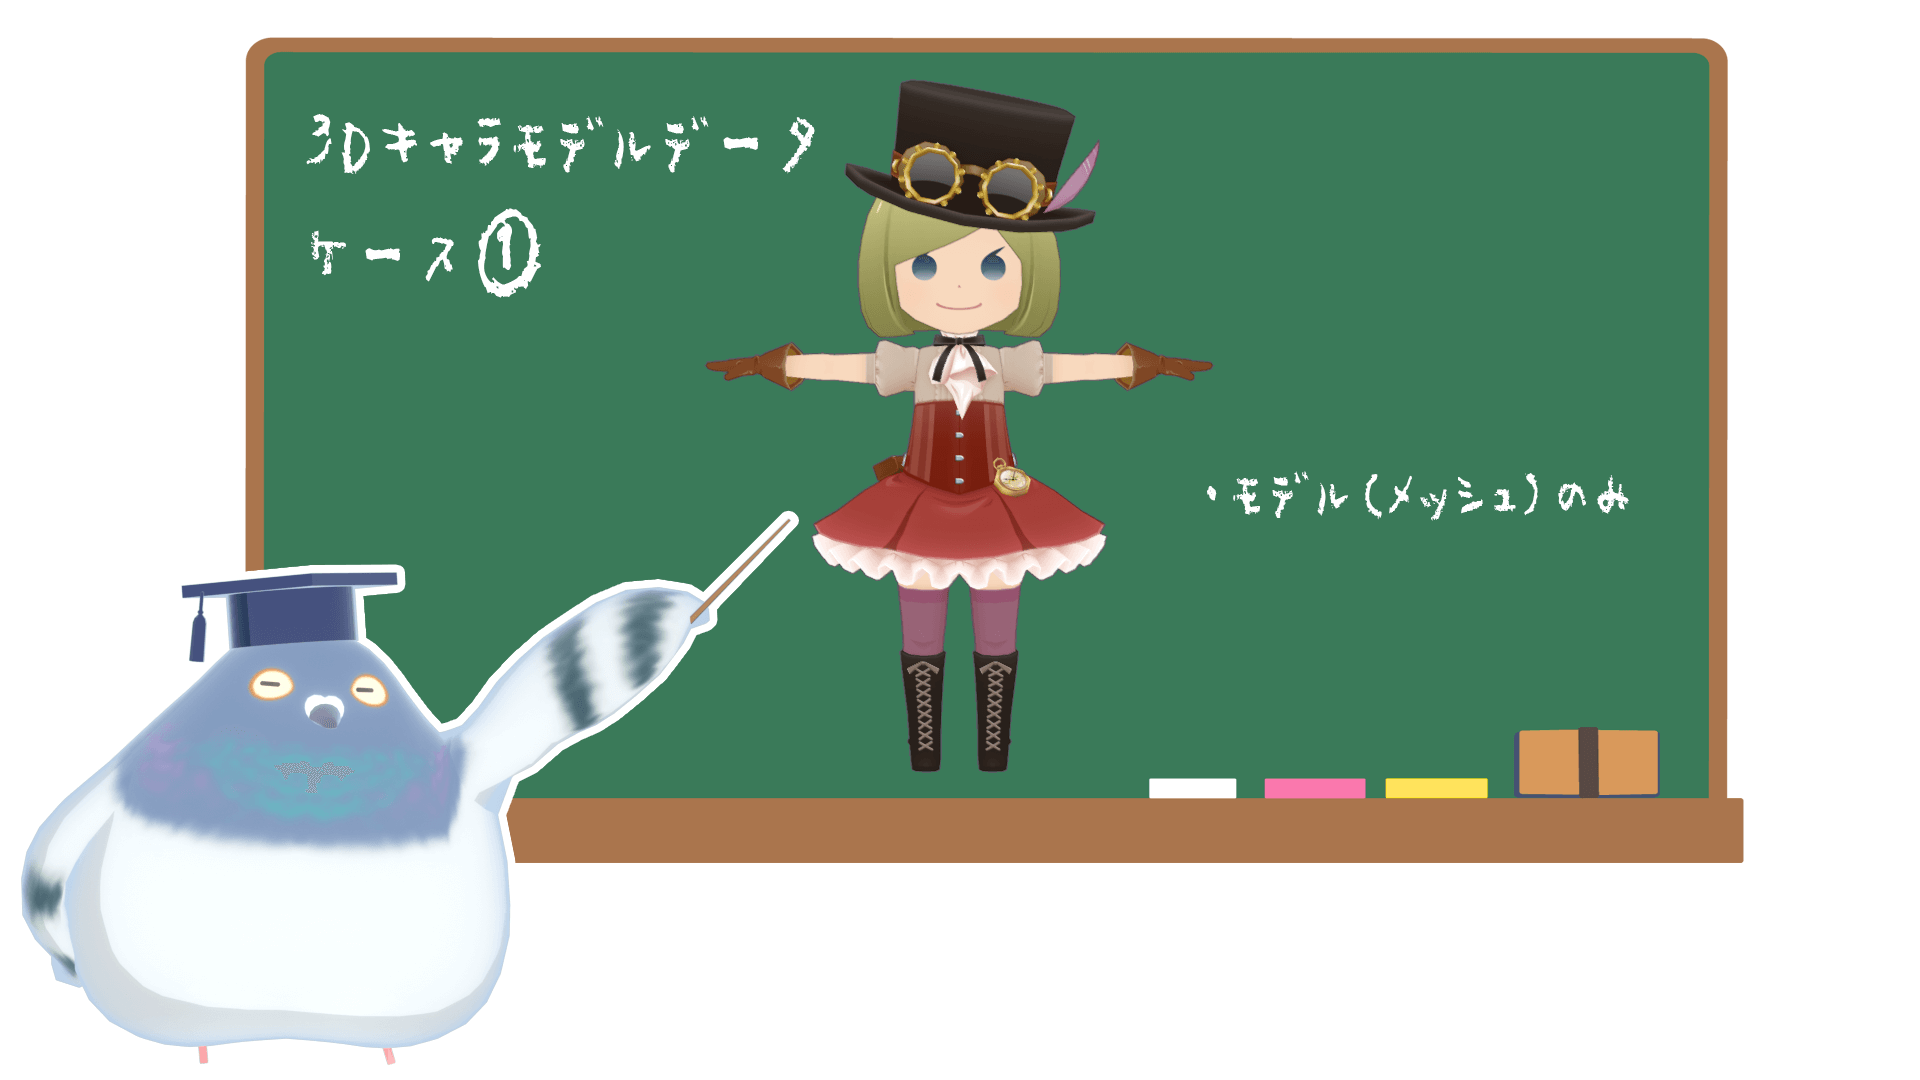
Case.1 is the case where a character model with only a mesh is used.
The easiest way to take full advantage of Mixamo’s services is to use a character model without bones, just a mesh. You can even go as far as to attach a Blender rig to the character model.
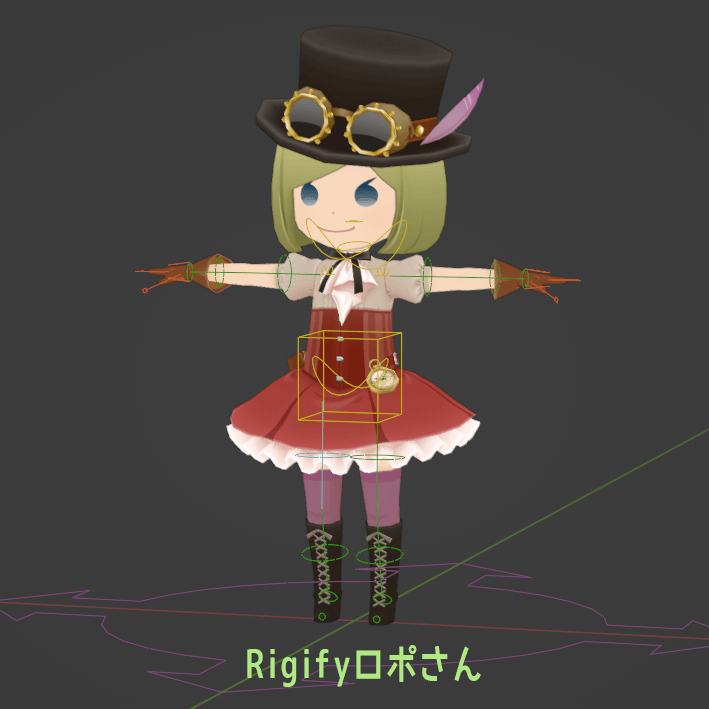
In this article, we will use the model of Lopo-san as an illustrative model.
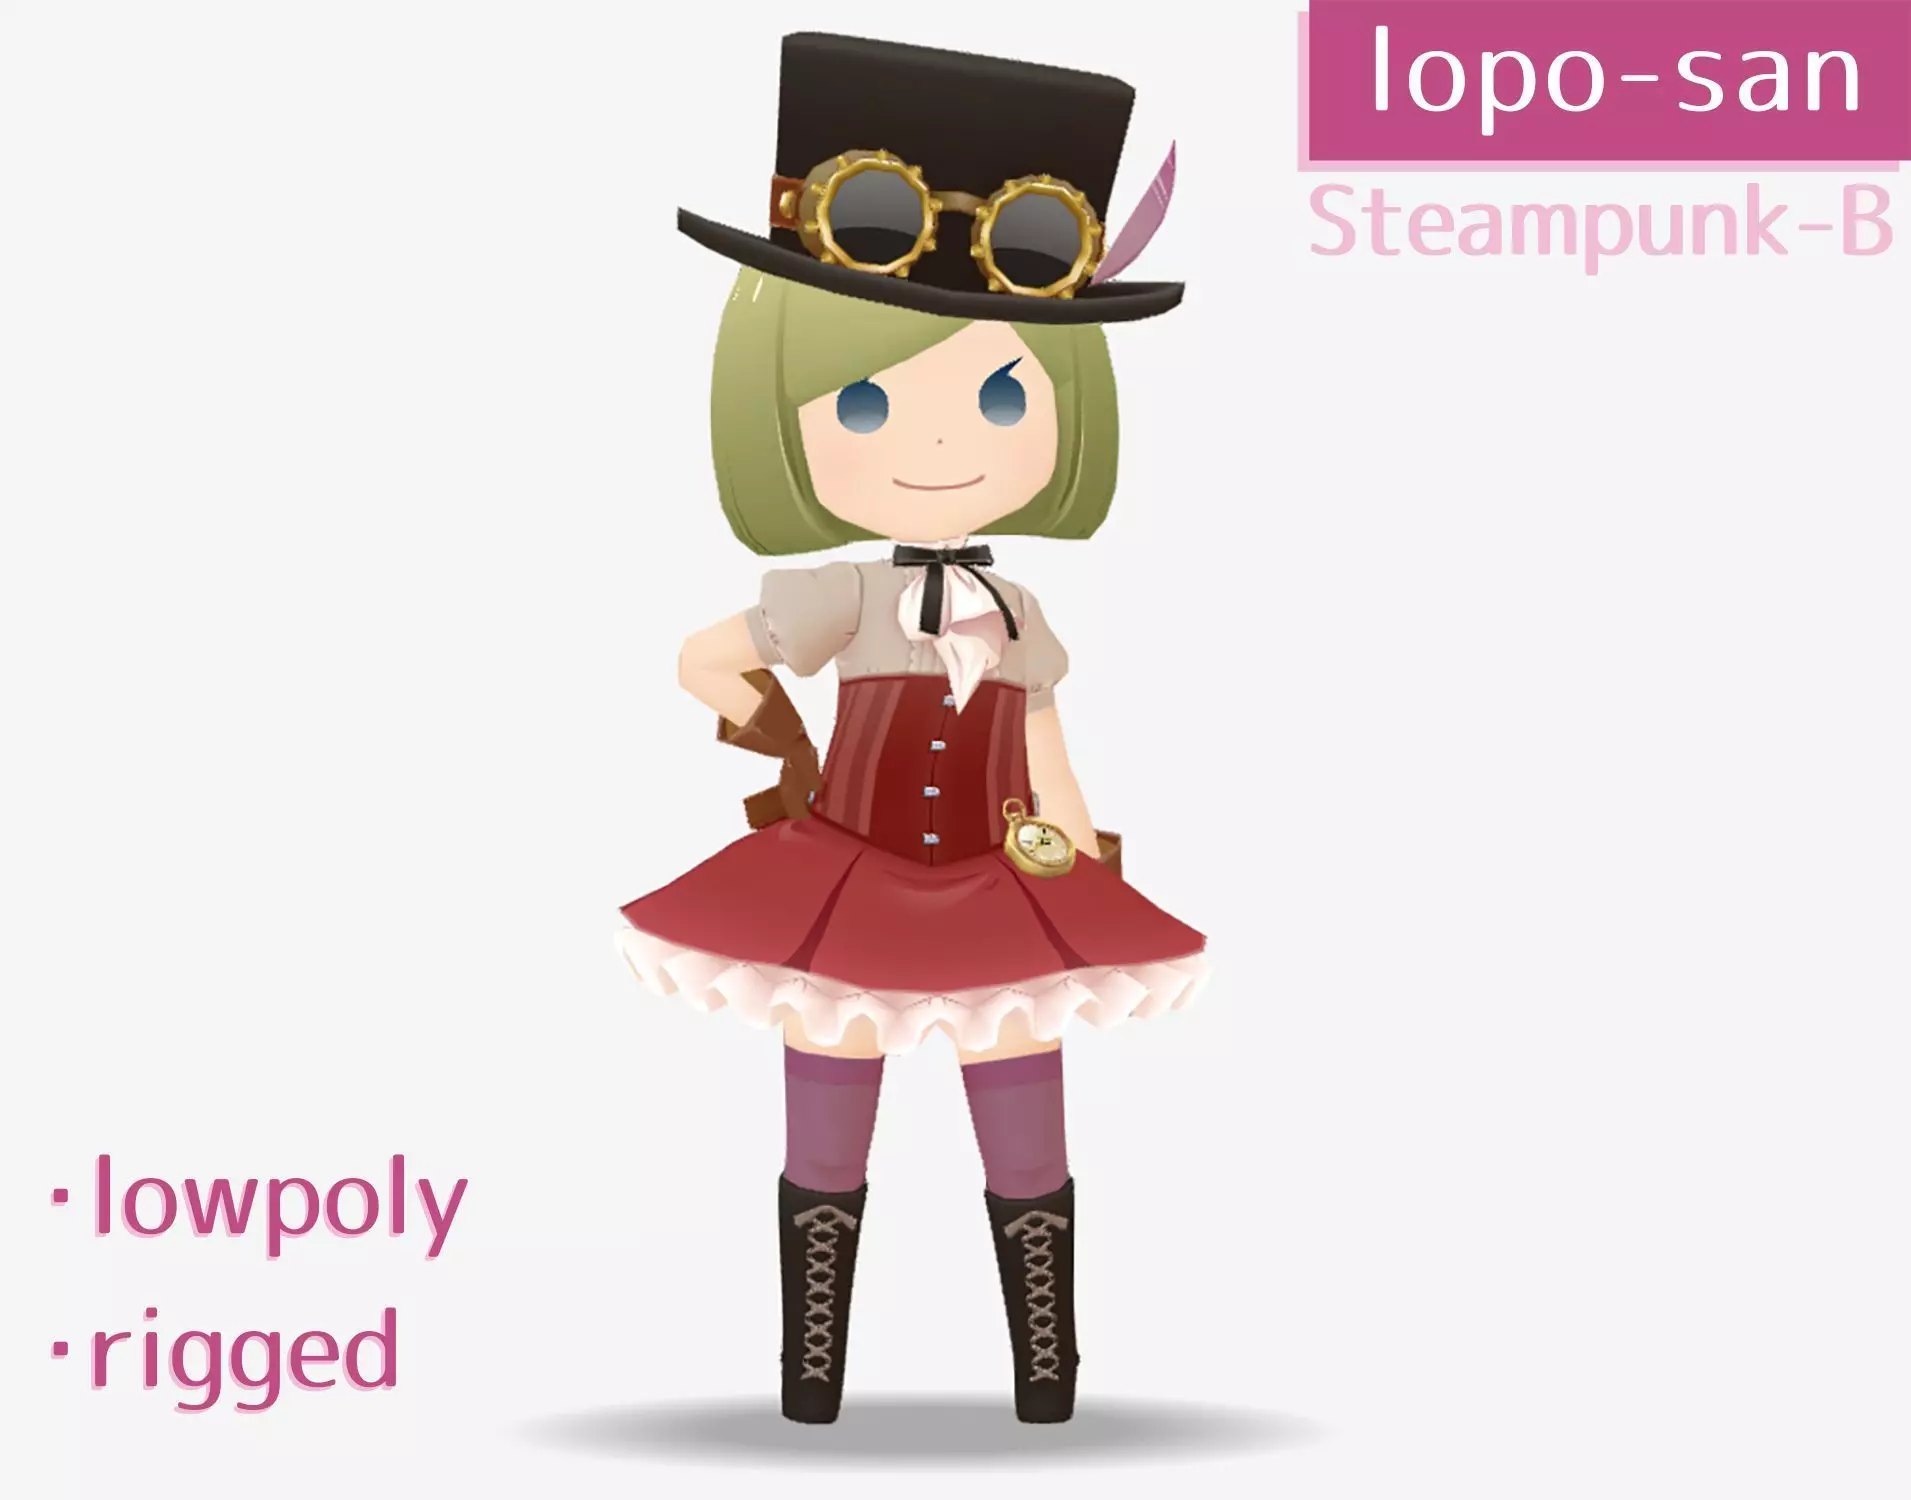
Lopo-san’s model has bones and weights already set, but here we have a separate FBX with only the mesh of the model exported, which we will use to explain the model.
1) Upload FBX of character model to Mixamo
Upload the character model (mesh only) data to Mixamo from the [UPLOAD CHARACTER] button in Mixamo. FBX and OBJ data formats are supported.
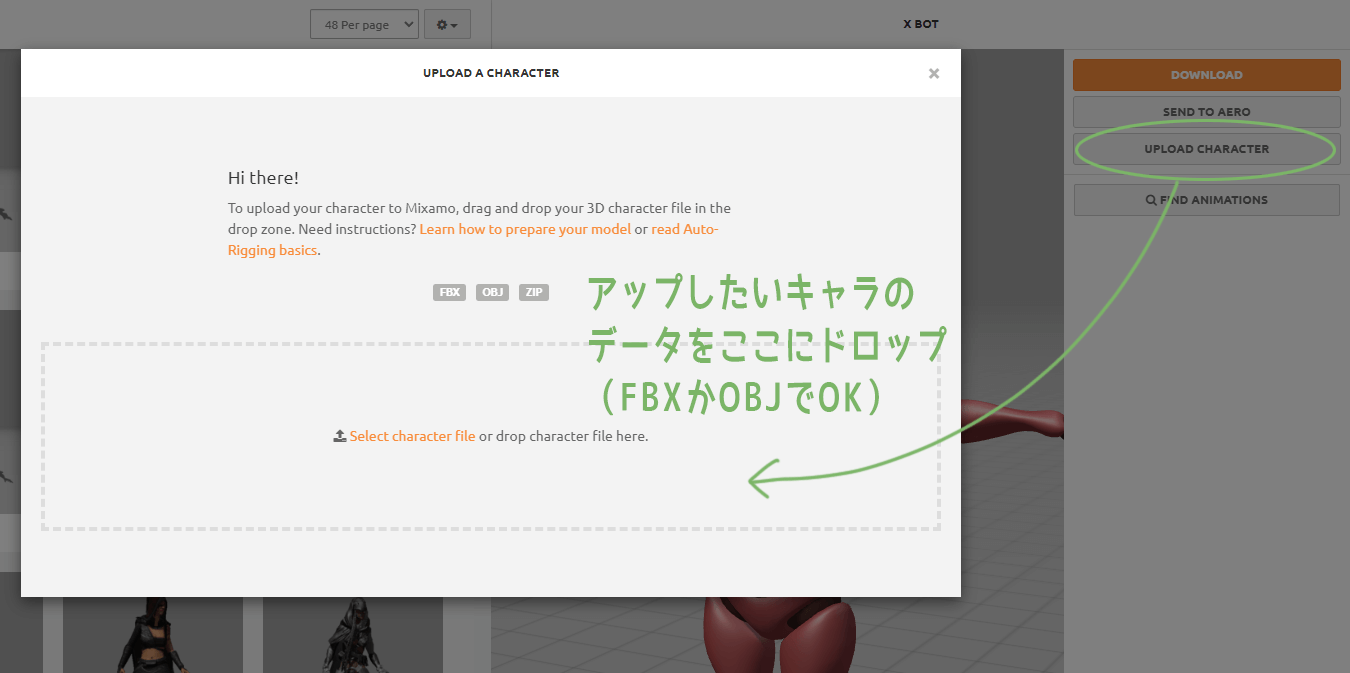
If you upload the file normally, no textures will be included, but if you just want to use the animation, no textures are needed, so proceed as is.
*If you would like to upload a textured model to Mixamo, please refer to this article.

2) Semi-automatic setting of bones & weights for character models with Mixamo tool
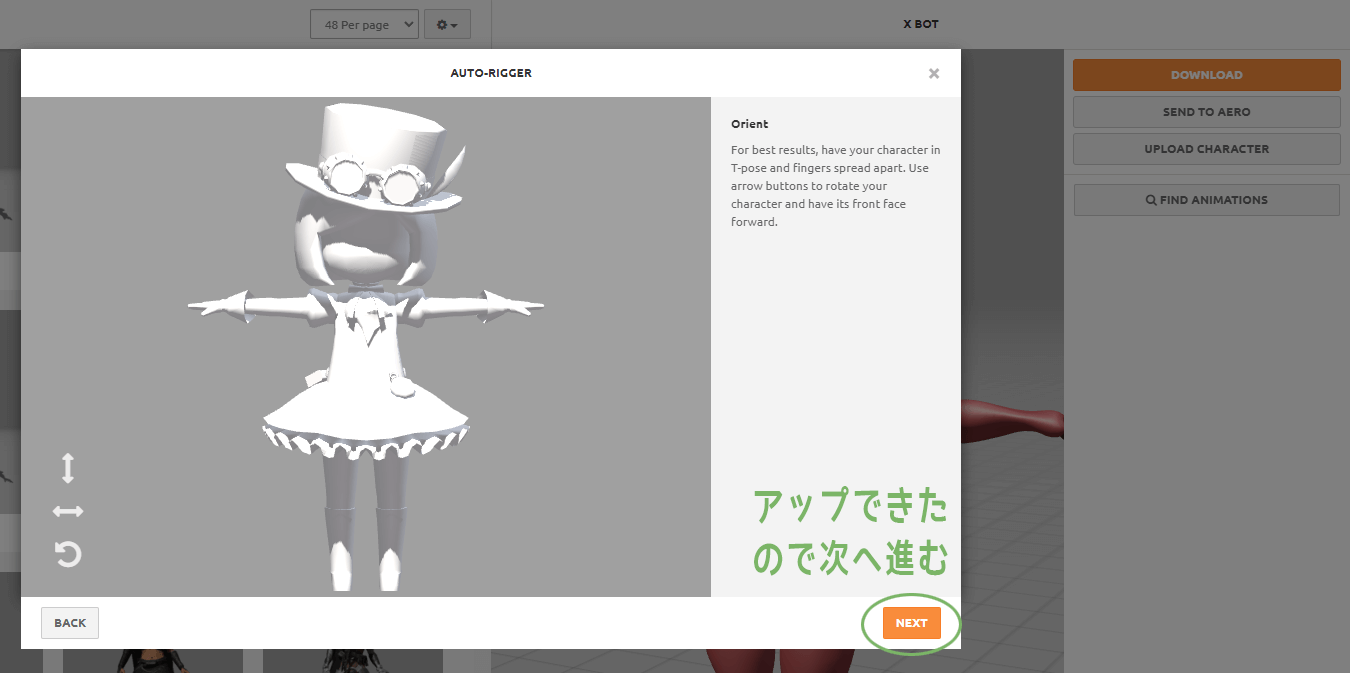
When you proceed to the next step, you will see a screen like this, where you can specify the joint positions, etc. for the character model.
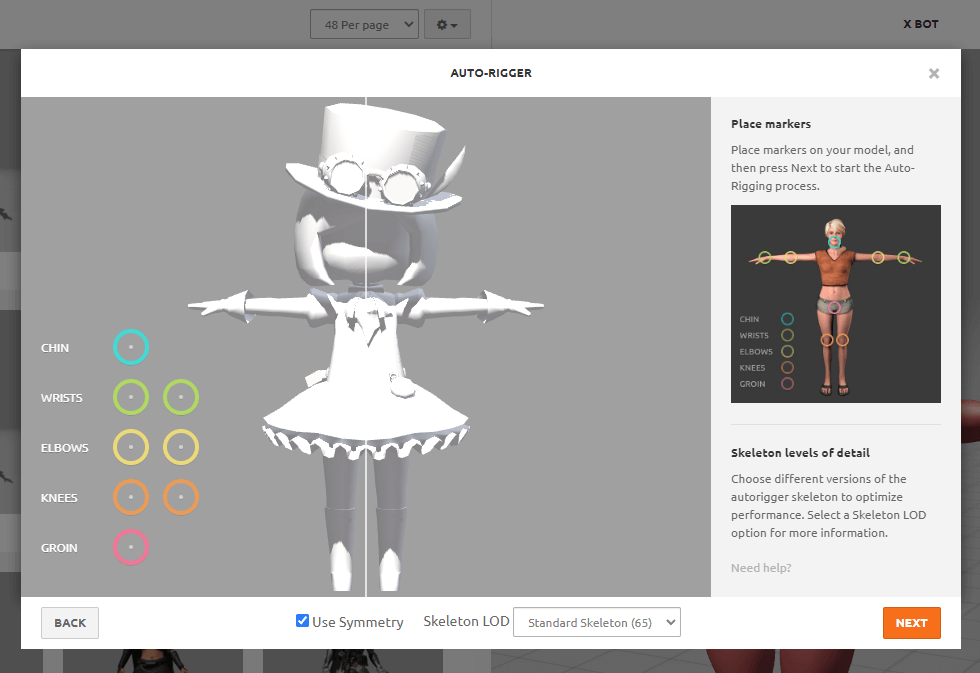
After specifying, proceed to the next step and wait for a while, and the bones and weights will be automatically set on the uploaded character model. It is great because it adds weight quite nicely.
3) Apply your favorite animation to the character model with Mixamo
Now you can apply Mixamo animations to your uploaded character model.
Search for the animation you want from the Animations tab and click on the thumbnail to make the model move.
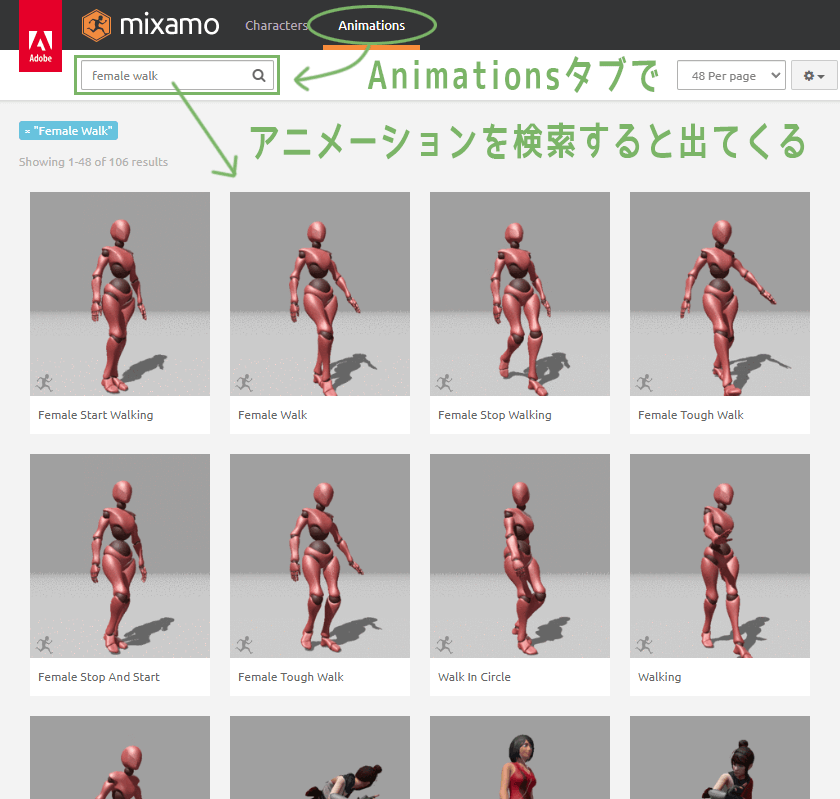
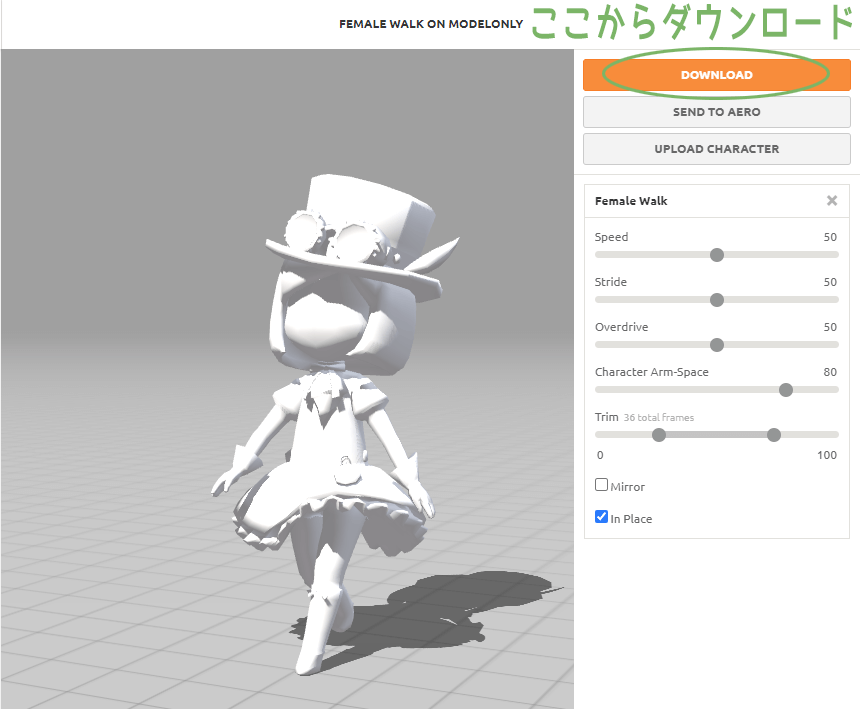
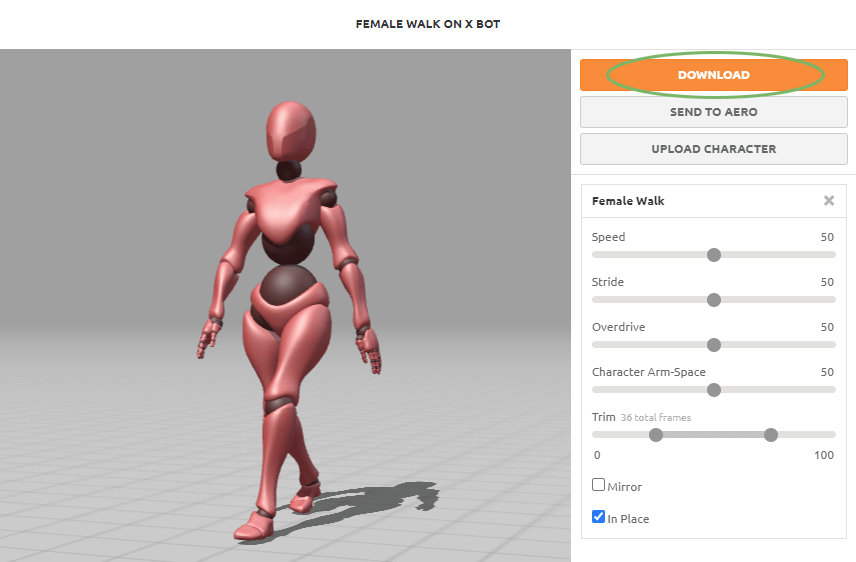
The menu on the right allows you to walk in the place, and adjust the width of the hand spread and the speed of the animation.
4) Download character models with animation from Mixamo
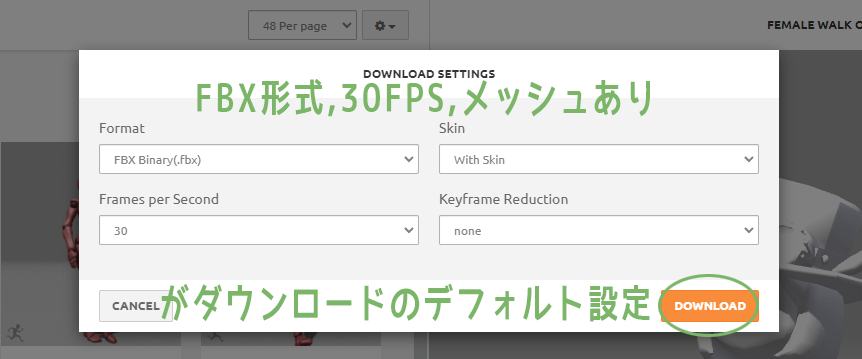
After the adjustments are made, download the FBX character model with animation.
Since there is no problem with the default settings, press the [DOWNLOAD] button as is.
An FBX will be downloaded and saved.
5) Obtain and install the Blender add-on from the official Mixamo
To add a Mixamo rig in Blender, use the add-on provided by the official Mixamo.
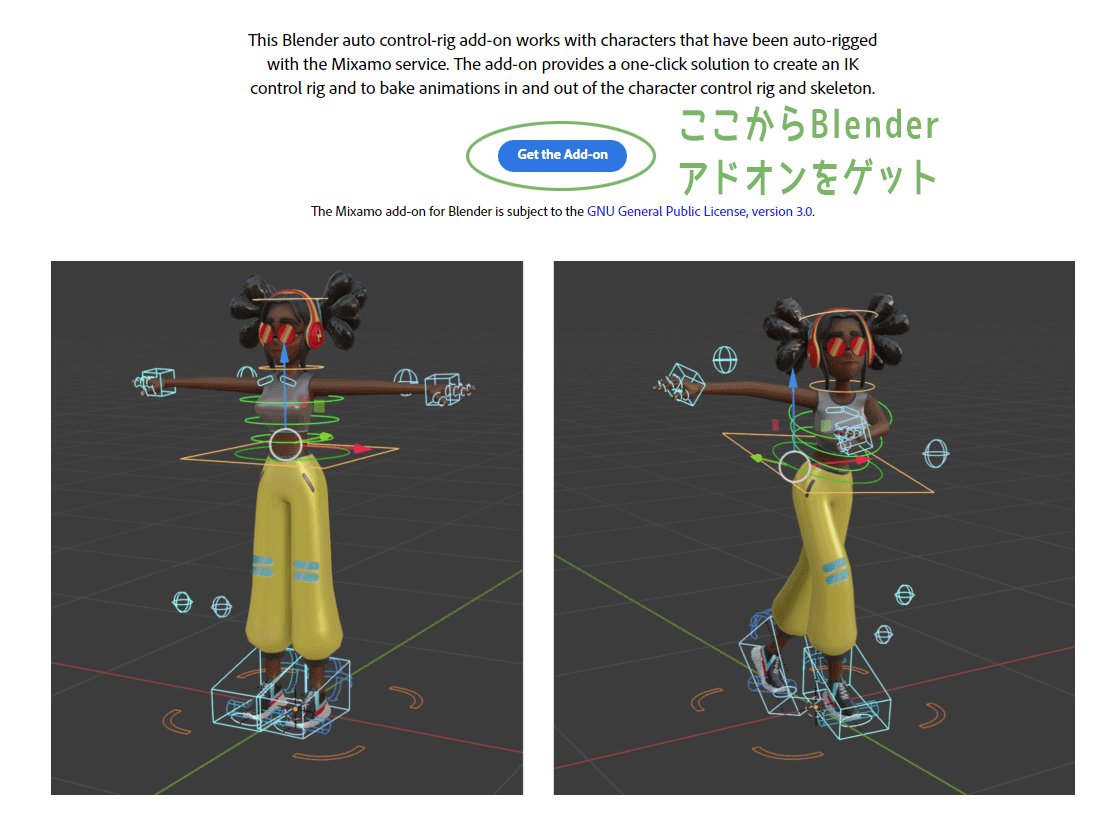
Click the [Get the Add-on] button to download the Blender add-on.
The downloaded add-on should be installed in Blender.
6) Add a Mixamo rig to a character model using an add-on in Blender
The FBX of the character downloaded from Mixamo will be rigged in Blender.
First, open Blender and import the relevant FBX data with the standard FBX importer.
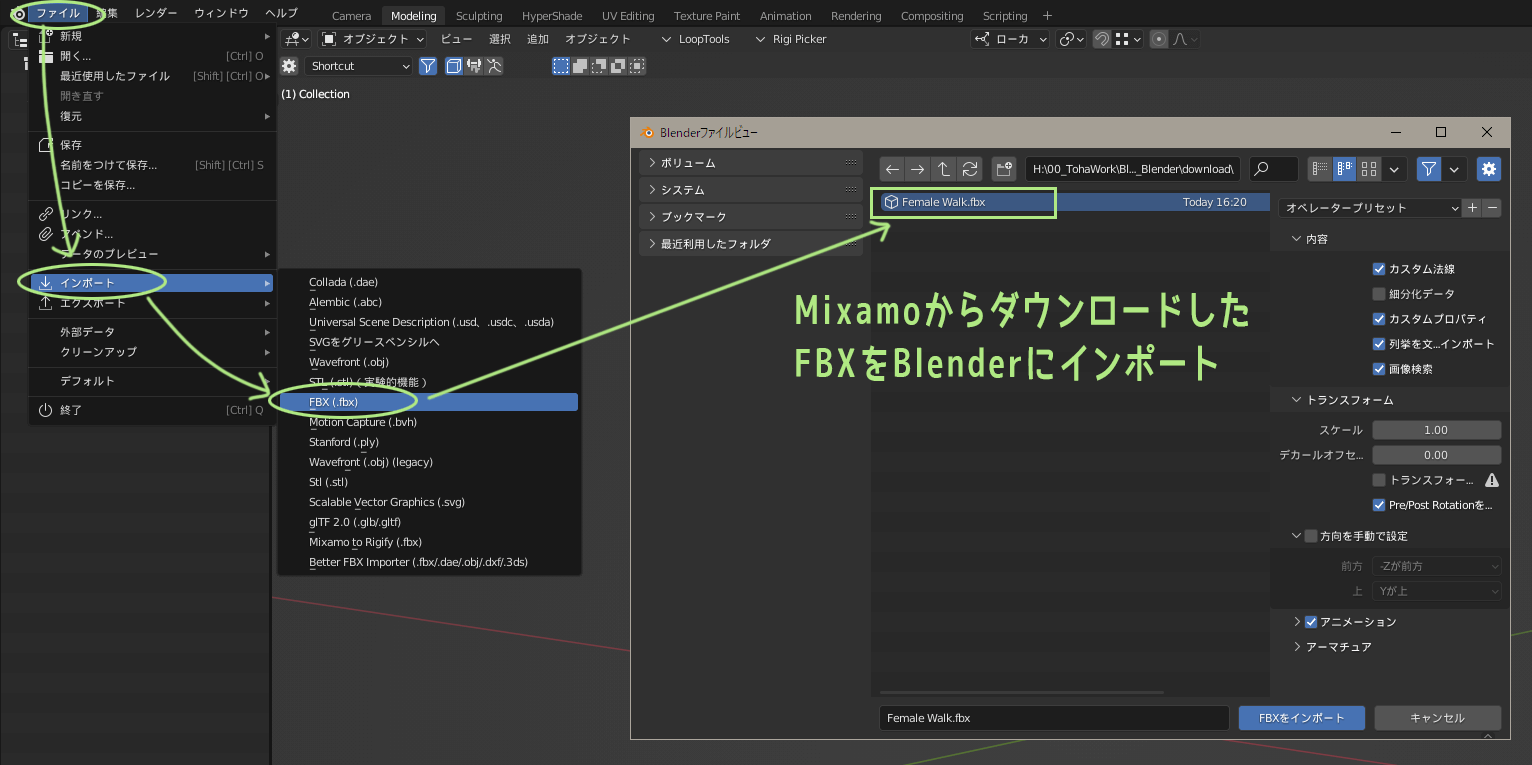
Once you have imported the FBX into Blender, open the “Mixamo” tab in the sidebar.
*The Mixamo tab will appear when the official Mixamo Blender add-on is enabled.
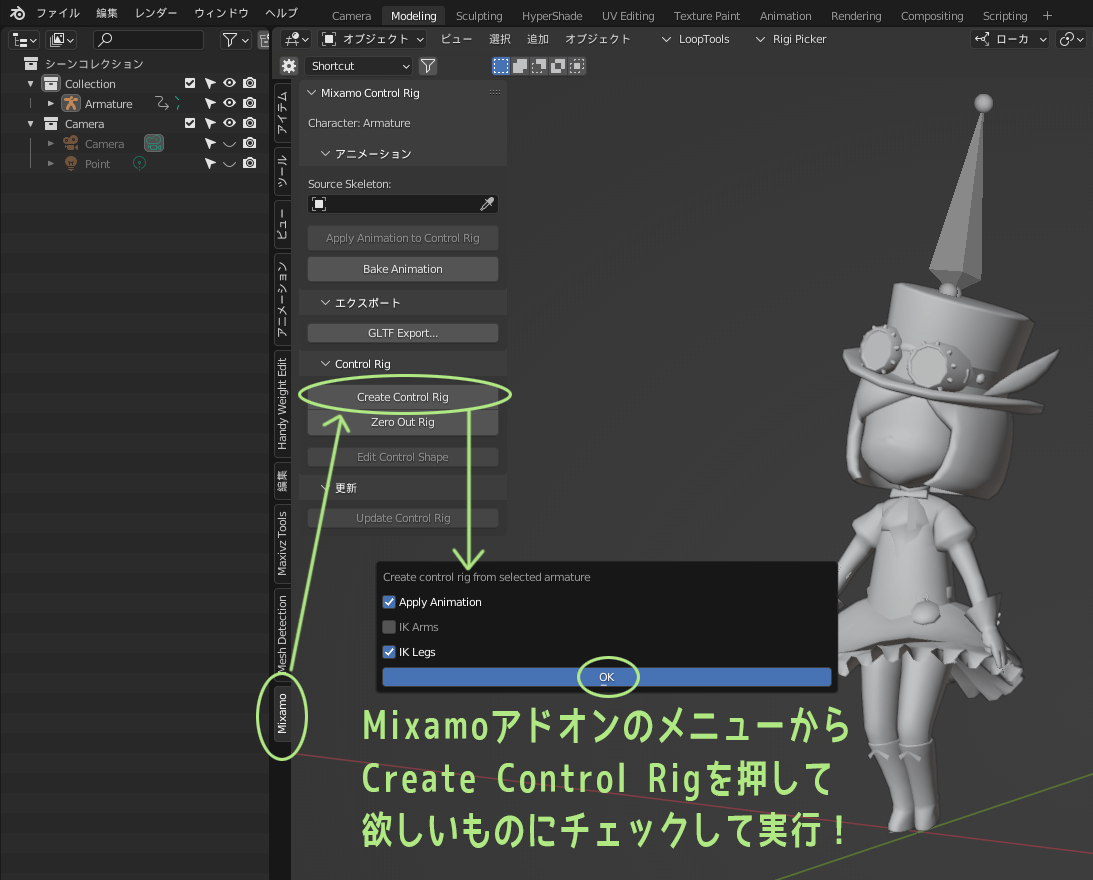
Click on the [Create Control Rig] button in the menu and set up the rig in the pop-up that comes up. Since we want to make the legs an IK rig, we check the Apply Animation and IK Legs checkboxes.
Ta-dah!
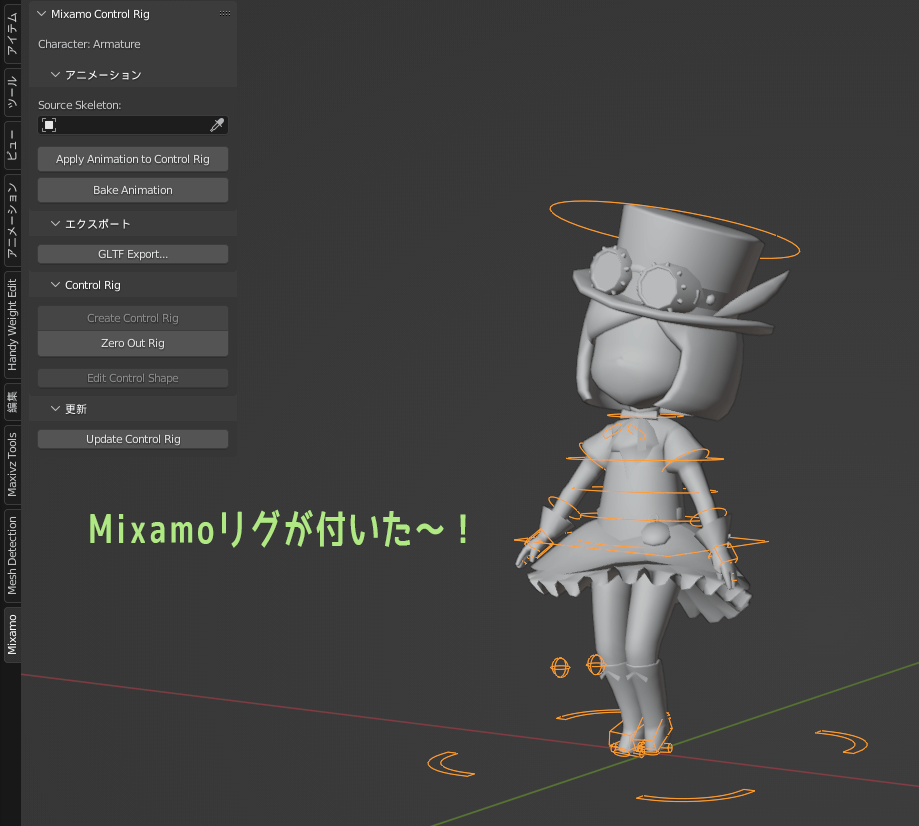
So, we were able to rig the character model in Blender, where there was only a mesh~.
It also comes with animation, so it will walk properly when played back.
Case.2: When you have a character model with bones and weights, but no rig
Case 2 is a case where the bones and weights set in the character model are to be used as they are.
Mixamo’s automatic weights are pretty good, but if you have a character model that is already weighted, I would like to use those weights.
When using such a model, it is not necessary to specify joint positions with the Mixamo tool.
But!
If you want to add even a rig in Blender, uploading the model takes a little more work.
1) Change the bones (armature) of the character model to a Mixamo-compliant structure
This is the most time-consuming part, but you need to do it if you want to rig it with the Blender add-on.
When rigging a character model using a Blender add-on, the add-on looks at the structure of the armature and the names of the bones and processes them. Because of this,
Character models whose bone structure and names are not Mixamo compliant cannot be rigged with add-ons.
Note that the add-on for rigging in Blender is available here.

It is a paid add-on, but it is inexpensive at $5, so it is easy to install.
This add-on allows you to attach Rigify rigs to models downloaded from Mixamo. mixamo to Rigify has been updated and now works with Blender 4.2.
*For an overview of Rigify, see this article Rigify and HumanIK for more information.
So, the first step is to change the bone structure and name of the character to be uploaded to Mixamo and prepare the model data to be processed by the add-on.
Specifically, the following actions are required
- Basic bones Hip, Spine, Neck, Head, Arm, Hand, Leg, and Toe are required. (Finger is not necessary)
- If there is no toe (Toe) and bone, create a new one.
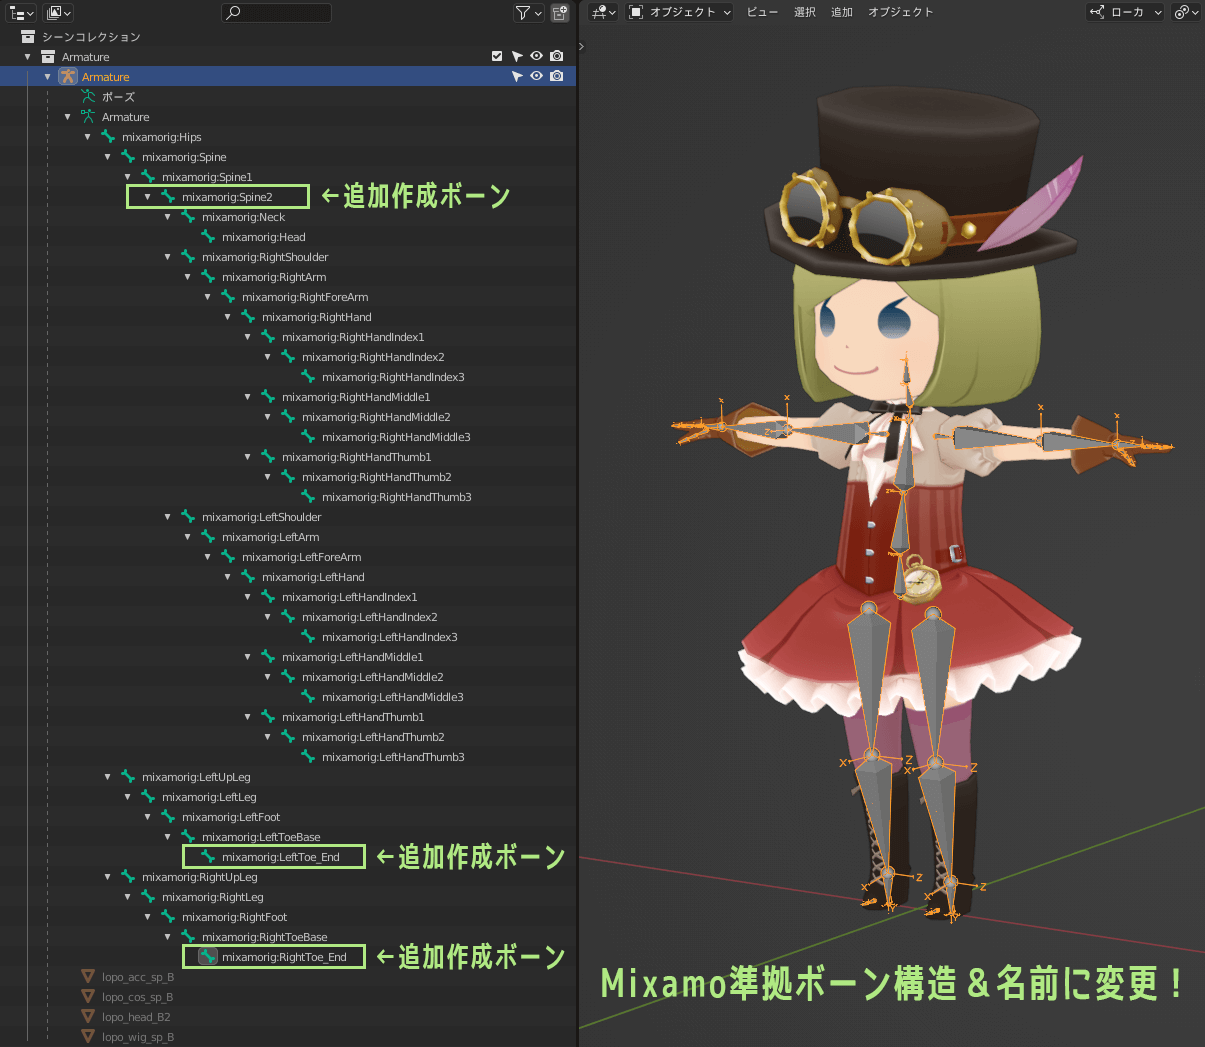
- Three spines (Spine) bones are required, if there are not enough, create additional bones.
- Rename all bones to the same name as the Mixamo model.
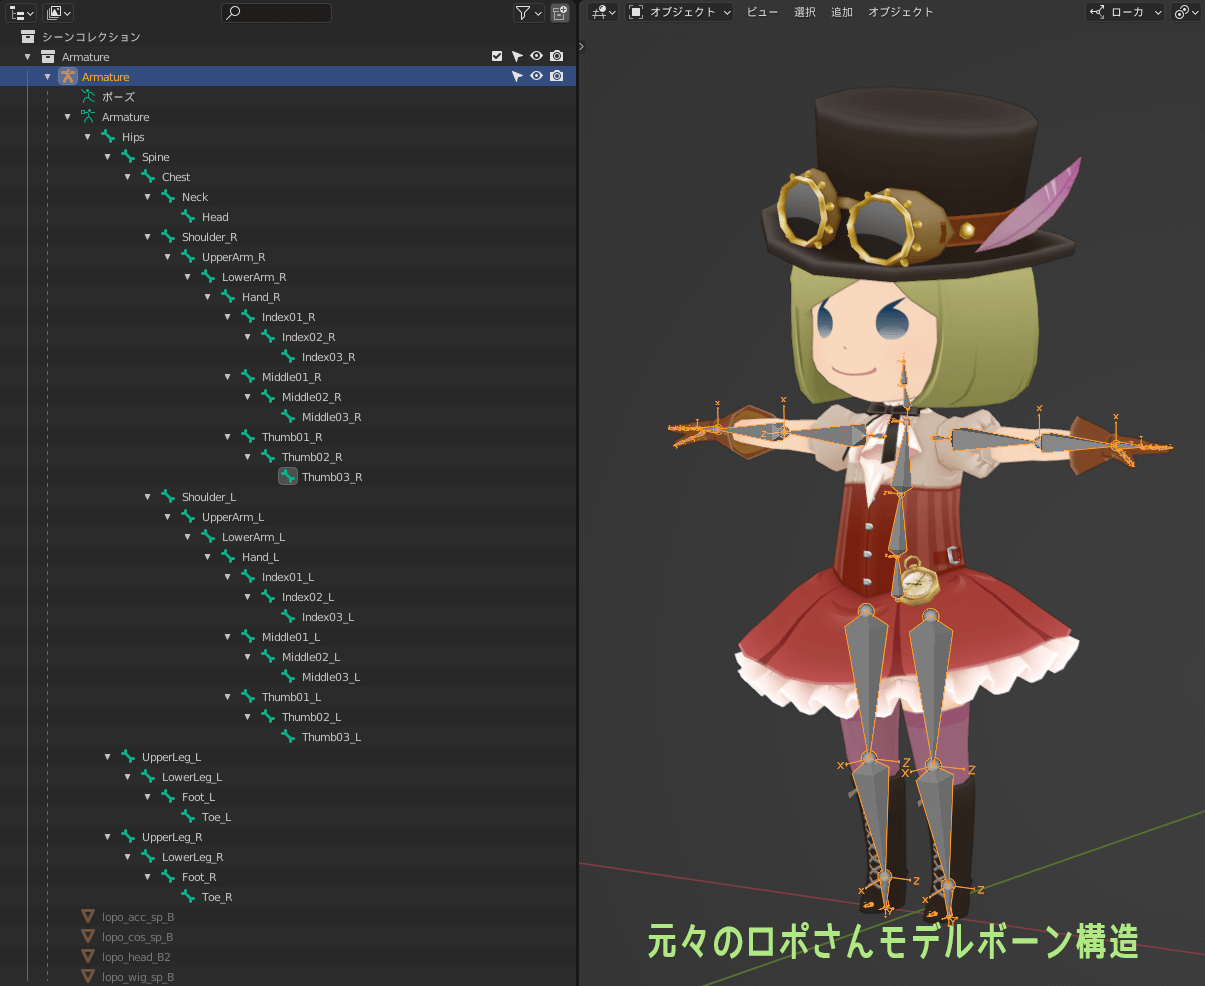
The model Lopo-san used in this article for explanation is a “model with no toe endbones and only two backbones,” so the missing bones are created additionally.
Creating additional bones is easy.
After selecting the armature and entering edit mode, the bone you want to add and add by “extruding the bone” at the “Bone Extrusion”. You do not need to assign weights to the additional bones.
By the way, Lopo-san has only three finger bones, Thumb, Index, and Middle, but there is no problem.
Here is a comparison of the original Lopo-san model and the model adjusted for the Mixamo upload.
元々のロポさんモデル
Mixamo準拠のボーンに変更したロポさんモデル
When you are ready to do this, export the model to FBX and upload it to Mixamo.
I went through a lot of trouble to add a Rigify rig with the Blender add-on, but if you don’t need a rig, you can skip this step entirely.
The reason we want to add a rig is that When adjusting the animation later, it is easier to do so with a rig.
The concept of this article is “to use Mixamo animation in earnest,” so I’m doing my best to get the rig ready~.
I’ll leave the name of the Mixamo-compliant bone here so that you can copy and paste it, so if you want to use the Blender add-on to automatically create a Rigify rig, please use it.
Required basic bones and their names
mixamorig:Hips
mixamorig:Spine
mixamorig:Spine1
mixamorig:Spine2
mixamorig:Neck
mixamorig:Head
mixamorig:RightShoulder
mixamorig:RightArm
mixamorig:RightForeArm
mixamorig:RightHand
mixamorig:LeftShoulder
mixamorig:LeftArm
mixamorig:LeftForeArm
mixamorig:LeftHand
mixamorig:RightUpLeg
mixamorig:RightLeg
mixamorig:RightFoot
mixamorig:RightToeBase
mixamorig:RightToe_End
mixamorig:LeftUpLeg
mixamorig:LeftLeg
mixamorig:LeftFoot
mixamorig:LeftToeBase
mixamorig:LeftToe_End
Finger bones and their names
mixamorig:RightHandThumb1
mixamorig:RightHandThumb2
mixamorig:RightHandThumb3
mixamorig:RightHandIndex1
mixamorig:RightHandIndex2
mixamorig:RightHandIndex3
mixamorig:RightHandMiddle1
mixamorig:RightHandMiddle2
mixamorig:RightHandMiddle3
mixamorig:RightHandRing1
mixamorig:RightHandRing2
mixamorig:RightHandRing3
mixamorig:RightHandPinky1
mixamorig:RightHandPinky2
mixamorig:RightHandPinky3

mixamorig:LeftHandThumb1
mixamorig:LeftHandThumb2
mixamorig:LeftHandThumb3
mixamorig:LeftHandIndex1
mixamorig:LeftHandIndex2
mixamorig:LeftHandIndex3
mixamorig:LeftHandMiddle1
mixamorig:LeftHandMiddle2
mixamorig:LeftHandMiddle3
mixamorig:LeftHandRing1
mixamorig:LeftHandRing2
mixamorig:LeftHandRing3
mixamorig:LeftHandPinky1
mixamorig:LeftHandPinky2
mixamorig:LeftHandPinky3
2) Upload FBX of character model to Mixamo
Upload the prepared character model data to Mixamo from the [UPLOAD CHARACTER] button on Mixamo. FBX and OBJ data formats are supported.
In Case.1, you had to specify the joint positions of the character model after uploading it. However, when a character model with bones and weights is uploaded, the model starts moving immediately.
3) Apply your favorite animation to the character model with Mixamo
The same as Case.1: 3) Mixamo to apply any Same as applying animation to a character model, but with a caveat.
I will use Mixamo animation later with the Mixamo to Rigify Blender add-on,
When using add-ons, animations may be imported a few frames shorter.
In the case of loop animation, if even a few frames are cut off, the animation will not loop properly.
Therefore, before downloading an animation from Mixamo, it is recommended to set “No Animation Trimming” in the menu on the right side before downloading.

4) Download character models with animation from Mixamo
It is the same as Case.1: 4) Animation from Mixamo Download the character model with animation from Mixamo, so please check there.
5) Get the Mixamo to Rigify add-on and install it in Blender
Get the Mixamo to Rigify add-on from Blender Market for 5$.
Here is the add-on.
After downloading, install the software in Blender and make it ready for use.
6) Import FBX into Blender using Mixamo to Rigify
With the Mixamo to Rigify add-on enabled, a “Mixamo to Rigify (.fbx)” item will be added to Blender’s import menu.
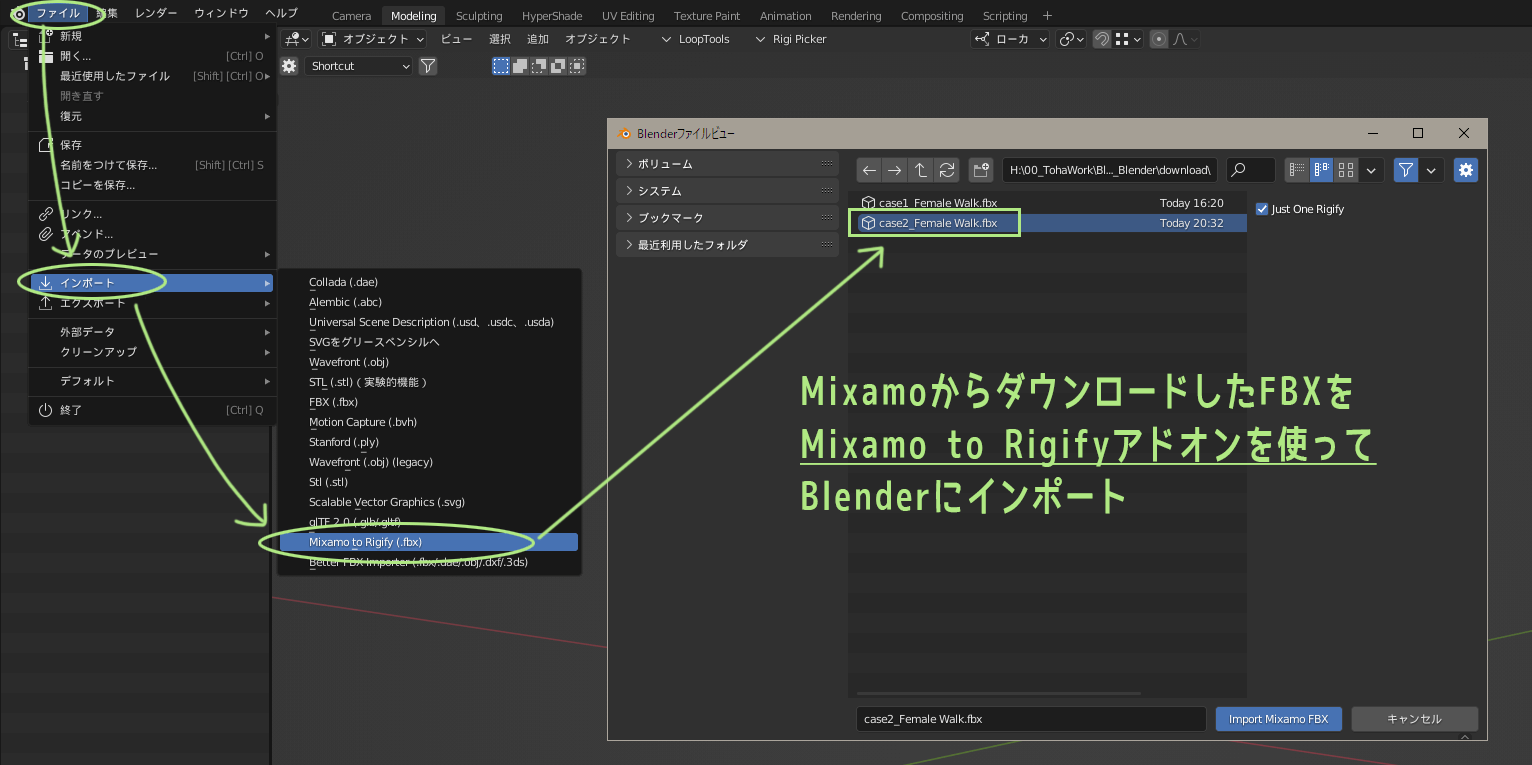
Using this to import FBX downloaded from Mixamo will automatically import the model and animation with the Rigify rig added.
Ta-dah!
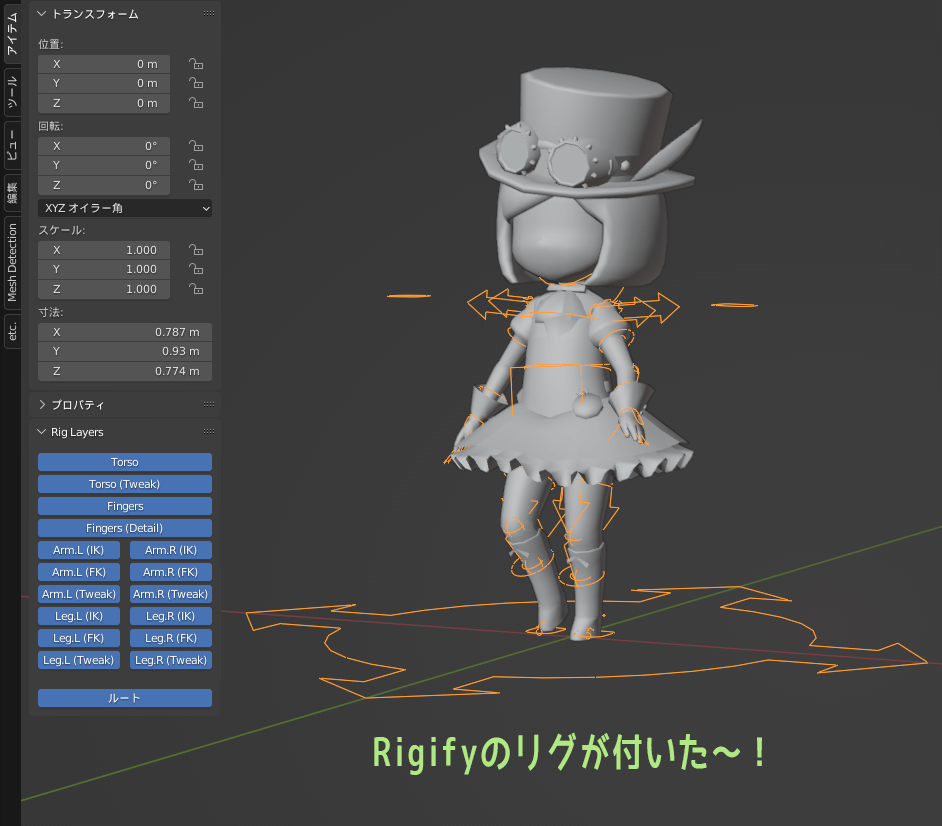
So, I was able to attach Blender’s Rigify rig to a model that originally had bones and weights set up, while applying Mixamo animations~.
If you get an error when importing with an add-on, it is probably due to a different bone name or a different bone structure.
When importing with Mixamo to Rigify fails in Blender 4.2, the file path may not be properly followed. In this case, go to Preferences -> File Paths -> Script Editor and add the folder containing the Mixamo to Rigify add-on, and the path will pass and the error will disappear.

If you are using the portable version of Blender 4.2, add-ons can be found in “\Blender4.2\portable\scripts\addons” if you have properly created a portable folder.
Also, the add-on may have shortened the animation by a few frames, but if you download the file without trimming, the extra animation will loop just fine even if it has been cut.
Case.3: When you have a character model with bones & weights already set in the Rigify rig

Case 3 is the case of applying Mixamo animation to a character model that has already been Rigify set up.
I have an existing model that has been rigged with bones in Blender’s Rigify. It would be great if we could get the animation data from Mixamo and put it into the Rigify rig.
In this case, sometimes it is sufficient to simply download the animation from Mixamo.
However, if you want an animation that fits your character model perfectly, we recommend uploading the model to Mixamo.
*Toha is a Rigify lover, so this article will explain how to use the Rigify rig. If you want to do something similar with Auto Rig Pro, you may find this article helpful.
1) Check if Mixamo animation can be used on existing Rigify models without modification
The way to stream Mixamo animations into a Rigify rig is to use Blender’s actions.
The specifics of how to do this are as follows
- Prepare a base Rigify character model into which the Mixamo animation will be poured.
- Login to Mixamo and download the FBX of the animation you want.
- Mixamo to Rigify to attach Rigify rig to FBX obtained from Mixamo.
- Save Rigify rigged FBX scene as Blender data.
- Open the base Rigify scene and append the Rigify action from the saved data.
You may think it is rather easy to do, but if you want to make “earnest” use of Mixamo animations, this method is sometimes not enough.
I will explain what this means here at Rigify Lopo-san.
Download the animation directly from Mixamo as it is already set up in Rigify.
The animation preview is playing on the pink person, which is the default setting.
Here is the downloaded FBX rigged with Mixamo to Rigify.
The action name is automatically set. Save this as Blender data.
Then load the action append to Rigify Lopo-san’s scene. Here is the result.
Can you see the difference from the original animation?
First of all, the feet are not grounded, and the movement is fluffy and strange.
The problem of the feet not being grounded can be solved by baking the original animation into the IK rig, but then you get this result.
The stride does not match Lopo-san’s at all.
These are probably due to the fact that Lopo-san’s model is a little over 1 meter tall, and that the height of Lopo’s head is quite different from that of Mixamo’s default pink person.
Actions are a very useful feature that can be used to divert animation from another model, but they may not work well if the source model and the target model have very different physiques.
This problem can be solved by uploading Lopo-san’s model to Mixamo and then downloading the animation.
Here is the result of this response.
The animation is perfectly suited for Lopo-san.
Mixamo provides several character models in addition to the default model.
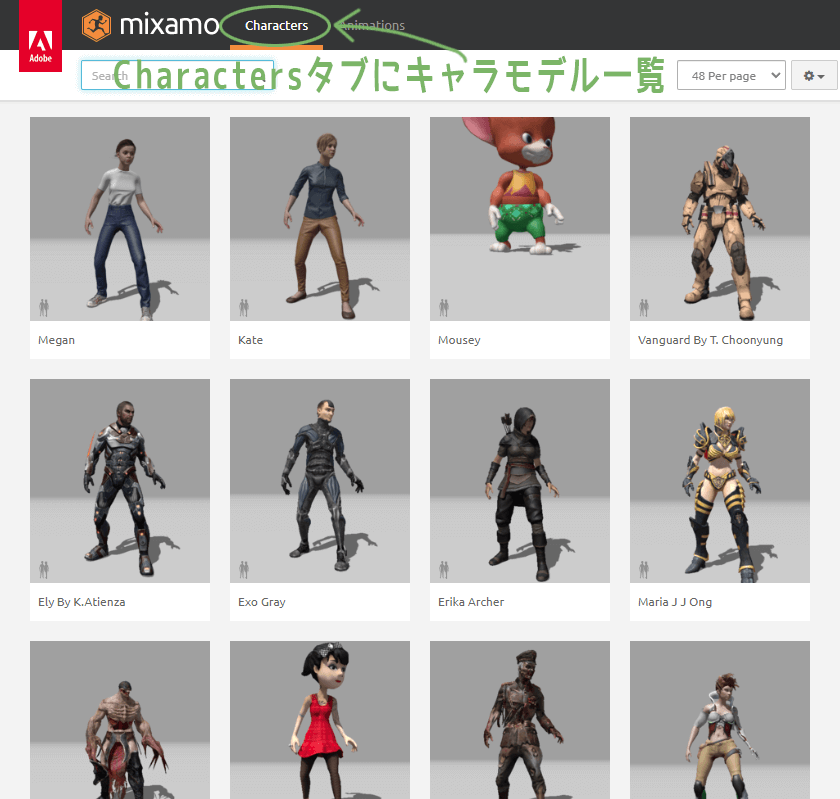
If the head and body of an existing Rigify setup model are very close to the model provided by Mixamo, it may be possible to use the animation of the Mixamo model without modification.
So it’s good to try it out first – it’s so much easier if you can use it as is.
But if the model provided by Mixamo does not work, you should upload your character model to Mixamo as you did in Case 2.
So we will continue to explain how to do this.
2) Change the bones (armature) of the character model to a Mixamo-compliant structure
Just as we did in Case 2 with Changing the bones (armatures) of the character model to a Mixamo-compliant structure, we will change the bone structure and names of the Rigify setup models to a Mixamo-compliant one, just as we did with the
First, from a model with many Rigify rig controllers, I extract only the model mesh and necessary bones and export them to FBX to create model data for Mixamo upload.

The tricky part here is that the standard Blender FBX exporter makes it a bit difficult to export FBX like the above from a Rigify model.
I recommend using the paid Blender add-on called Better FBX to do it quickly.
With this add-on, you can export an FBX from a Rigify model with only the model mesh and necessary bones extracted with a single click.
If you don’t use the Better FBX add-on, you can manually adjust and output or use Rigify to Unity. There are other ways to do this. But I think it is a little more time-consuming than using Better FBX.
Once you have created an FBX with only meshes and bones by either method, the next step is the same as in Case.2.
The exported FBX will be opened in Blender and the bone structure and bone names will be changed to make the model data ready for processing by the Mixamo to Rigify add-on.
Specifically, the following actions are required
- Basic bones Hip, Spine, Neck, Head, Arm, Hand, Leg, and Toe are required. (Finger is not necessary)
- If there is no toe (Toe) and bone, create a new one.
- Three spines (Spine) bones are required, if there are not enough, create additional bones.
- Rename all bones to the same name as the Mixamo model.
The detailed explanation is the same as in Case.2, Please check there for a detailed explanation.
Once the data is ready, export the model to FBX and upload it to Mixamo.
By the way, even if your character model has bones in its hair or skirt, it will not animate in Mixamo; the model you upload to Mixamo should probably be like a bare model of your character.
3) Upload FBX of character model to Mixamo
Case.2: 2) Upload the FBX of your character model to Mixamo Upload to Mixamo and see there for the same thing.
4) Apply your favorite animation to the character model with Mixamo.
Case.2: 3) Mixamo to apply any Apply animation to character model and it will be the same.
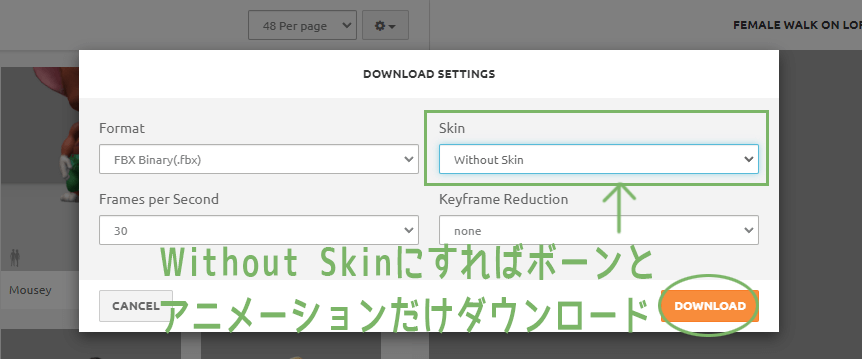
5) Download character models with animation from Mixamo
Basically Case.1 & 2 4) Download character models with animation from Mixamo Same as above, but you do not need to download the mesh of the model, as you only need the animation.
If you change the Skin item in the download settings to “Without Skin,” only the character bones and animations will be downloaded.
If you have bones, you can create a Rigify rig with add-ons.
6) Get the Mixamo to Rigify add-on and install it in Blender
Please refer to Case.2: 5) Get the add-on Mixamo to Rigify and install it in Blender.
7) Import FBX into Blender using Mixamo to Rigify
With the Mixamo to Rigify add-on enabled, a “Mixamo to Rigify (.fbx)” item will be added to Blender’s import menu.
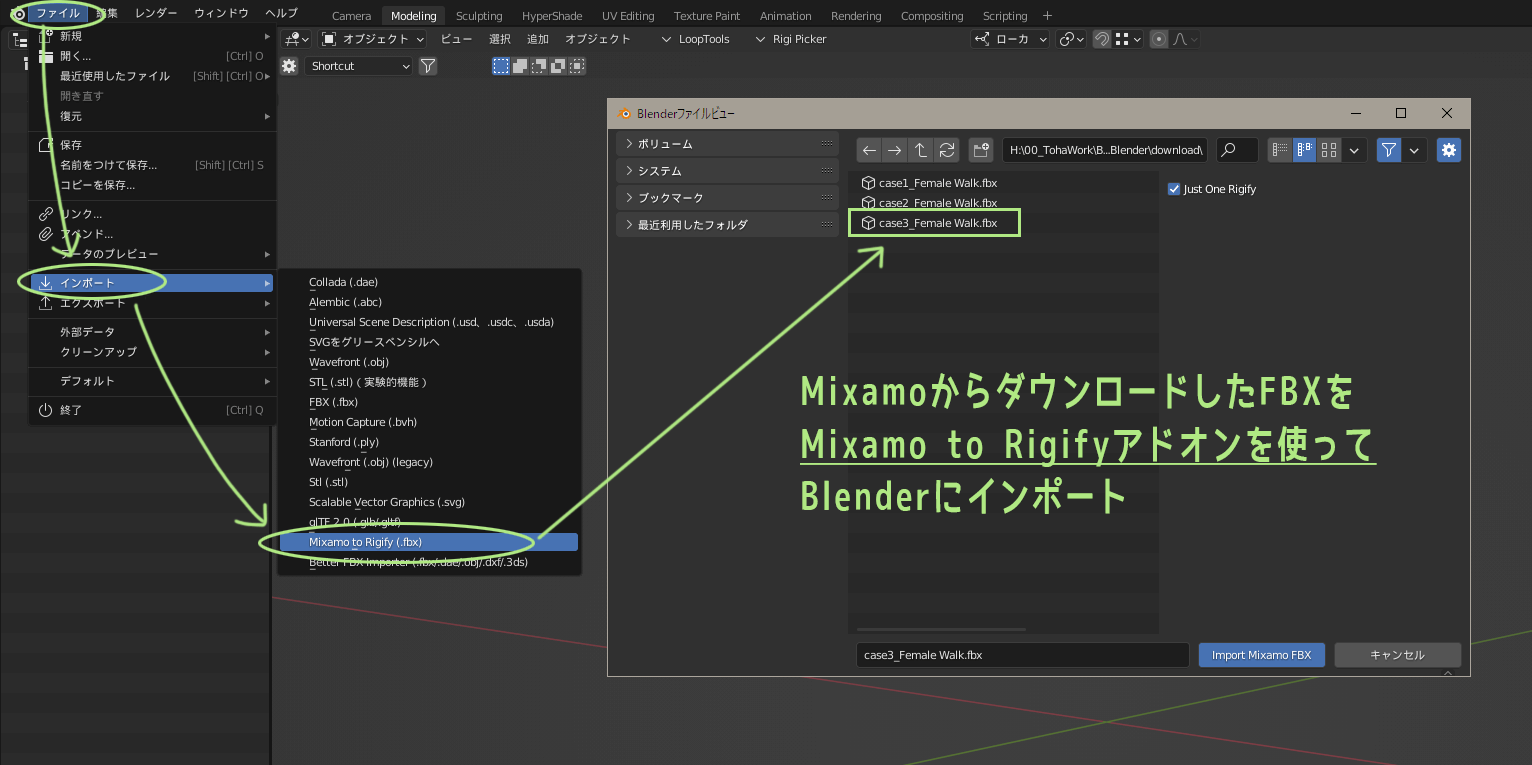
When you import a character model FBX downloaded from Mixamo using this, the model and animation will be imported with the Rigify rig automatically added.
Ta-dah!

So, I was able to attach the Rigify rig in Blender to the bone and animation-only data I downloaded from Mixamo.
This data was downloaded after uploading Lopo-san’s model to Mixamo, so the animation is perfectly suited to Lopo-san.
Also, the add-on may have shortened the animation by a few frames, but if you download the file without trimming, the extra animation will loop just fine even if it has been cut.

8) Save the animation to Blender data and append the Rigify action to it.
Save the previous animation to use it as an action in Blender.
Saving to Blender data allows appending to other Blender data.

Open the Blender data to which you want to append an action, and select from the menu to select the saved animation data. Select the action you want from “Action” in the appended item.

You should now be able to apply the Mixamo animation as an action to your existing Rigify character model.
Select the appended action from the pull-down menu and play it back.
It’s done!
Since any number of actions can be appended to a single Bender scene, creating a large number of actions from Mixamo animations for appending may help you make progress in creating animations for your characters.
However, please be careful not to forget to set up fake users if you plan to load and utilize many actions.
Actions that are not used anywhere will disappear.
*Fake users are discussed in this article The following section explains whether or not unused materials are automatically removed. Please check it as well.
How to adjust Mixamo animations poured into a rig

Well.
We have described three different ways to use full-scale Mixamo animation in a Blender rig, depending on the state of the character model.
There is a reason why we took the time and effort to convert the animation into a Blender-rigged animation.
There is a difference in the ease of working with and without a rig when adjusting animations.
Sometimes it is simply easier to move the rig with a rig controller, but the big thing is that with a rig, you can switch between the IK and FK of the limbs. The IK of the feet is especially important.
*For more information on IK and FK, please see this article.

When we rigged Mixamo to a model in Case.1, you could set whether the limbs are IK rigged or not. Convenient.
When Rigify rigged in Case.2 & 3 was no place to set IK/FK.
This is because, with the Mixamo to Rigify add-on, all Mixamo animations are baked into the FK rig. However, the Rigify rig’s functionality allows IK/FK conversion, so you can use IK rigs as well.
If you download the data from Mixamo normally without doing anything, the animation is baked directly to the bones, so all movements are in FK. Since there is no rig, it is a bit difficult to convert from FK to IK.
The ability to use IK rigs for feet, for example, makes it much easier to adjust walking animations.
Sorry for the long introduction.
The following is a list of useful functions for adjusting Mixamo animations in Blender~.
– IK/FK conversion functionality for Rigify rigs
Rigify rigs have the ability to convert IK/FK.
Specifically, the function will bake the state of the animation keyed to FK into the IK rig.

This allows Mixamo animations baked into an FK rig with the Mixamo to Rigify add-on to be rebaked into an IK rig’s animation.
It takes a little time to bake after pressing the “Action” button, but once baked, the same animation will play regardless of whether you switch to the IK or FK rig.
To switch between IK/FK for a Rigify rig, enter 0-1 in the IK-FK field to switch. (0=IK, 1=FK)

Note that when applying animation to an existing Rigify model using actions, the results will vary depending on whether IK/FK is enabled for the model’s Rigify rig or the action’s animation.
– Animation Layers add-on
When adjusting animations in Blender, this add-on is extremely useful.

In another article, Animation Layer is explained a little. As explained in the previous section, the animation can be adjusted by creating a new layer and adding it to the base animation.
For example, like this.
The data downloaded from Mixamo is keyed at every frame, so it is very difficult to adjust the animation as it is.
The Animation Layers add-on makes your work easier by allowing you to create new layers and adjust the animation.
– Keyframe weight reduction function
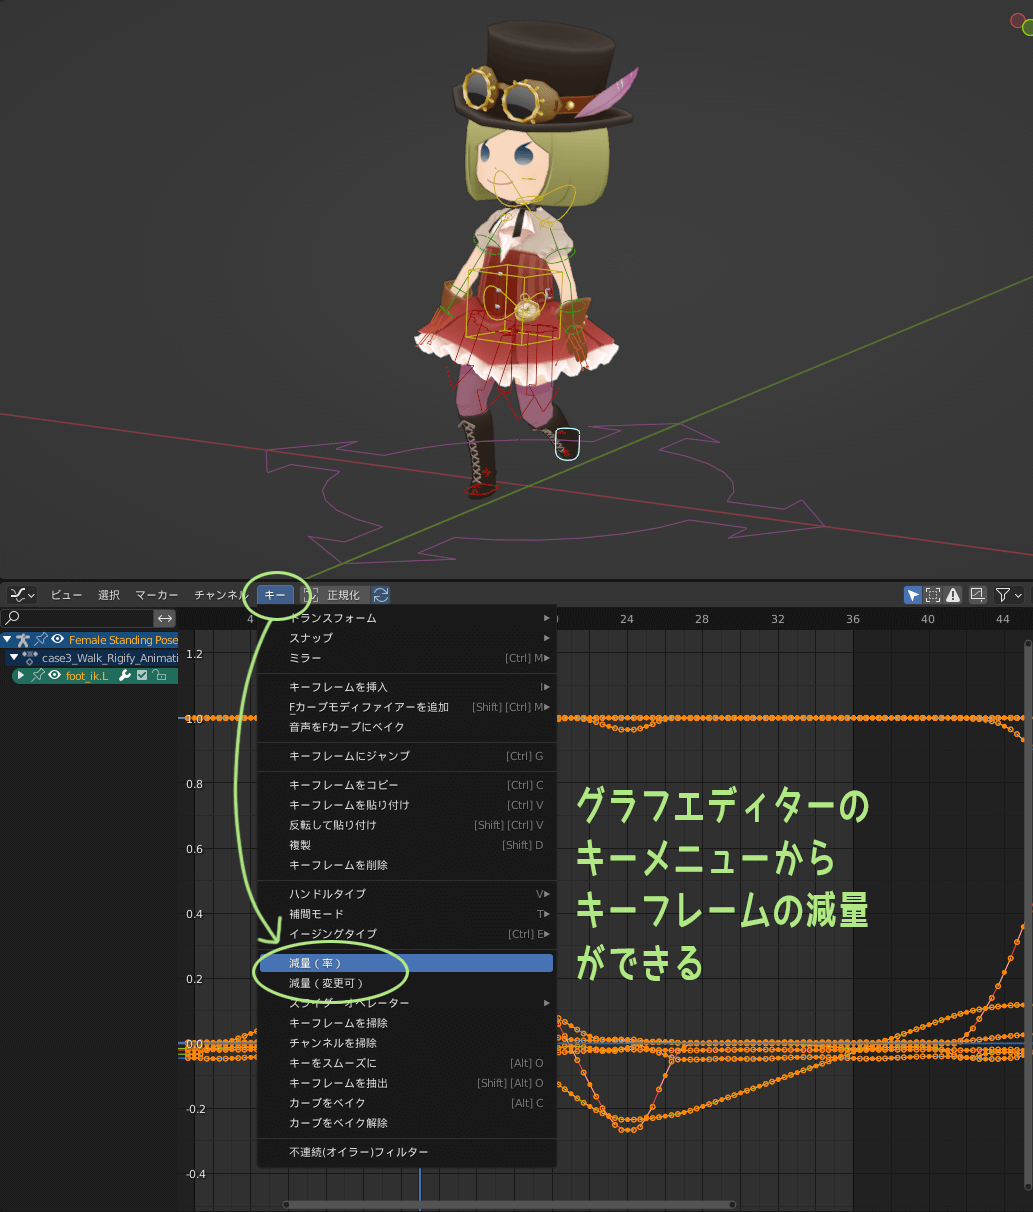
Mixamo animations are downloaded with keys baked into every frame.
As it is, it is difficult to make animation adjustments, but you can use Blender’s standard “weight reduction” function to reduce the number of keys that are hit.
Keyframe weight reduction can be performed from the “Keys” menu in the graph editor.
The reduction function can be used to reduce the number of keys typed in a ratio, for example. If you reduce the number of keys too much, the animation will be broken, so try to find the right amount of reduction.
Here is the result of reducing the keyframe with a ratio of 0.8.
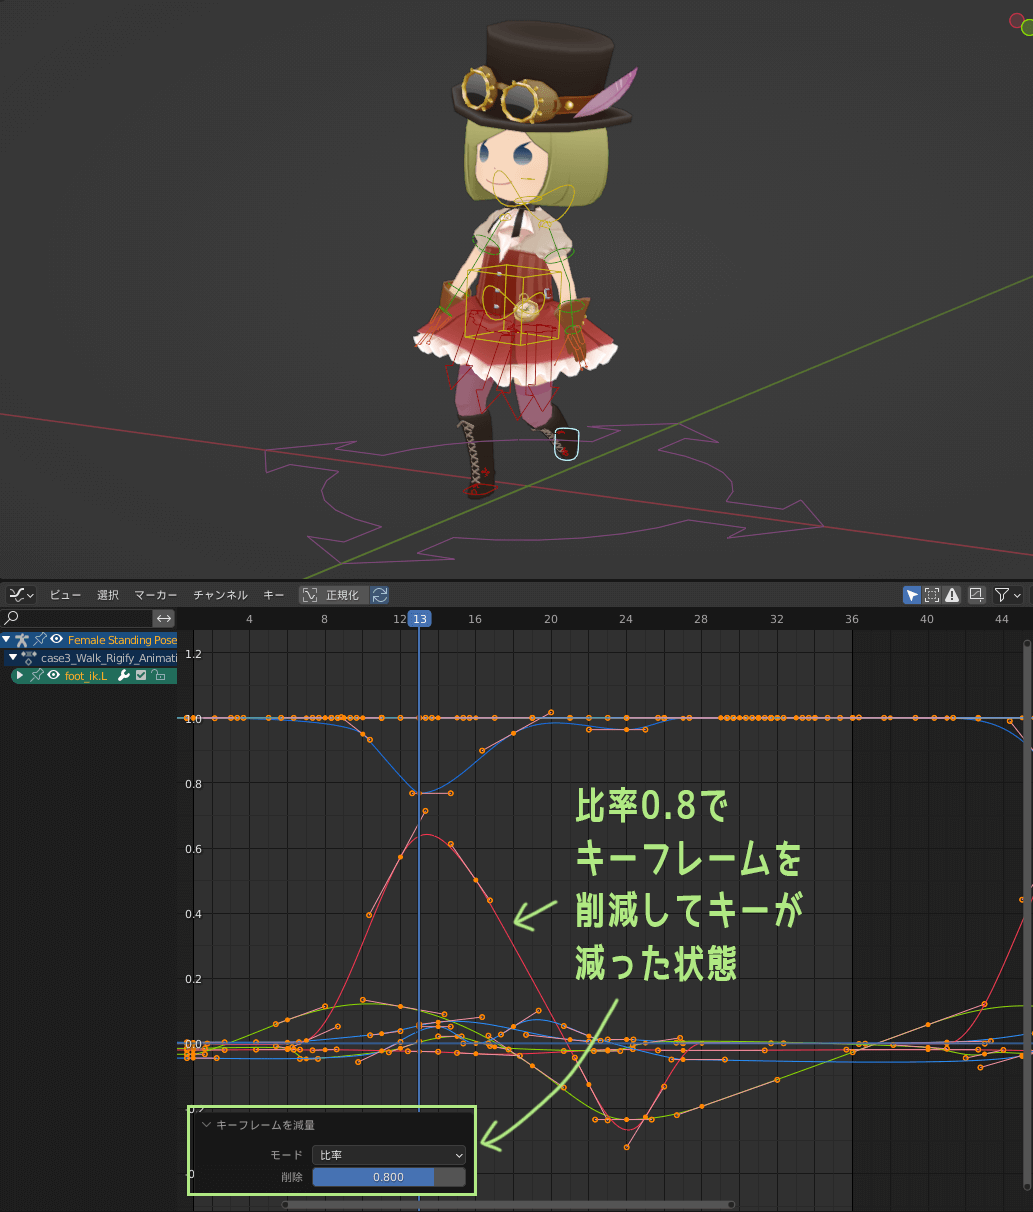
Keys that used to be struck every frame have been reduced while maintaining the curve shape.
I think it is possible to edit the curves in this state.
Of course, it is convenient to use Mixamo animations as materials, but I think it is also useful for studying animations because you can check the shapes of graphs of various animations like this.
For more information on weight loss, please check here, as someone has already written an article about it~.
Caution! Redistribution of Mixamo models and animations is prohibited!
Mixamo has a wide variety of animations and is very convenient if you can make use of it, but there is a word of caution.
Redistribution of data downloaded from Mixamo as-is is expressly prohibited.
You are allowed to use them as materials for the content you are creating, whether commercial or non-commercial, but you are not allowed to, for example, sell Mixamo animation data in an asset store.
I would like to make effective use of the rules while strictly observing them.
Please refer to the QA here, which mentions the Terms of Use.

Summary: Good use of Mixamo animation can save time and study!

In this article, “How to Use Full-Scale Mixamo Animation with a Blender Rig,” we described three patterns of methods depending on the setup situation of the character model.
Case.1 When there is only a character model without bones
Case.2 When you have a character model with bones and weights, but no rig
Case.3 When you have a character model with bones & weights already set in the Rigify rig
I’ve done some things that take a bit of time and effort to rig in Blender, but once you do it, I think you can use Mixamo’s animations quite effectively – I’m sure.
Adding a Blender rig (mainly Rigify in this article) will make it easier to adjust the animation later. The important point is to be able to use the IK rig for the feet.
Various types of content could make use of Mixamo animation, such as game productions and video productions.
I believe that Mixamo animations can be used not only as material for content but also as useful reference material for creating 3D animations in Blender.
As a creator of games myself, I would love to take advantage of Mixamo’s benefits while still following the rules!
Thank goodness for that~

- Coments - コメント一覧