This article summarizes The Basic Blender Operation.
Even if you want to create something with Blender, if you don’t know the basic operations, you won’t be able to create what you want.
If you get the basic operations right the first time, the stress of operating Blender will decrease and you will be able to use it comfortably.
First, you should be able to move the cube object that is displayed when you start Blender at will.
So, let’s take a look at how to operate the basics of Blender.
Things to check before operating Blender

Before trying the basic operations of Blender, please review the following
(1) Blender have a Japanese menu display?
All content in this article is based on the Japanese menu.
If the Blender menu you have launched is in English, please refer to Change Blender’s menu to Japanese for reference.
(2) Workspace, mode, and 3D viewport axes
Look at the top of the Blender screen when you start up and see what each one looks like.
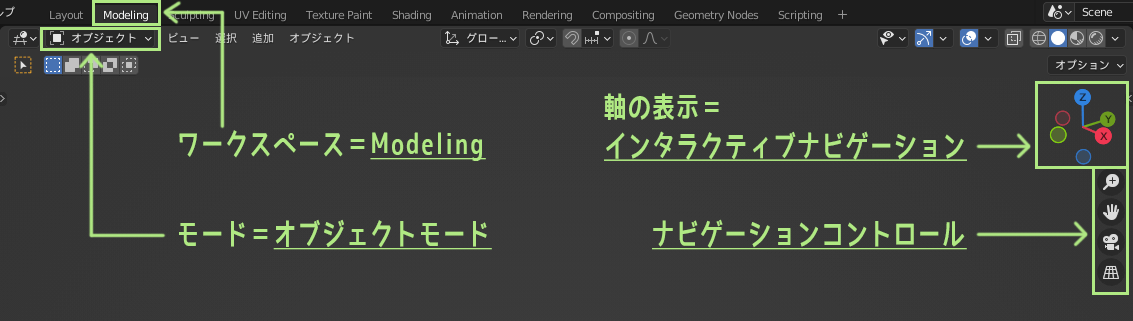
Is Modeling selected as the workspace tab? If not, click on the Modeling tab to select it.
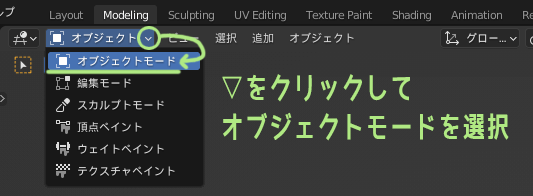
Is the mode set to object mode? If not, click the ▽ next to the mode and select object mode from the pop-up.
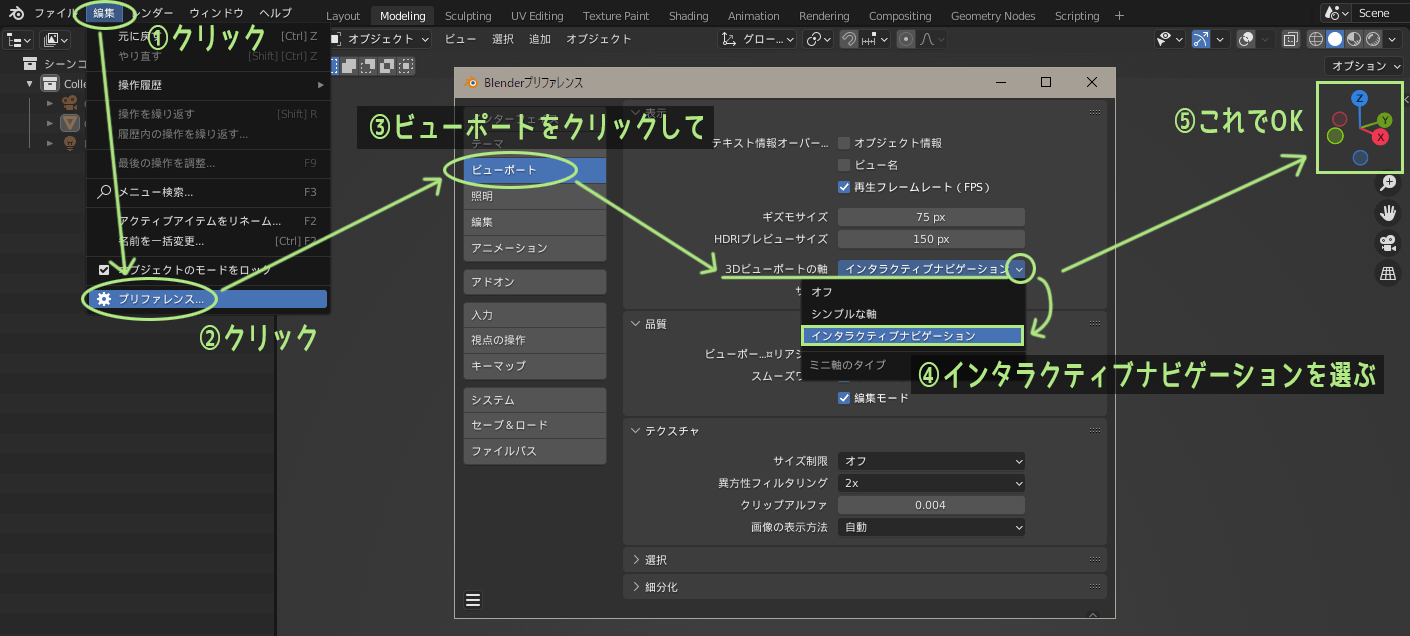
Are the axes in the 3D viewport set to interactive navigation? If not, go to Edit → Preferences → Viewport and change the 3D viewport axes to interactive navigation.
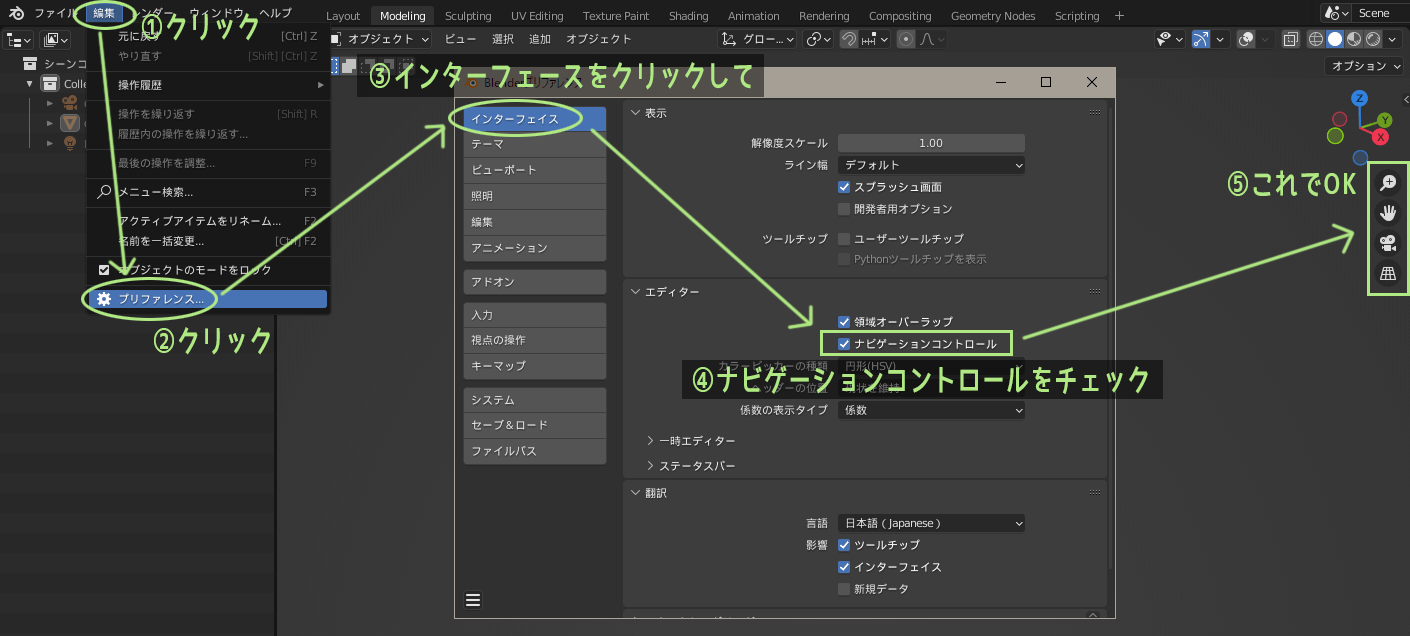
If you do not see a magnifying glass or a hand symbol near the axis, go to Edit→Preferences→Interface and check the Navigation Controls checkbox.
(3) Blender screens be different depending on the customization
The Blender used by Toha is customized to Toha’s liking.
In this Getting Started with Blender series (1) – (3), we have made various changes to make it easier to use.
If the Blender screen image used in this article is different from your Blender screen, this is the reason.
If the screens are too different to understand, please refer to the Getting Started with Blender series (1) – (3).
(4) Basics explain “how not to use shortcuts”
Blender has a variety of keymaps, and the shortcut keys are different between the standard Blender keymap and the industry-compatible keymap.
Since keymaps vary from person to person, we will basically explain the “no shortcut method”.
Shortcuts are only a convenience feature, and most things can be done without using shortcuts.
So, please get to know how not to use shortcuts first, and if it becomes inconvenient, use shortcuts if you prefer~!
(5) Shortcuts, etc. introduced in this section are assumed to be Maya-style keymaps
Because Toha has been a Maya user for many years, he uses Maya-style keymaps.
All shortcuts and operations introduced in the article are Maya-specific.
Sorry if you are using the Blender standard keymap.
The add-on that Toha has installed is called “Maya Config Addon For Blender”, but the keymap will be almost the same if you use the “Industry Compatible Keymap” that comes standard in Blender.
For more details, see another article, Maya-like operation of Blender
Now, let’s move on to the basic operations of Blender.
3D viewport operations (rotation, translation, zoom)

The first step is the basic operation of the 3D viewport. Without these operations, nothing can be done.
(1) Rotate Viewport
Click and hold on an axis in the interactive navigation and move the mouse to rotate the viewport.
How to rotate the view using the mouse and keyboard without interactive navigation ↓
Rotate Viewport
Alt+mouse left click & move
(2) Move Viewport
Click and hold the palm symbol on the navigation control and move the mouse to move (pan) the viewport.

How to operate the view using the mouse and keyboard instead of using the navigation controls ↓
Move viewport
Alt+click & hold middle mouse button to move
(3) Zoom viewport
Click and hold the magnifying glass symbol in the navigation control and move the mouse to zoom the viewport.
How to zoom the view with the mouse and keyboard instead of using the navigation controls ↓
Zoom on view
Alt+right mouse click and hold to move
or use mouse wheel to scroll
Object manipulation (selection, movement, rotation, scaling)

The next step is basic object manipulation. Once this is done, you can move the object
(1) Selection Object
Select “Select Box” from the toolbar, and then “left-click and drag” the object you wish to select. You can also select an object by simply clicking on it.
Box selection is possible even while using other tools such as moving or rotating.
How to select “Box Selection” as a shortcut ↓
Box selection for object
Press Q on the keyboard
You can also select other selection methods by [left mouse click and hold] on the “Box Selection” toolbar.
To deselect, [left mouse click] anywhere in the view except the object.
(2) Move Object
Select “Move” from the toolbar, and click on the object to display the arrow (move gizmo).
- If you grab the arrow part with the mouse and move it, you can move it only in the direction of the arrow’s axis.
- If you grab the square between the arrows and move it, you can move it only in the direction of that plane.
- Grab and move the arrow middle circle to move it freely in all directions.
How to select “Move” as a shortcut ↓
Move object
Press W on the keyboard.
(3) Rotate Object
Select “Rotate” from the toolbar, and click on the object to produce a circle (rotation gizmo).
- If you grab the edge of a circle with the mouse and move it, you can rotate the circle only in the direction of its axis.
- If you grab and move the circle except for the edge part, you can freely rotate it in all directions.
- Grab and move the edge of the white circle to rotate it relative to the direction you are viewing in the view.

ow to select “Rotate” as a shortcut ↓
Rotate object
Press E on the keyboard
(4) Scaling Object
Select “Scale” from the toolbar and click on the object to bring up a square bar (scale gizmo).
- If you grab the square bar with the mouse and move it, you can scale it only in the direction of that axis.
- If you grab and move the square between the square bars, you can scale only in the direction of that plane.
- Scale in all directions at the same time by moving around a white circle.

How to select “Scale” as a shortcut ↓
Object Scale
Press R on the keyboard
You can also select “Scale Cage” by [left mouse click and hold] on the toolbar’s [Scale].
“Scale” scaled the cage around the gizmo, but “Scale Cage” scaled the cage in the direction it was moved.
(5) Move, rotate, zoom in/out while holding down [Shift]
When using the move, rotate, scale tools, hold down the Shift key on your keyboard while moving the gizmo to reduce the amount of change caused by the tools. You can reduce the amount of change caused by the tool.
If the movement of movement, rotation, or scaling is too large, the Shift key can be used together for fine control.
![Blender [Shift]を押しながらの移動](https://tohawork.com/wp-content/uploads/2022/09/b_shift_key.gif)
(6) Undo and Redo
When you perform an operation in Blender, you can undo it by pressing Ctrl+Z.
If you want to undo an undone operation, you can use Ctrl + Shift + Z with to return.
Each can undo/redo an operation as many times as the key is pressed.
Undo (undo an operation)
Press Ctrl+Z on the keyboard
Redo (redo the undo operation)
Press Ctrl+Shift+Z
The default Blender setting for the number of undo is 32.
If you prefer to be able to undo more, increase the number of times you can undo back
7) Switching between global and local coordinates
In manipulating objects, it is also important to switch between global and local coordinates.
To learn more about the difference between global & local coordinates, please Basics of 3D Models 1) – The 3DCG World is Managed by Coordinates.

Whether you are using global or local coordinates will change the result of manipulating the object.
Movement of objects with different global and local coordinates
Object rotation differs between global and local coordinates
Object scale differs between global and local coordinates
Edit Mode Operations (Vertices, Edges, Faces)
To create a 3D model using Blender, you need to manipulate the vertices, edges, and faces of an object.
(1) Object mode → Edit mode
To manipulate an object’s vertices, edges, or faces, change to Object Mode → Edit Mode.
How to switch between object mode & edit mode with a shortcut ↓
Switch to edit mode
Press TAB on the keyboard
———-
*In the industry compatible keymap, the search is registered on the TAB key, but 1 2 3 keys directly switch to edit mode to vertices, edges, and faces. (4 for object mode)
(2) Operation in vertex edit mode
To manipulate a vertex in edit mode, select the left-most icon next to the mode selection.
Shortcut to vertex edit mode ↓
nter vertex edit mode
While in edit mode, press 1 on the keyboard.
(3) Operation in edge edit mode
To manipulate an edge in edit mode, select the middle icon next to the mode selection.
Shortcuts to edge edit mode ↓
Enter edge edit mode
While in edit mode, press 2 on the keyboard.
(4) Operation in surface edit mode
To manipulate a surface in edit mode, select the far right icon next to the mode selection.
Shortcut to edit face mode ↓
Enter surface edit mode
While in edit mode, press 3 on the keyboard.
(5) Switching between global and local coordinates
Switching between global and local coordinates is also enabled in edit mode.
The local coordinates of the object’s vertices, edges, and faces reflect the local coordinates of the object itself. It is convenient to use it differently if necessary.
(6) Use transparency to select the backside
In Blender, basically, you cannot select vertices or edges that are not visible on the backside.
If you want to select vertices and edges on the backside, use transparency. To do so, press the Transparency button in the upper right corner of the viewport.
Now you can select the vertices on the backside.
Summary: Try some basic Blender operations and get used to it!

This is the basic operation of Blender.
Can you now move the cube object in the 3D viewport at will?
The best way to understand how to operate Blender is to actually operate it with your hands. Please refer to the article and try operating Blender yourself~.
The basic operations described here are the first basic operations.
If you make 3D models in Blender, it is ideal to be able to perform these operations as if you were breathing. Please try various operations and get used to the basic operations of Blender.
Once you have the basic operations down, it’s time to get to modeling!
There are two articles about modeling in Blender, [Knowledge] and [Practical], so please read the one you prefer.
I recommend starting [Knowledge]

- Coments - コメント一覧