
Currently, I use Maya for corporate game projects and Blender for personal 3D modeling.
This time, I wrote an article that I am sure could be written only because of me.
The title is…
Blender vs Maya! Comparison of 2 Softwares By Game Character Modeler
Before reading the article, please note the following points.
- There are no descriptions useful for visual CG, such as those related to rendering.
- Blender-specific features such as bendy bones are not mentioned.
- Only what I can know and find out from me is listed here.
Because I primarily produce game character models for real-time rendering, there is a bias in the Blender and Maya items compared in the article.
Please note that this is a comparative study of Blender and Maya from my viewpoint.
So here we go!
Compare Basic Functions
– How to operate

First, let’s talk about the basic operation.
Blender has long been said to have a unique operating method, but recently industry-compatible keymaps have been implemented, and more and more parts of Blender can be used with the same operating feel as other 3DCG software such as Maya.
3D Viewport Operations
Blender
Blender standard keymap
- View Rotation: Mouse middle drag
- View move: Shift+mouse middle drag
- View magnification: Ctrl+mouse middle drag
Industry-compatible keymap
- View rotation: Alt+mouse left drag
- View move: Alt+mouse middle drag
- View magnification: Alt+mouse right drag
Maya
- View rotation: Alt+mouse left drag
- View move: Alt+mouse middle drag
- View magnification: Alt+mouse right drag
Move, rotate, and scale objects
Blender
Blender standard keymap
- Move: G
- Rotation: R
- Scale: S
Industry-compatible keymap
- Move: W
- Rotation: E
- Scale: R
Maya
- Move: W
- Rotation: E
- Scale: R
Mouse click selection
Blender
Basically left click
In the case of the standard Blender keymap, you can also change to right-click the selection, just like in the old Blender.
Maya
Left click
– Favorite tools and custom shelving
Blender
A similar feature to Maya’s Custom Shelf is Blender’s Favorite Tool.
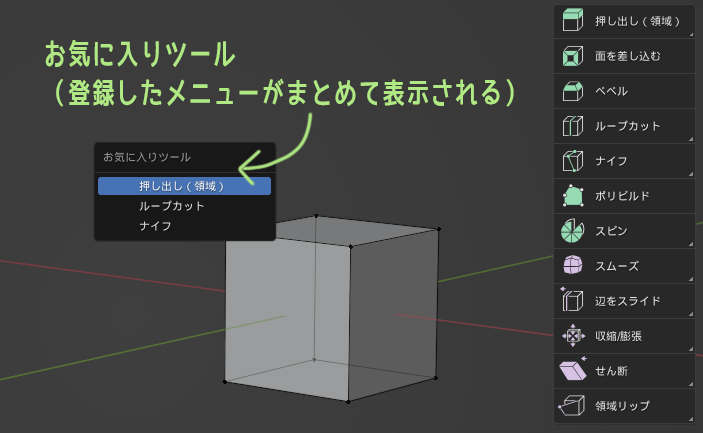
You can register almost anything you see in Blender’s UI by right-clicking on it. But if you register too many tools, it may be difficult to find them among your favorite tools.
Maya
A feature similar to Blender’s Favorite Tool is Maya’s Custom Shelf.
Custom shelves allow you to freely register frequently used functions and scripts.

Shelf registration from the menu is done by Ctrl+Shift+Left Click, and shelf registration from the script is done by drag & drop. Labels and icons can be assigned to registered shelves.
When I first learned about Maya at the company, a senior colleague told me, “Working with Maya is all about how well you use shelves.
That is why Toha uses shelves more often than pie menus in Maya.
– Importing data files
Import with copy & paste
Blender
You can copy an object in a Blender scene with Ctrl+C and then Ctrl+V in another Blender scene, and paste the copied object into another scene.
Currently, the copied and pasted object is imported in the appended state.

Maya
In Maya, you can also copy an object with Ctrl+C and then Ctrl+V in another Maya scene to paste the object into another scene.
However, in Maya, the name of the copied and pasted object is prefixed with “__pasted”.
After copying and pasting, you may want to manually rename the object or use Mel or Python, which removes the “__pasted” prefix.
You can make your own or find one on the Internet.

Drag & drop import
Blender
When you drag and drop another Blender file into Blender’s 3D viewport, a pop-up opens to allow you to choose from the following three operations
- Open
- Link
- Append
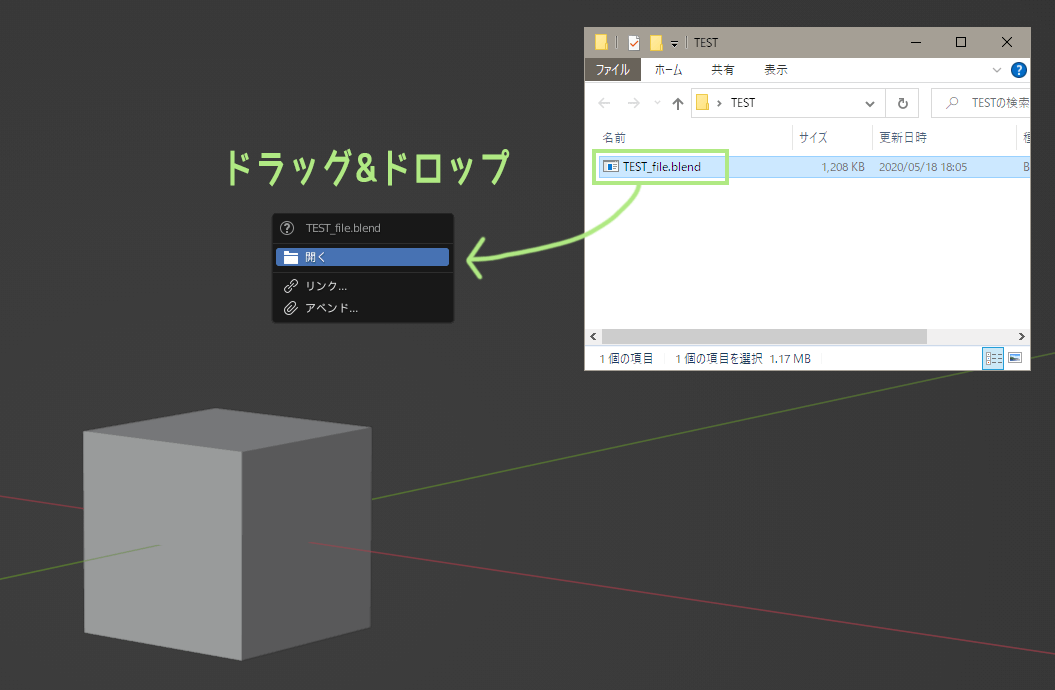
This is quite convenient~!
On the flip side, importing FBX files is not possible via drag and drop.
You can do this with add-ons, etc., but I think importing from the File menu’s Import is safer, as Blender’s FBX area often causes problems.
Add-on for drag & drop FBX import into Blender is here.

Maya
FBX import into Maya can be done drag & drop into the 3D viewport.
It’s useful to quickly check the contents of the FBX.
Be careful when importing multiple FBXs, however; Maya’s default setting is that if there are objects with the same name in multiple FBXs, the objects with the same name will be overwritten when imported.
Maya data can also be imported by dragging and dropping Maya files into the 3D viewport.
At this time Depending on the setting of the namespace, each object’s name will automatically be prefixed. If you do not wish to add a prefix, either do not use namespaces or use the settings shown in the image below.
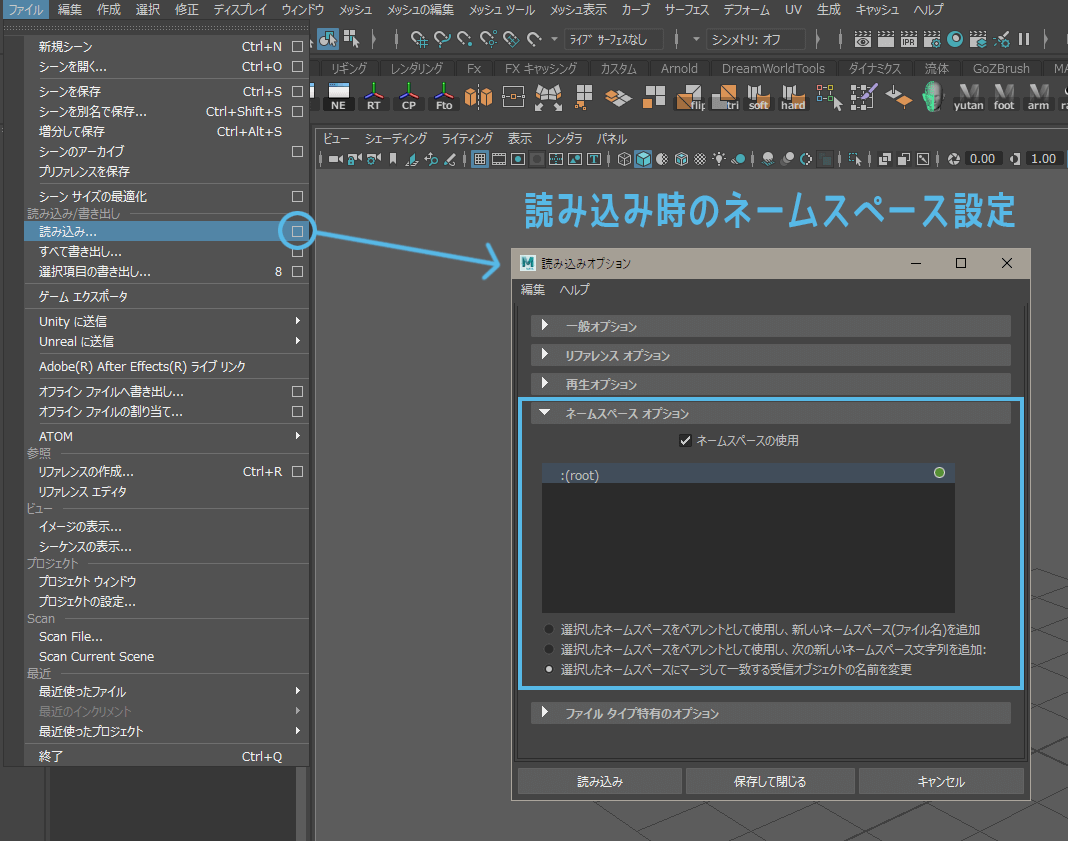
I don’t need prefixes when importing data.
Data can also be imported from the File menu. If you want to check the import settings each time, we recommend importing from the menu.
– FBX Export
Blender
At the moment, the biggest headache for Toha in Blender is FBX-related issues.
In the production of 3DCG for games, the work is never completed only within the 3DCG software. Eventually, models must be exported to FBX or other software and then loaded into a game engine such as UE or Unity.
…but the standard Blender FBX exporter causes a lot of problems.
Currently, to export clean FBX from Blender, you can use the Better FBX, a paid add-on, is a safe bet.
I think it is a must-have, especially when exporting character models that are rigged with AutoRigPRO or Rigify.
Still, I have yet to be able to do some neat animation baking, so recently I’ve been using Game Rig Tools.
Blender is quite popular these days, and some small game studios are using Blender as their main tool, but if there is a clean way to solve this FBX export problem, I’d like to know!
Maya
FBX export from Maya is not a problem.
Can get beautiful FBX data out of it. I wonder if Blender’s FBX related is a bit special.
– Links and References
Blender
A similar feature to the Maya reference is the Blender link.
The difference between a link and an append is explained in detail in this article.

Since the model loaded with a link is unalterable, the original model cannot be inadvertently changed during motion creation, and this has the advantage that the modeler and animator can work on their respective tasks in parallel.
Maya
A feature similar to Blender’s link is Maya’s reference.
References are explained in detail in this article.
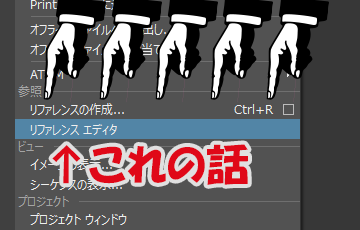
When working in a multi-person team, such as in game development, we often load character models into Maya scenes for motion creation, basically by reference.
Using references has the advantage that modifications to the original model’s shape and textures are reflected in all motion scenes, so data management is not complicated.

^^
– Collection and Display Layers
Blender
A feature similar to Maya’s display layer would be Blender’s collection.
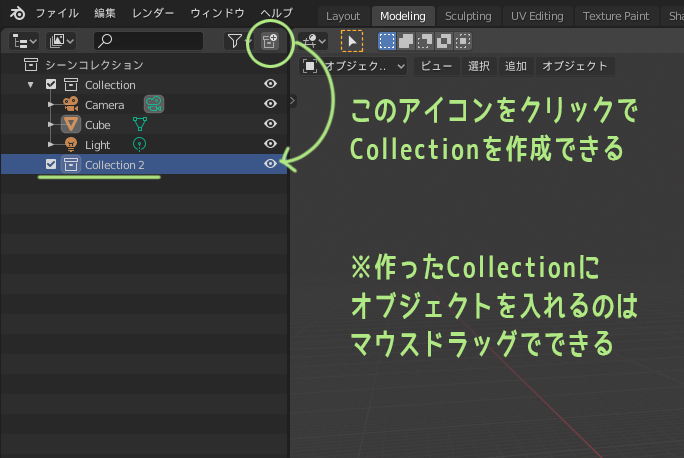
For more information on the collection official manual or Commentary on this site.
In creating a 3D model of a character, it is easy to keep parts of the model divided into smaller parts while working and then hide/wireframe/unselect each part as needed.
At the moment, Blender can not display wireframes on a collection-by-collection basis.
We have no choice but to use a wireframe display for each object instead.
For more information on how to do this Blender Modeling [Addendum] explains it – take a look.
Maya
A similar feature to Blender’s collections is Maya’s display layer.
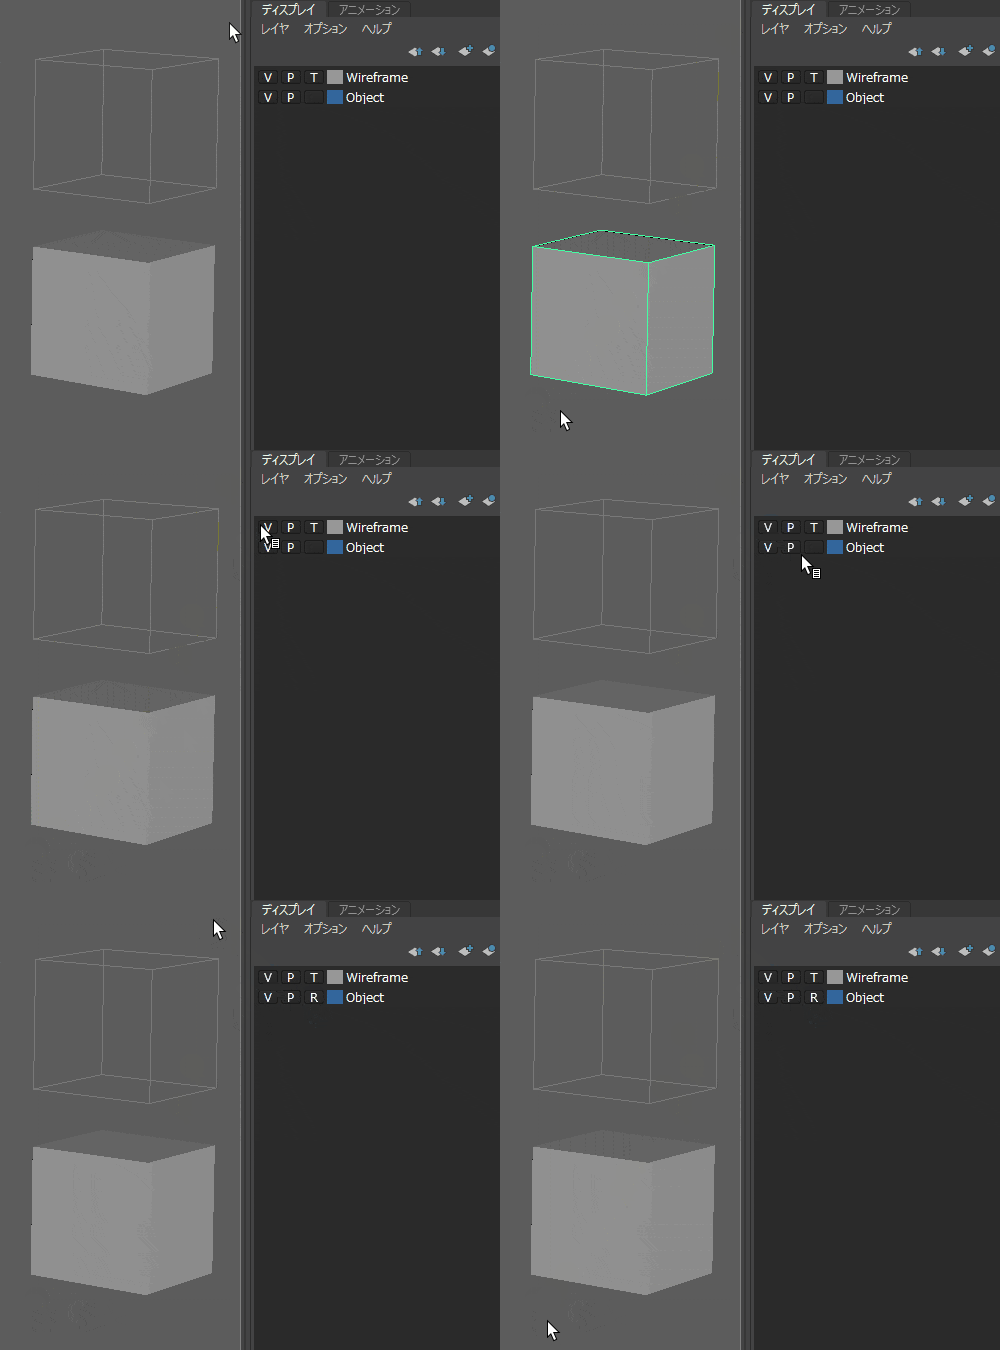
This is a feature that I use very often when modeling in Maya. Each layer can have a name and a color.
– Outliner
Blender
The outliner is available in both Blender and Maya. The functions are similar.
Blender’s Outliner features include the following.
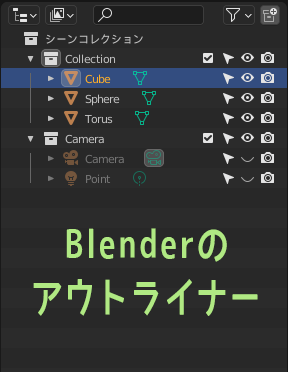
- Icons can be used to manage selection/unselection, show/hide, render/not render, etc.
- Ability to change display mode (view layer/Blender file/isolated data, etc.)
- No free reordering of objects within the outliner (auto-sorting)
- A single object can be placed in multiple collections (link)
Maya
Maya’s outliner features include the following.
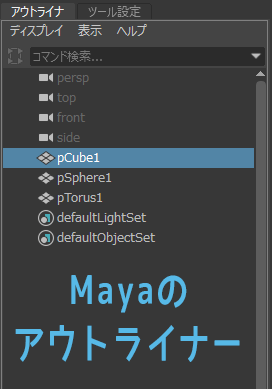
- Ctrl+H to hide objects, Shift+H to show hidden objects
- The type of things displayed in the outliner can be fine-tuned (though I don’t touch it much)
- The order in the Outliner can be freely changed by clicking and dragging in the middle of the mouse
- One object can only be placed in one group
– Selection of hidden and invisible vertices, etc.
Blender
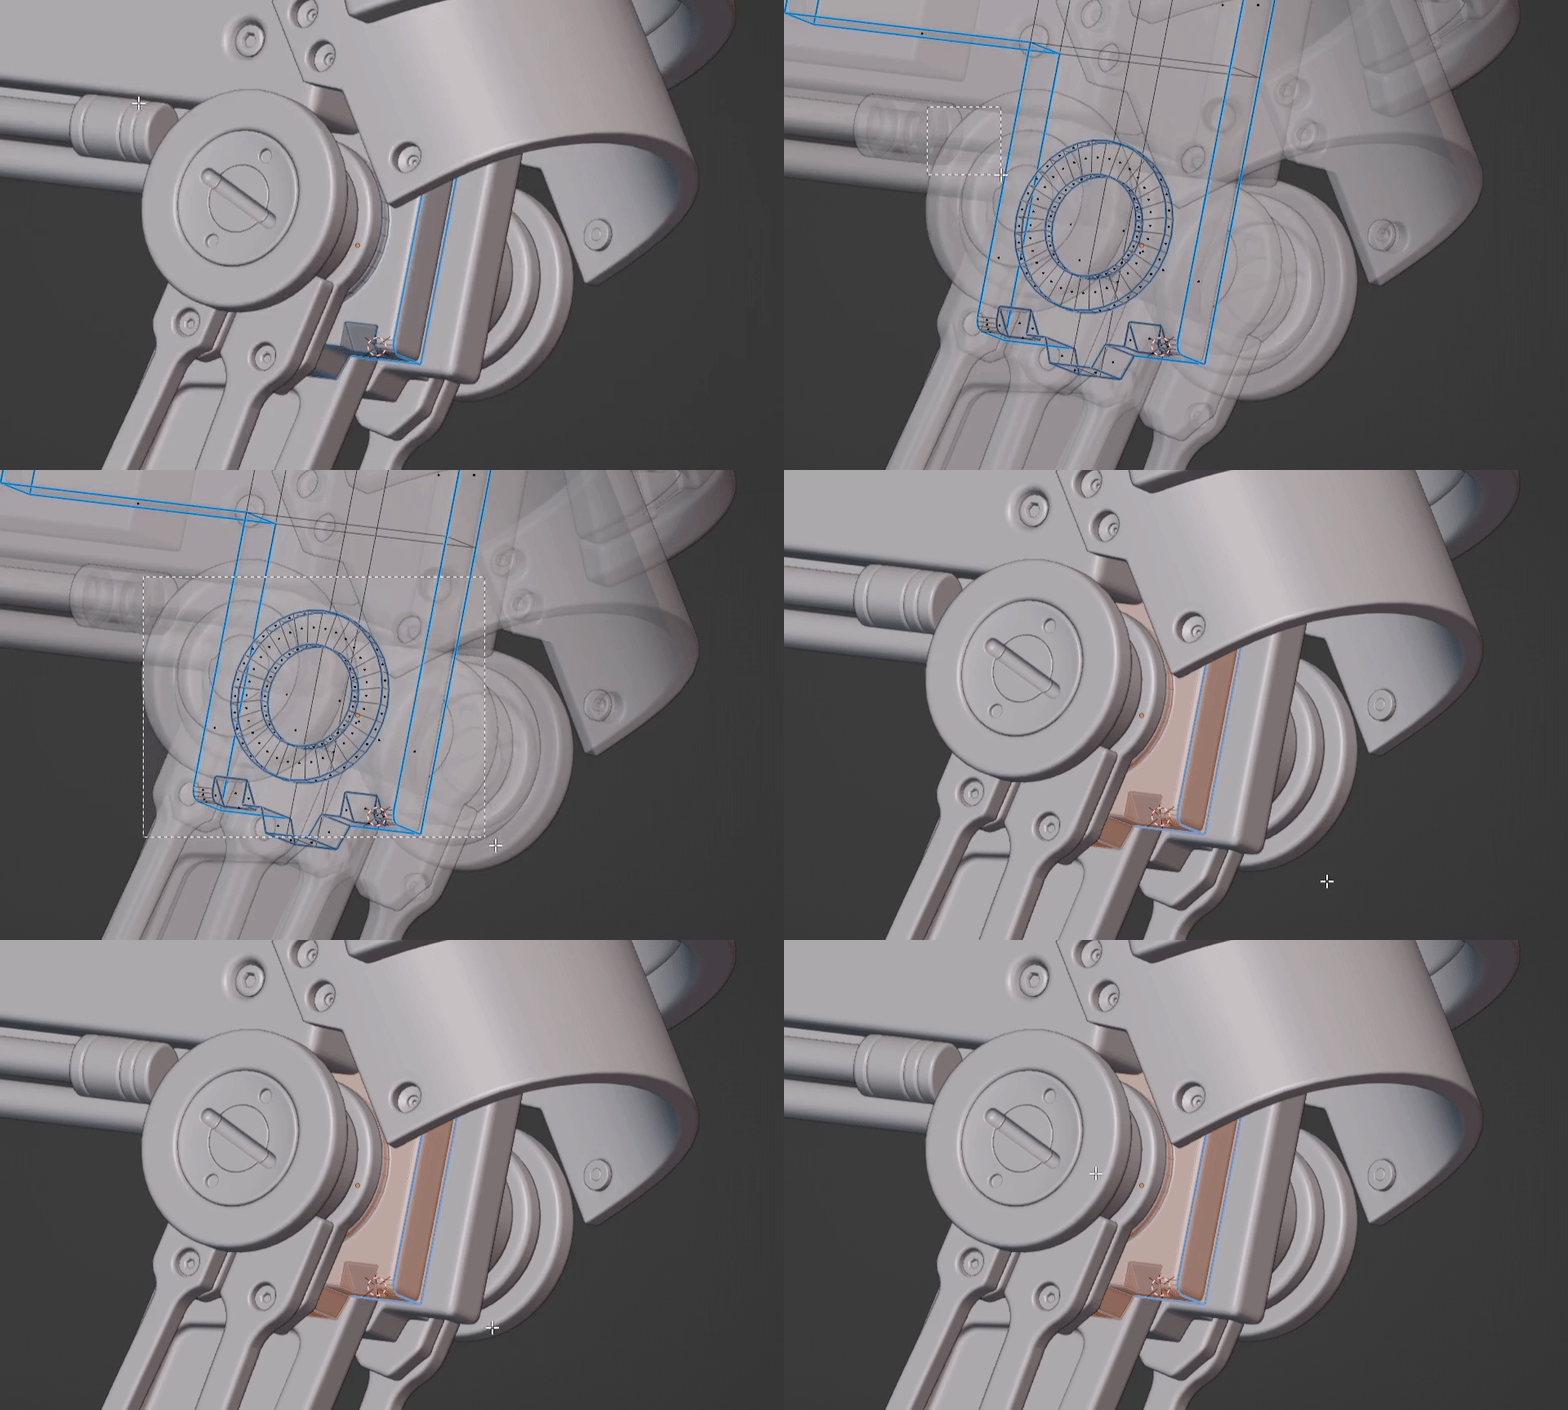
In Blender, to select vertices and meshes on the invisible backside, use transparent display.
Even if a wireframe display is used in viewport shading, vertices and other objects on the other side of the object will not be visible if the display is not transparent.
To always be able to select vertices on the invisible side, etc., I recommend including the X-ray Selection Tools add-on. Adjust the transparency of the transparent display also, you will be able to select the back side quite comfortably.
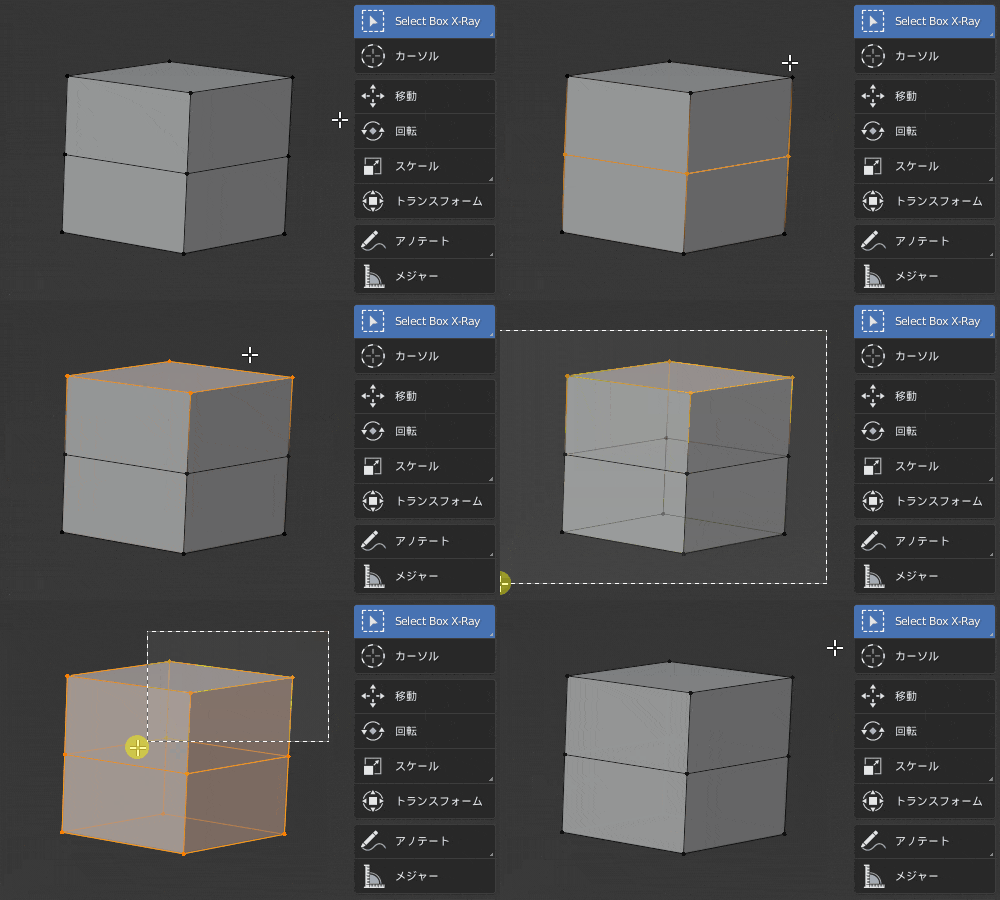
The X-ray Selection Tools allow you to fine-tune the selection behavior with the Advanced keymap setting.
If you adjust the difference and expansion of the box selection, you will be able to select vertices and other items with the same feel as in Maya.
Maya
In the case of Maya, the invisible backside vertices and meshes are also selected as they are.
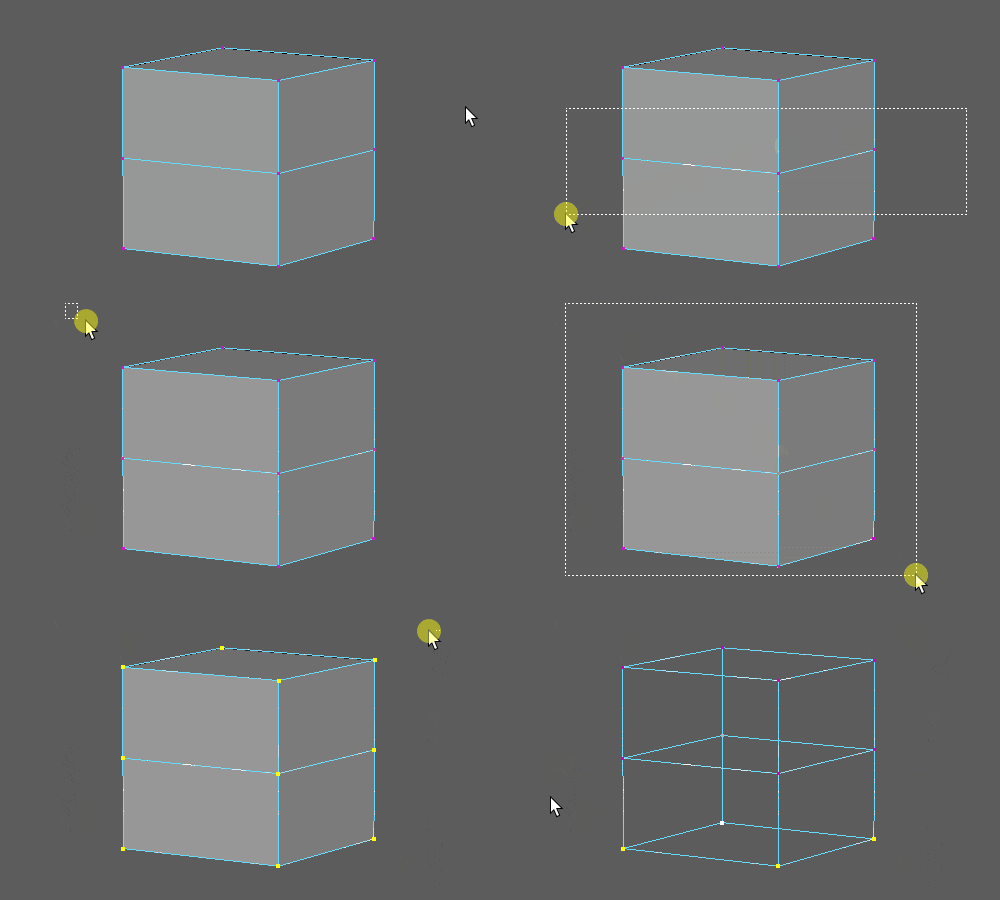
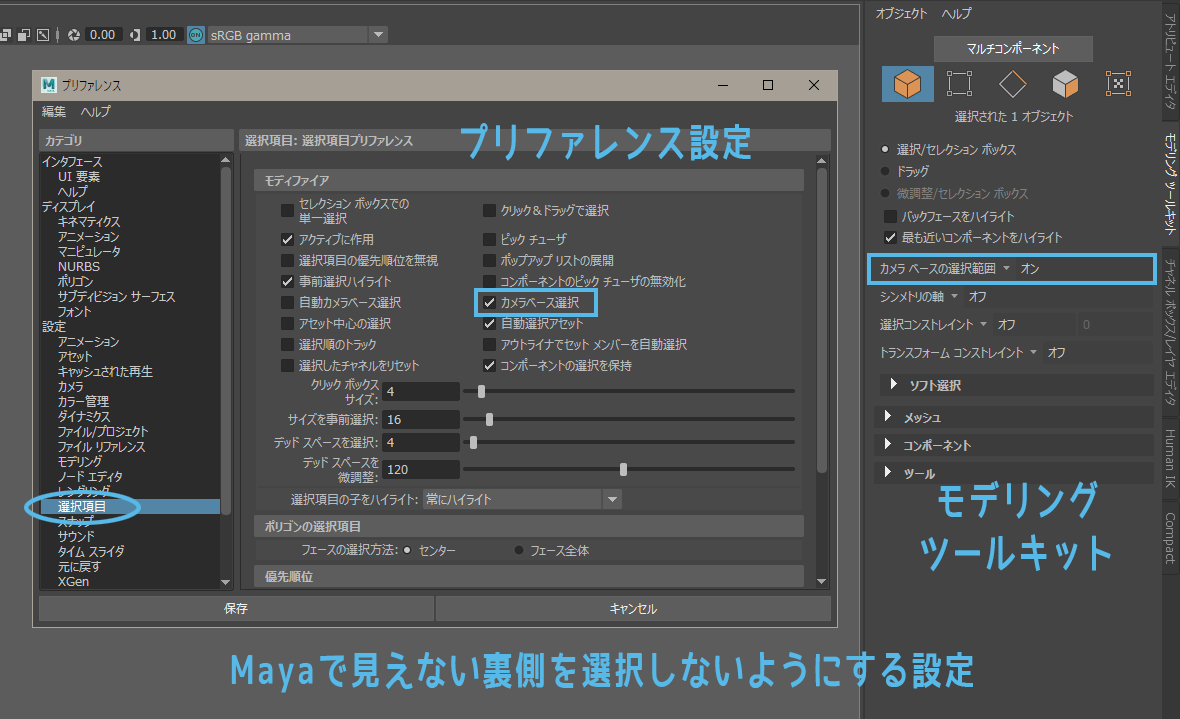
If you find it difficult to select parts of the image that are not visible, you can change the setting.
If you open the Maya Preferences and check “Camera Based Selection” in the Selection Settings or turn on “Camera Based Selection” in the Modeling Toolkit, the invisible backside will not be selected.
zzz…
– Whether unused materials, etc. are automatically deleted
Blender
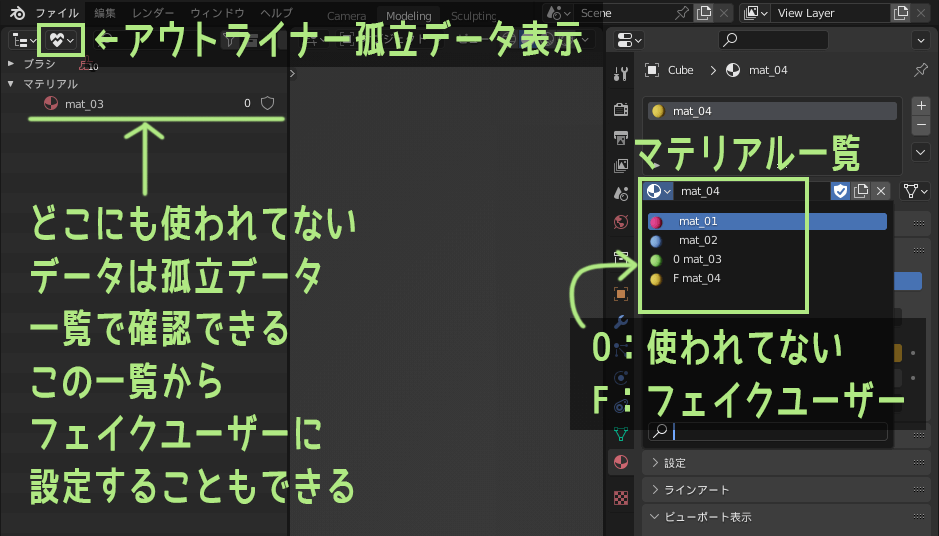
Blender’s specification is to automatically delete unused materials.
If you create a material, but the material is not used by any object in the Blender scene, save and reopen the scene and the unused material will disappear.
The good news is that no unnecessary data will be left behind, but there may be cases where you plan to use the data later and do not want it to disappear.
One means of preserving data that you do not want to be lost is to set up a fake user.
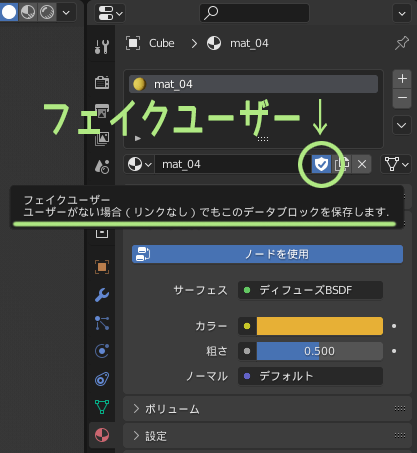
The shield icon next to the material is it.
If you don’t want something to be auto-deleted, press the shield icon to set it as a fake user – especially when creating Action in motion creation!
You can check if the data is unused from the list of materials and actions, or the “Isolated Data” view mode in the Outliner.
For a detailed explanation of fake users, please check this website.
Maya
In Maya, anything you create in a scene, material or otherwise, is not automatically deleted.
It is a good point that the data does not disappear on its own, but conversely, if you do not delete it yourself, unnecessary data will continue to remain.
“Scene Size Optimization” is a method for removing unnecessary data remaining in the Maya scene.
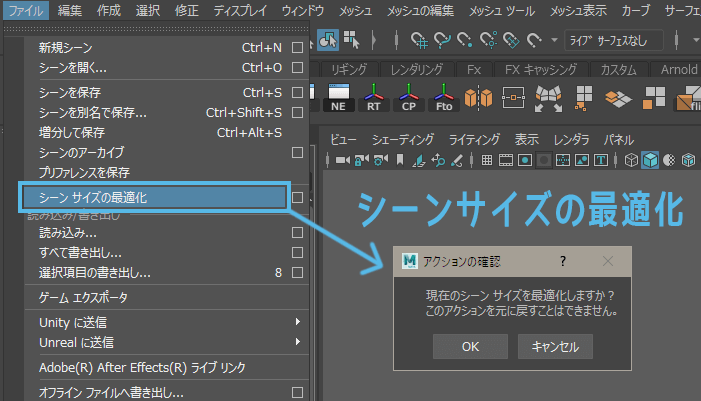
When creating 3DCG data using Maya, it is recommended to delete unnecessary data after the data is finally completed. Especially when creating Maya delivery data for work, you should do this!
What is removed by scene size optimization can be fine-tuned.

Once optimized, it is impossible to undo with Ctrl+Z, so be careful not to erase what you need. In the case of game model data, it is often not possible to erase the locator.

Compare Modeling Capabilities

The following is a comparison of the functions that Toha uses most frequently when modeling.
– With or without modifier
Blender
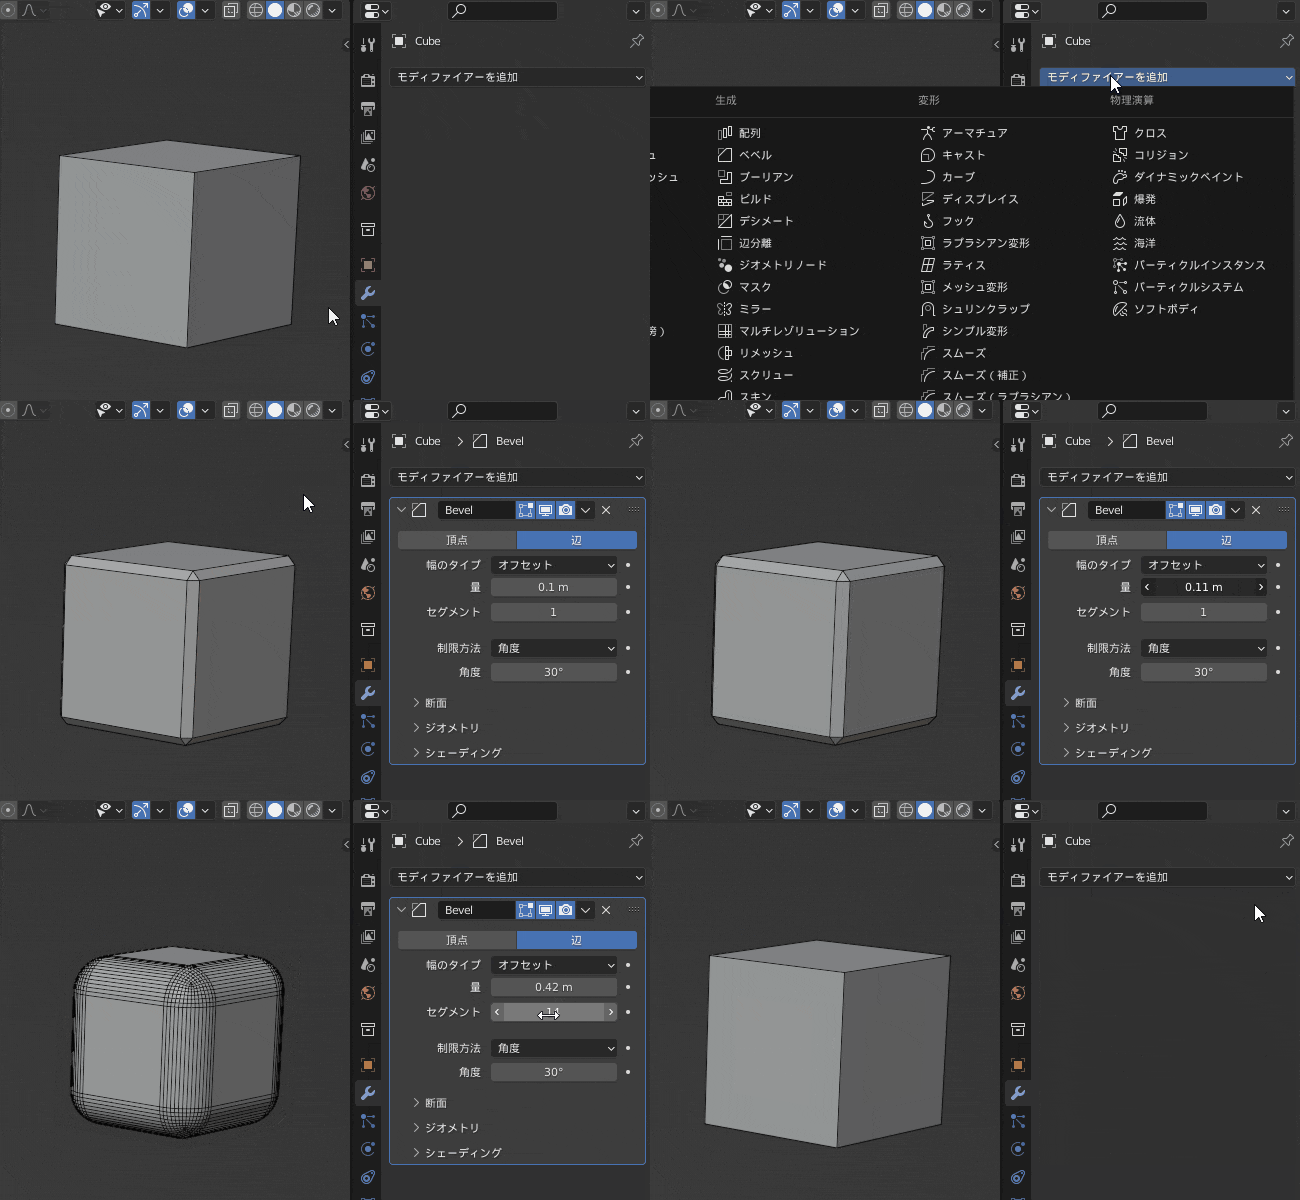
In Blender, you can use modifiers.
It is attached with a modifier the effect can be changed in value later, or the effect itself can be removed by deleting the modifier without applying it.
For example, with bevel modifiers, it looks like this.
Very convenient.
When modeling in Blender, there is no way to avoid using modifiers. Let’s use it as much as we can!
Maya
There is no such thing as a modifier in Maya.
For example, it is difficult to delete a bevel attached to a model later and pretend that it did not exist after all.
However, beveling and other conditions can be changed to some extent later in the “History” section.
Maya also has a history, which keeps track of the work that has been done on an object.
Using histories can be convenient, but they can accumulate rapidly if left alone, and histories that are too old do not reflect effects well when tampered with.
For a detailed explanation of the history See Autodesk’s column for more information.

– Toolbar and Modeling Toolkit
Blender
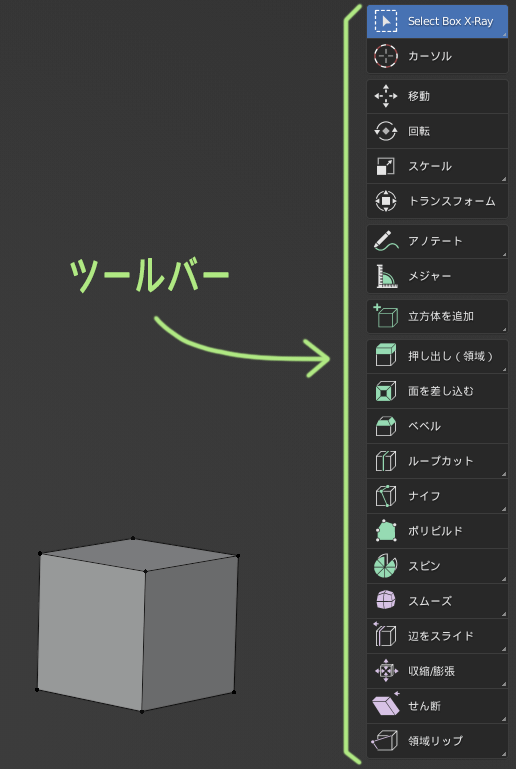
When modeling in Blender, Toha often uses Toolbar.
I like it because the various tools are easy to understand visually and I don’t have to remember a lot of shortcuts.
Maya
When modeling in Maya, Toha often uses the Modeling Toolkit.
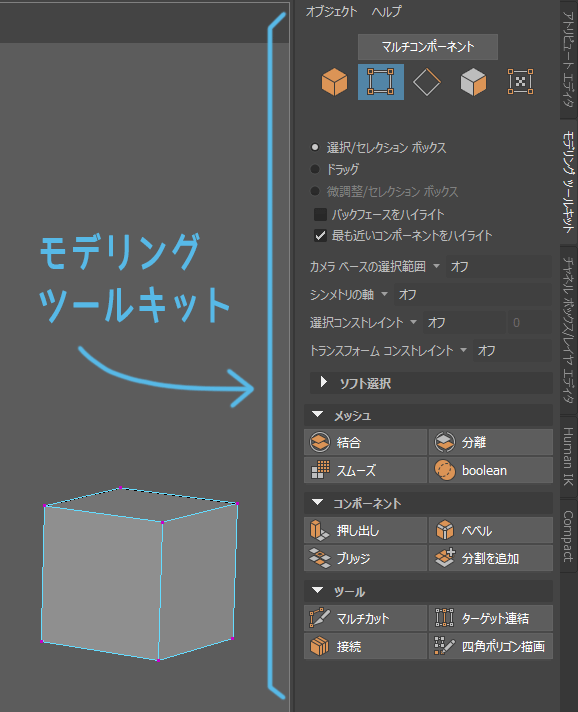
Toha does all of its modeling and other work on a board tablet. If you keep the tool-based menus on the right-hand side, it is not hard to move the cursor to the menu.
Therefore, rather than learning a variety of shortcuts, we usually use a lot of menus that are easy to see and understand.
When modeling with a mouse, it is troublesome to move the cursor a lot, so many people make use of the pie menu and shortcuts for modeling.
: )
– Edge flow
Blender
Currently, edge flow is not a standard feature of Blender.
If you want to do edge flow in Blender, you will have to use an add-on.
Toha is currently using Edge Flow add-on available on GitHub.
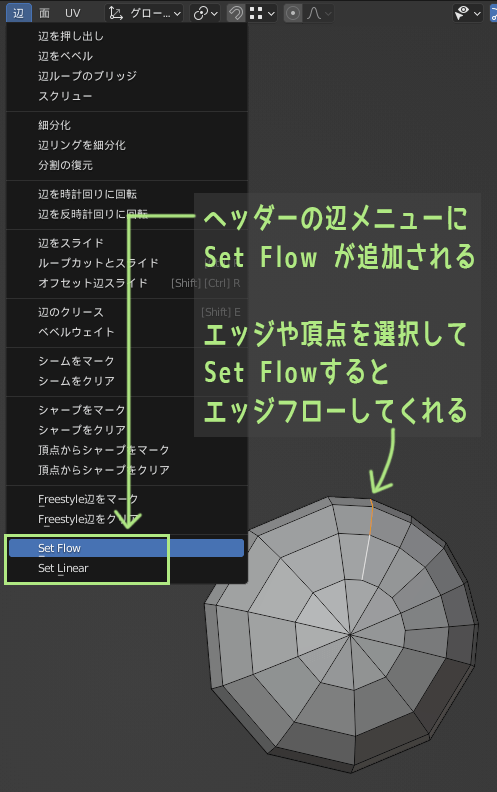
For more information, see our separate article EdgeFlow, a convenient modeling companion.
ostscript: 2022/11/16
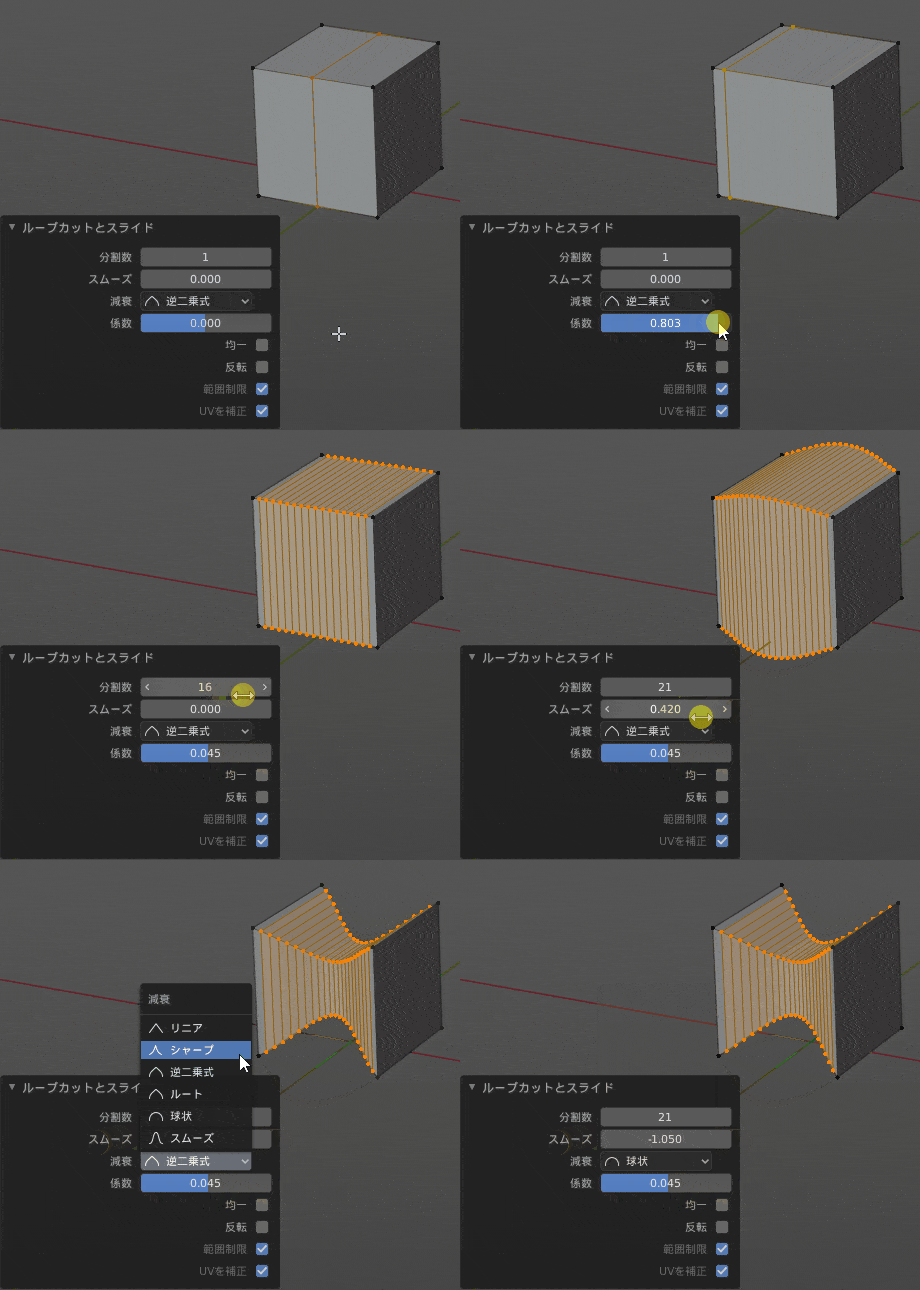
After using the Loop Cut Tool, in the operator panel, you can use the ” You can also change the “Smooth” value to inflate the edges in the same way as the edge flow. I forgot you can do that!
Maya
Maya’s Edge Flow is included as an option for the Multi-Cut tool.
I use the edge flow of the multi-cut tool crazily often. It’s useful.
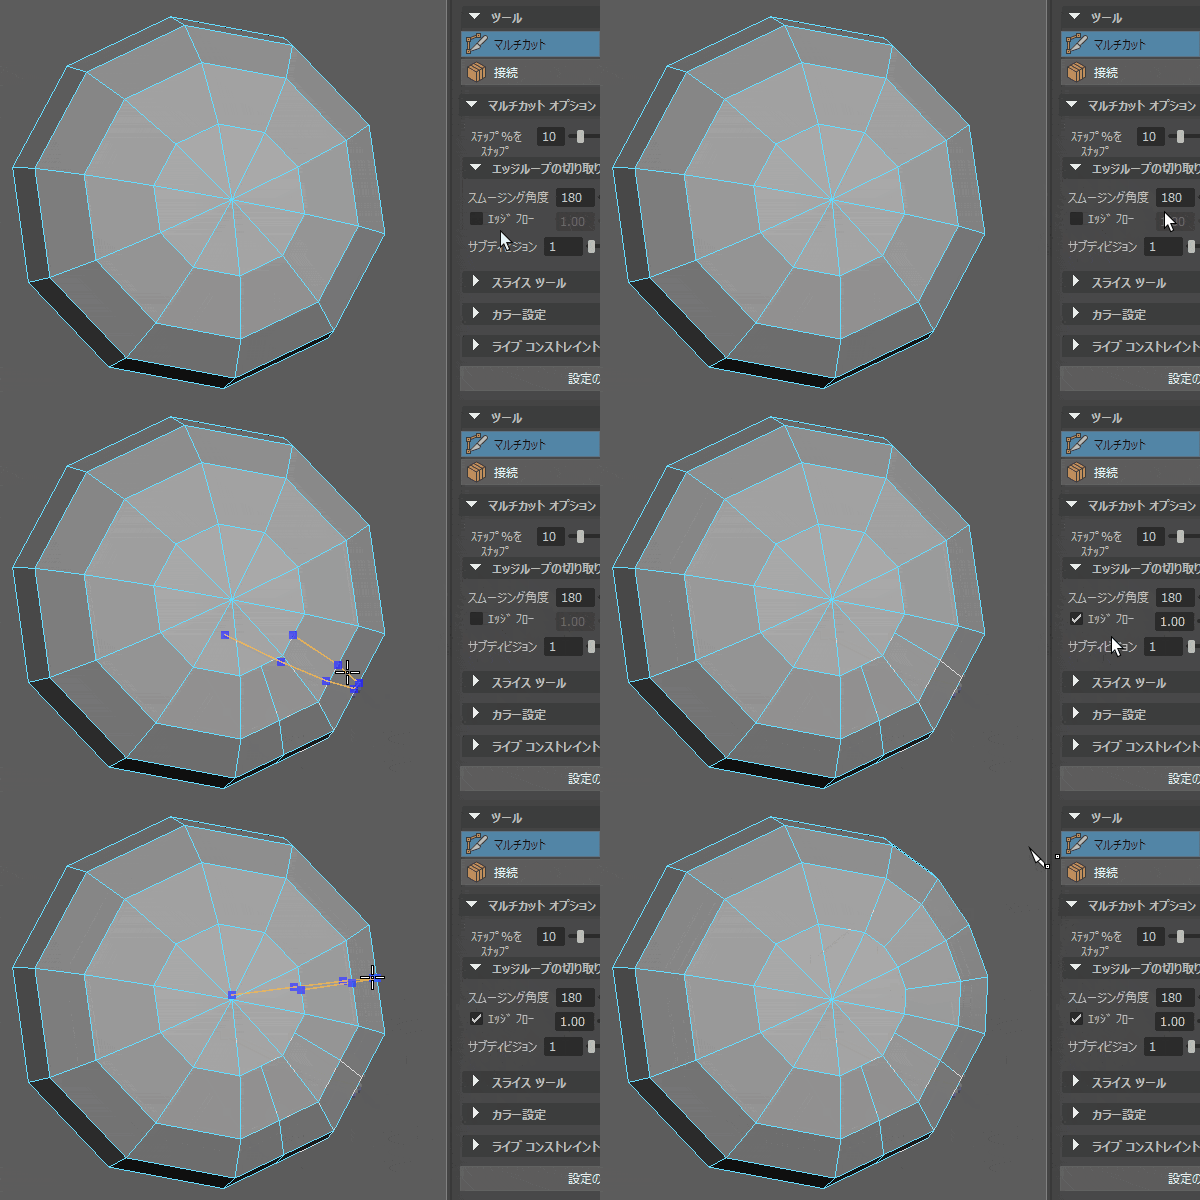
It can also be adjusted later using “Edit Edge Flow” in the Edit Mesh menu.
– Edge slide
Blender
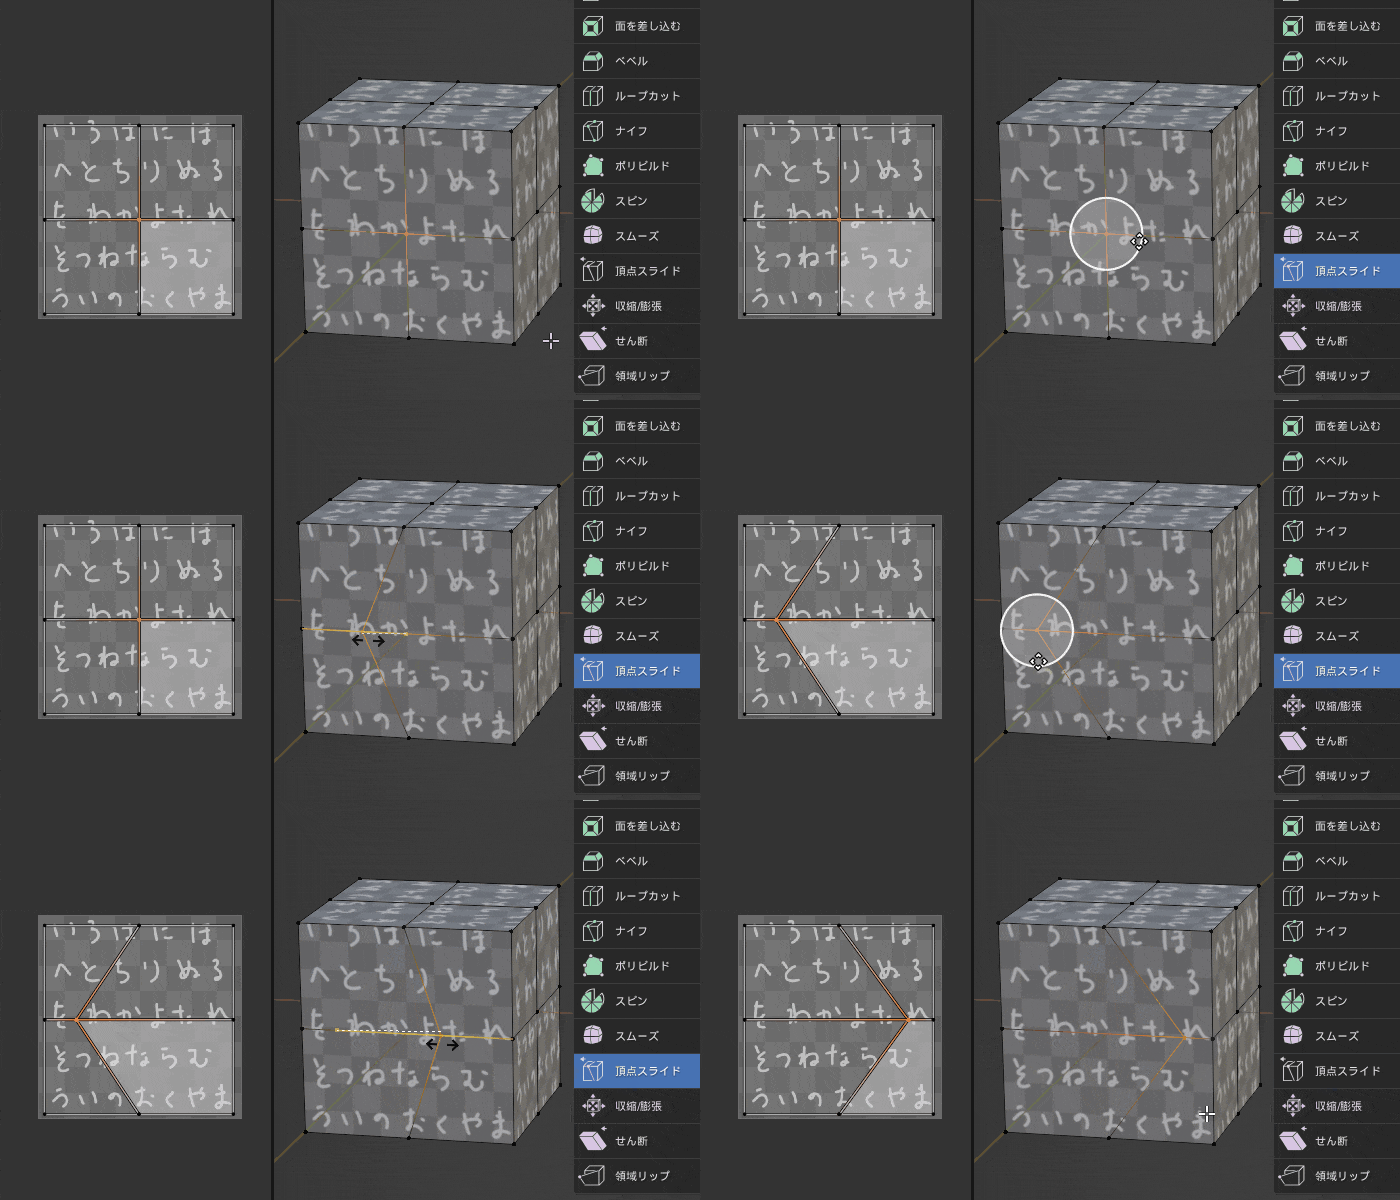
In Blender, the Vertex Slide/Edge Slide tool allows edge sliding.
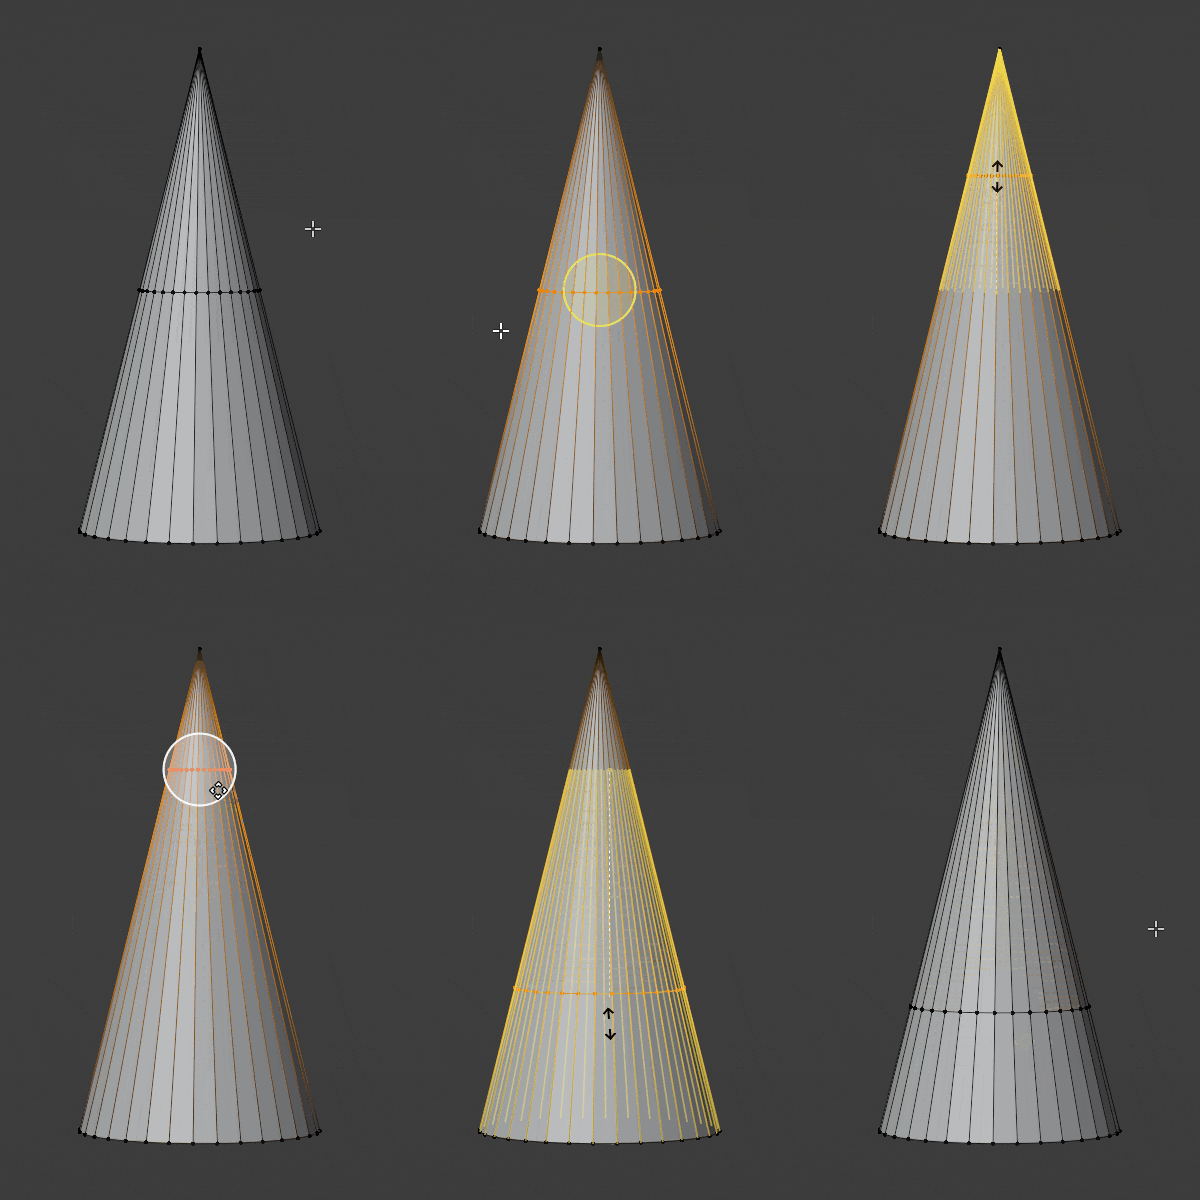
I quite like the fact that when you move vertices using the vertex slide tool, etc., the UVs move with them so that the texture is not distorted.
Maya
In Maya, edge sliding can be done with Ctrl+Shift+Move tool.
The great thing about Maya’s edge slide is that it can also be used with the rotate and scale tools.
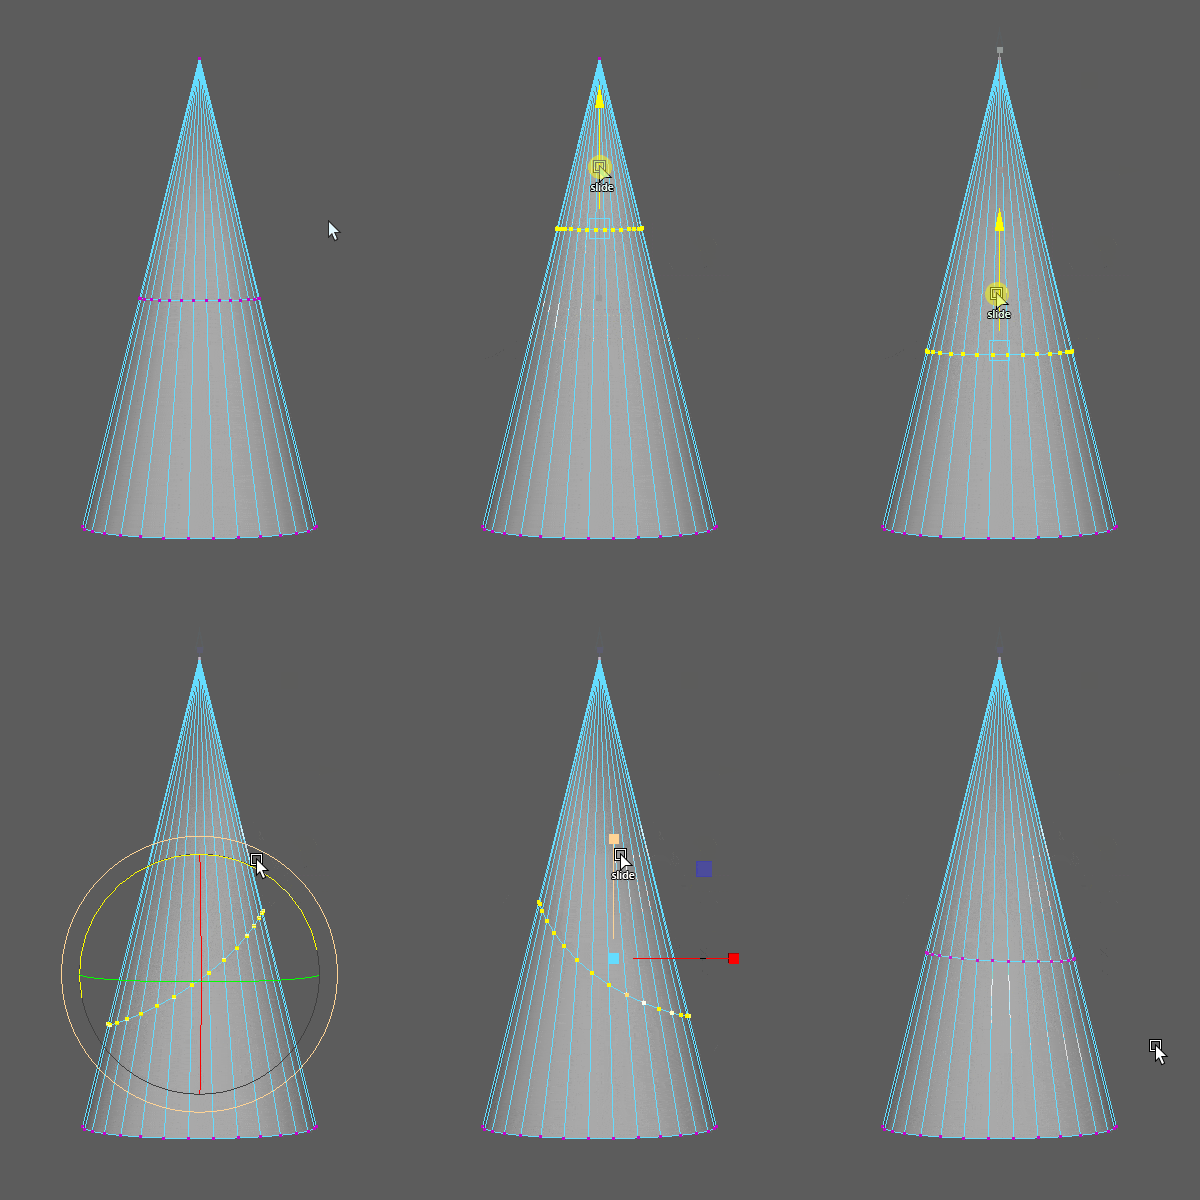
The ease of use is tremendous.
I would like to do the same rotation and scale edge sliding in Blender as I do in Maya, but I can’t find a good way to do it… If anyone knows how to do it, please let me know.
Postscript: 2022/11/4
Comments on how you can do the same edge sliding in Blender as you do in Maya!
The paid add-on MACHIN3tools edge-constraint functionality is what it’s all about – see this introductory video here to get a better understanding. Thanks for the info!
– Mirror
Blender
Blender uses a mirror modifier for mirror modeling.
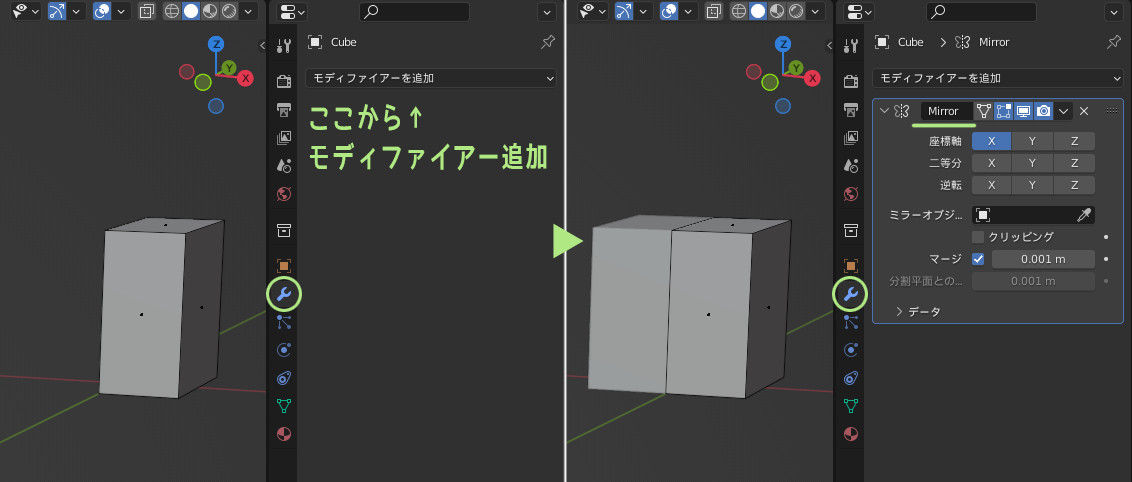
It is very convenient and I use it often.
By adjusting the modifier settings, it is possible to achieve not only symmetry but also top-to-bottom symmetry, and so on.
Maya
There is no modifier in Maya, but there are multiple ways to mirror modeling.
- Turn on the “axis of symmetry” setting in the Modeling Toolkit.
- Instance copy duplicates the halved object and scales the x-axis to -1.
- Delete half of the mesh and then execute “Mirror” from the Mesh menu.
Mirrors 1 and 2 are reflected in real-time; method 3 performs only one mirror replication at runtime.
Toha uses method 1 but sometimes uses method 3.
– Partial mirror
Blender
Partial mirror modeling in Blender is currently a bit difficult.
You can use the “Mirror” tool option to select and move symmetrical vertex. However, it cannot mirror operations such as extruding or cutting partially and in real-time.
The “Symmetrize” mesh menu allows you to mirror duplicate only selected portions, but it is not very useful in modeling work.

Now Toha thinks the best way to do a partial mirror in Blender is…
- Finish modeling the symmetrical part using the mirror modifier.
- Apply mirror modifier before modeling asymmetrical areas
Maybe.
If you know of a good way to do partial mirror modeling in Blender, please let me know!
Maya
In Maya, if you turn on the symmetry setting in the modeling toolkit, you can do partial mirror modeling that also reflects extrusion and cuts in real-time.
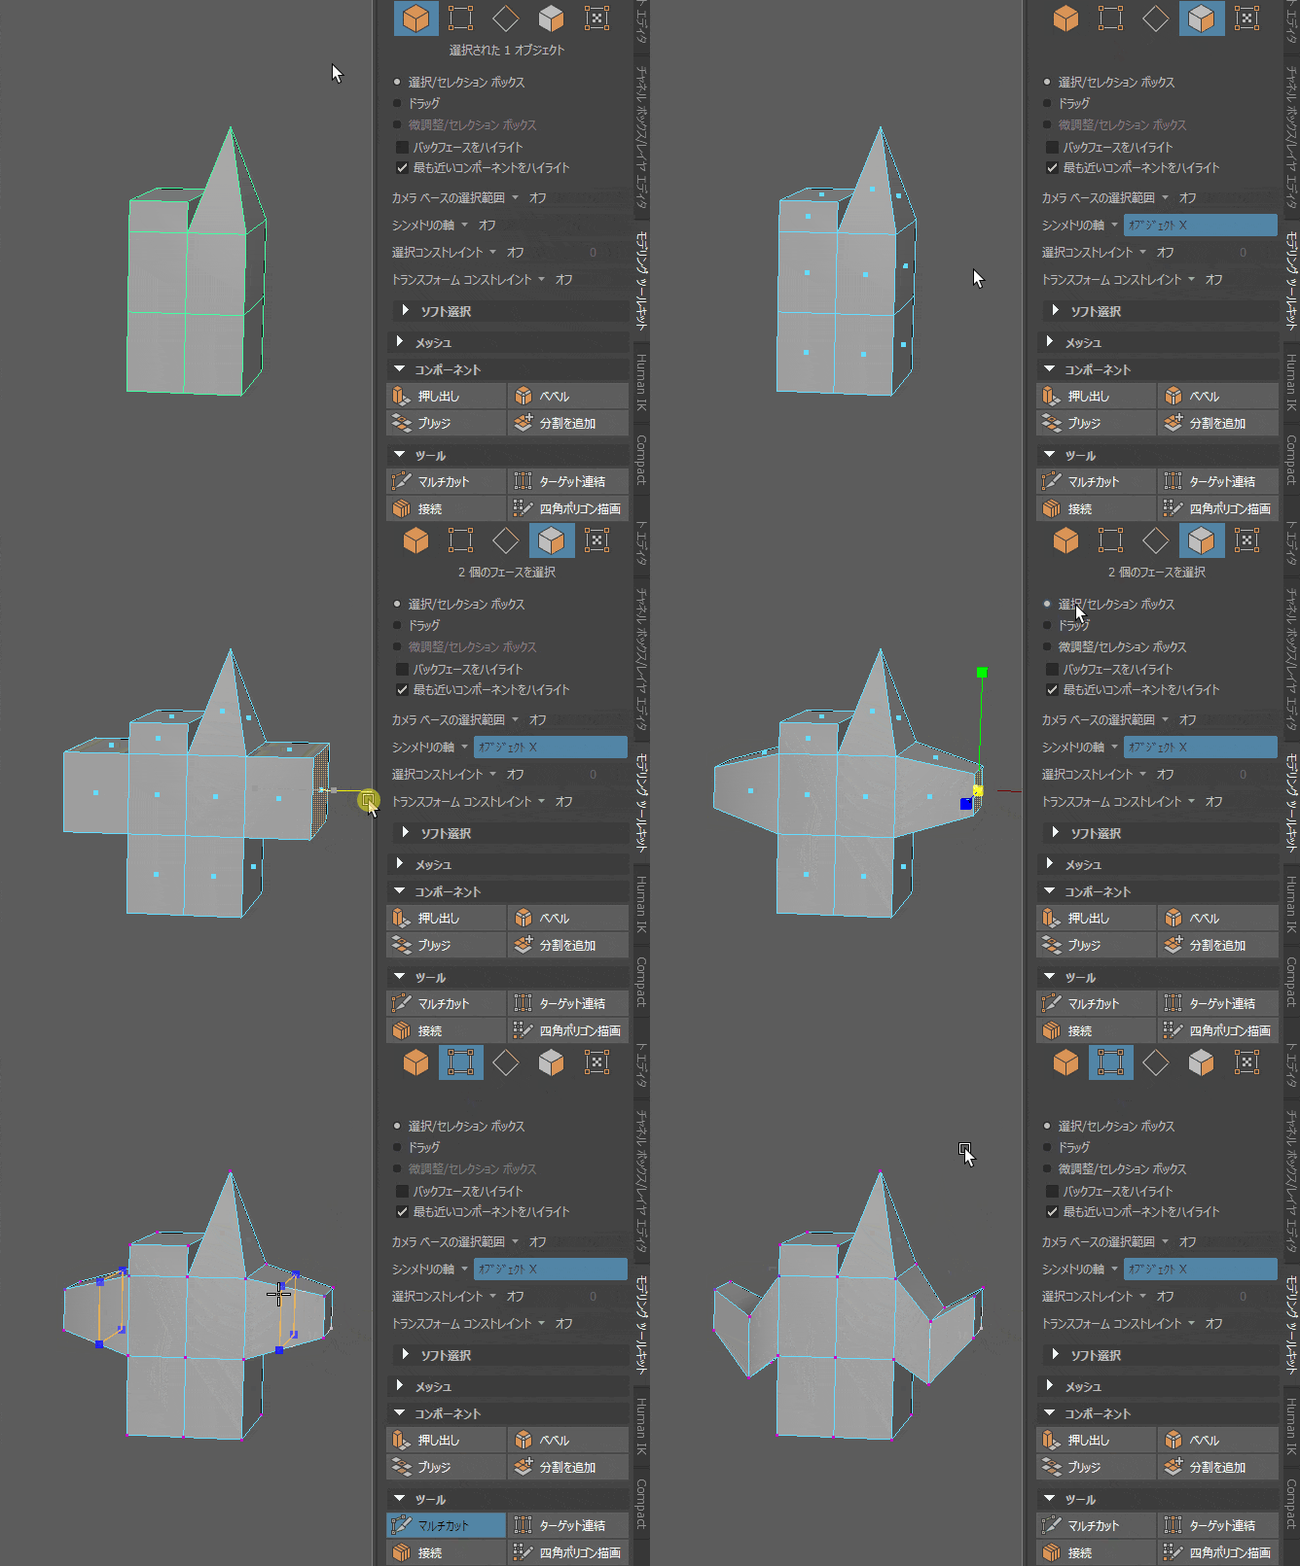
It is very convenient. If I can’t do it, it’s a bit of a problem.
部The reason why partial mirror modeling is necessary is that the game’s relatively low-poly character models
I don’t want to make a perfectly symmetrical model, but I want to make a partially symmetrical model to keep production costs down.
This is because.
It is less expensive to make symmetrical 3D models.
However, a completely symmetrical model tends to look CG-like or cheap, so Toha always makes sure to create asymmetrical parts in the model.
It would look even better if all parts were made asymmetrical, but that would double the production time…
Therefore, as a compromise, we would like to make a model with partial symmetry.
♪
– Proportional Editing and Software Selection
Blender
A feature similar to soft selection in Maya is proportional editing in Blender.
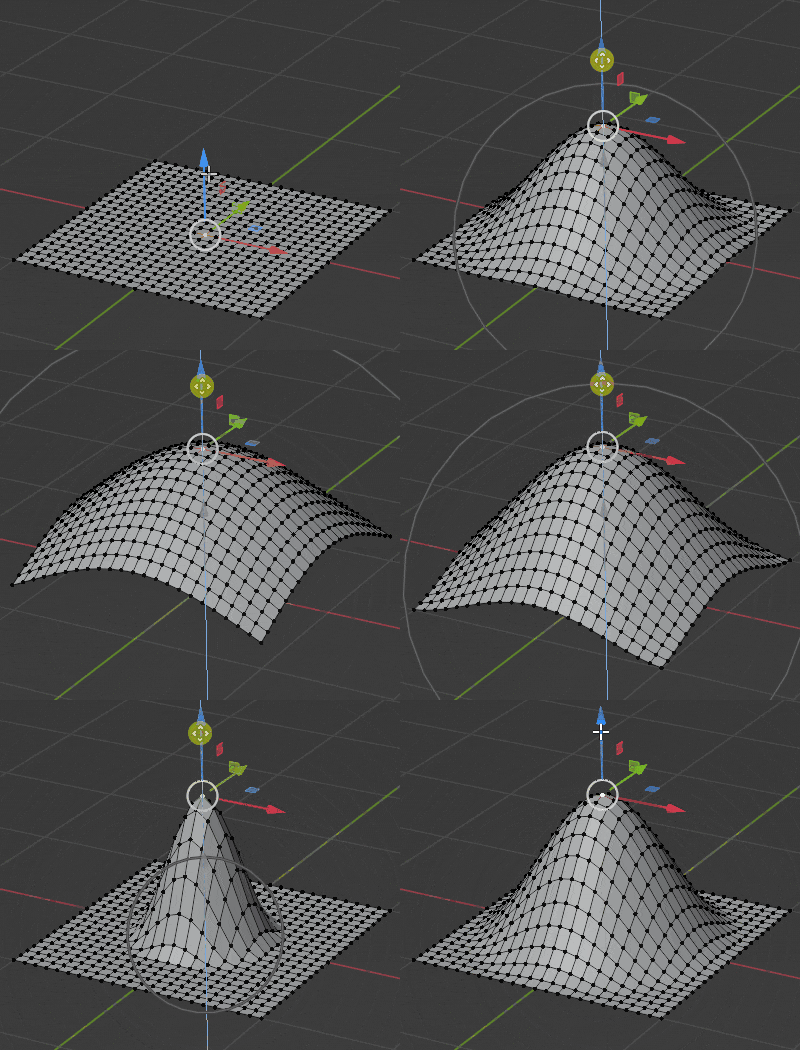
Please see Proportional Editing in a separate article for details.
Maya
A feature similar to proportional editing in Blender is software selection in Maya.
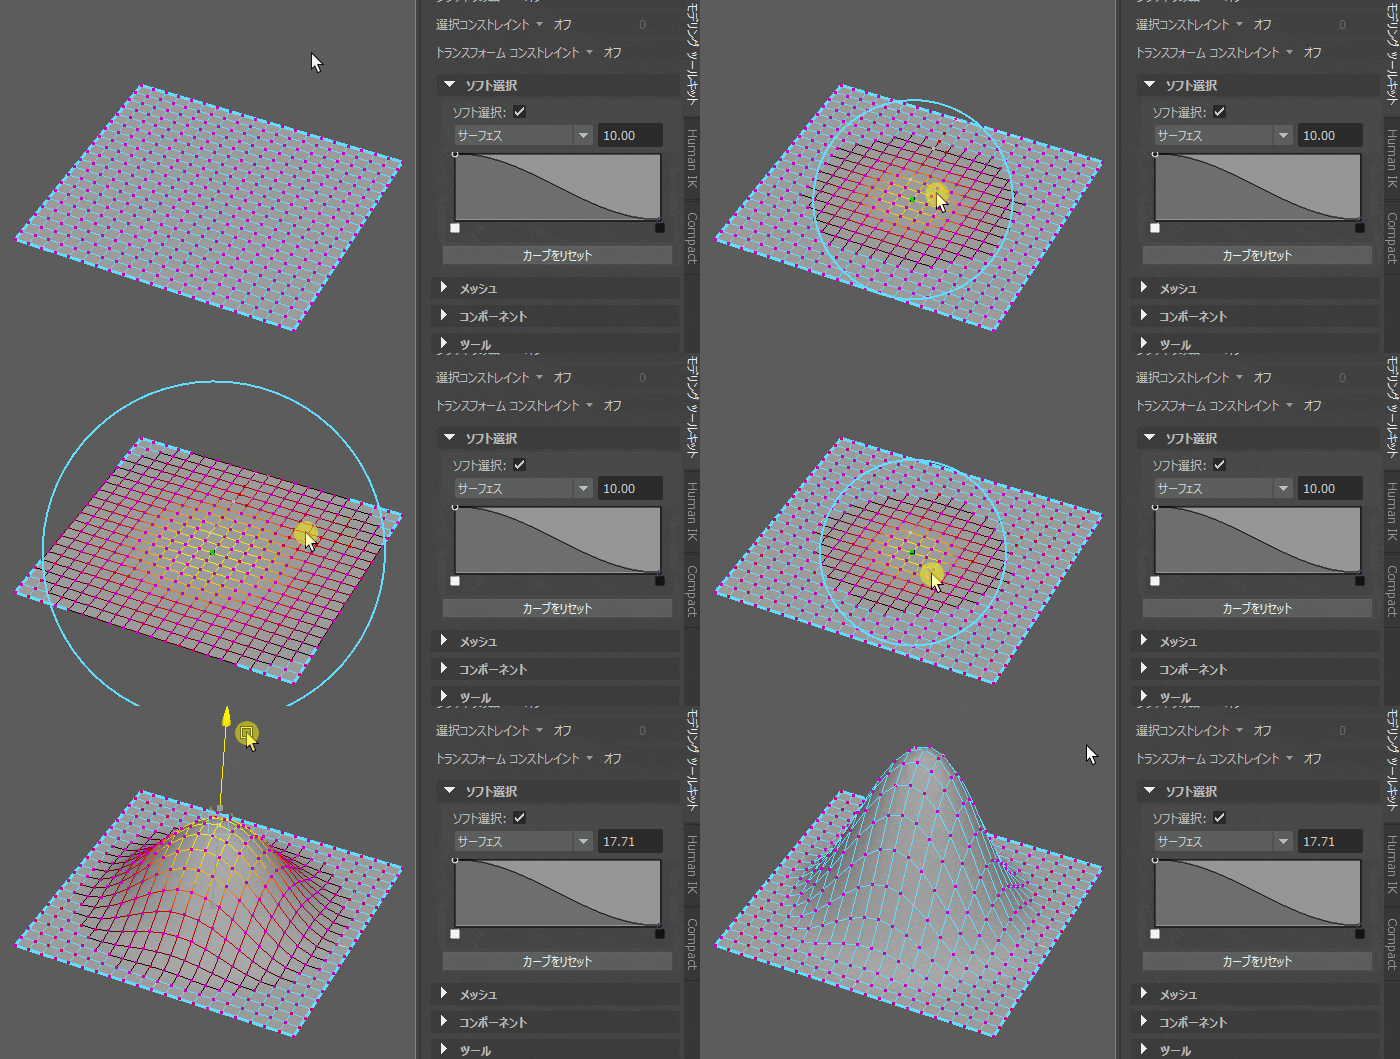
Use B + left mouse click and drag to change the area to be soft-selected.
The options to change the shape of the soft shapes and whether to select by volume/surface are the same as in Blender.
– Fine-tuning of movement and other parameters
Blender
In Blender, fine adjustments can be made by pressing the Shift key while using tools such as Move and Rotate.
It is a feature of Blender that Toha is very fond of in a humble way. easy to use.
![Blender [Shift]を押しながらの移動](https://tohawork.com/wp-content/uploads/2022/09/b_shift_key.gif)
Maya
There is no optional feature that allows Maya to reduce the amount of movement while using the tool.
Probably not. The following two functions seem to be the most likely.
- Use Alt + arrow keys to move (for movement only, but can also be used for vertices and edges)
- Ctrl + left mouse drag in the value input area of the channel box (only for objects)
To say the least, it is not easy to use.
I wish I could use the tweaking options in Maya like Blender!
– Various types of vertex merging
Merge around vertex
Blender
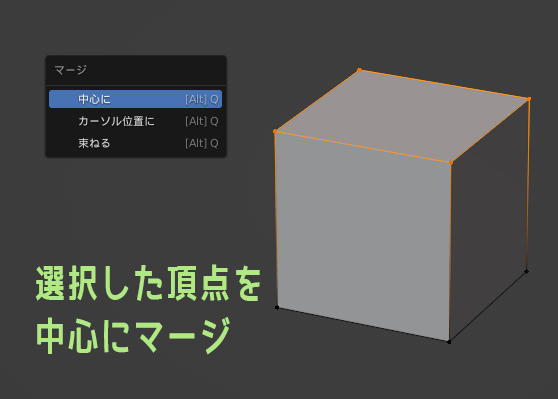
In Blender, “Merge -> Center” merges all selected vertices into one.
The default shortcut for merging is the M key.
Maya
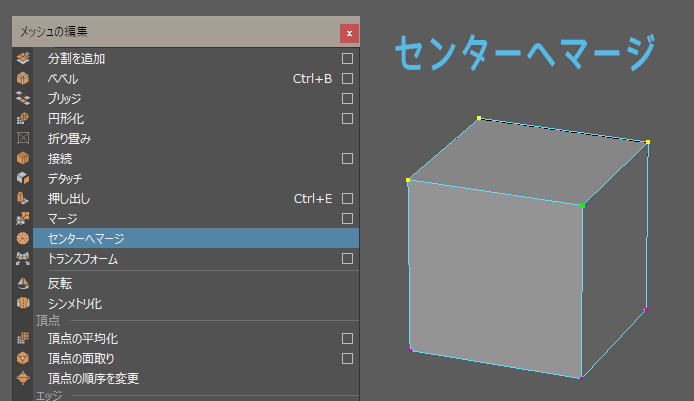
In Maya, “Edit Mesh -> Merge to Center” merges the selected vertices into one.
You may find it useful to register it with Custom Shelf or assign your shortcut.
Target linkage
Blender
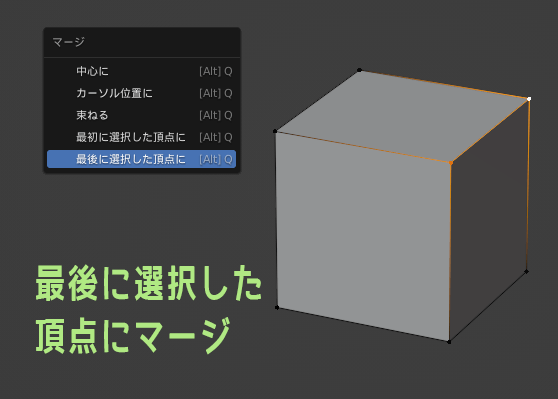
In Blender, select the vertices you want to merge in order and do “Merge → Last selected vertex”.
If you want vertex merging like Maya’s target concatenation, you can use a Sewing union of vertices.
Maya
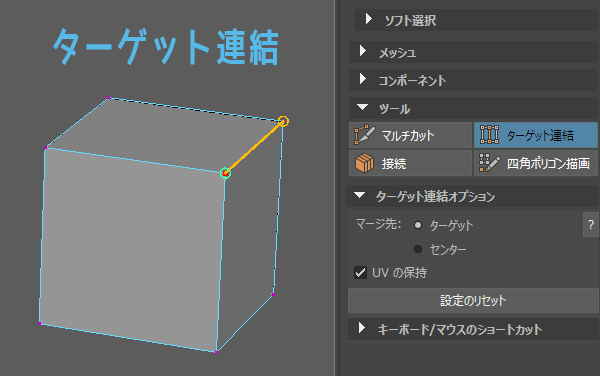
In Maya, you can use “target concatenation” in the modeling toolkit to merge vertices that are sewn together.
It is quite a useful feature and I use it often.
– Boundary edge highlighting
Blender
Personally, it would be useful to be able to display the boundary edges (mesh breaks) of objects
Since Blender’s standard features are difficult to deal with, we will use add-ons. The following two are candidates.
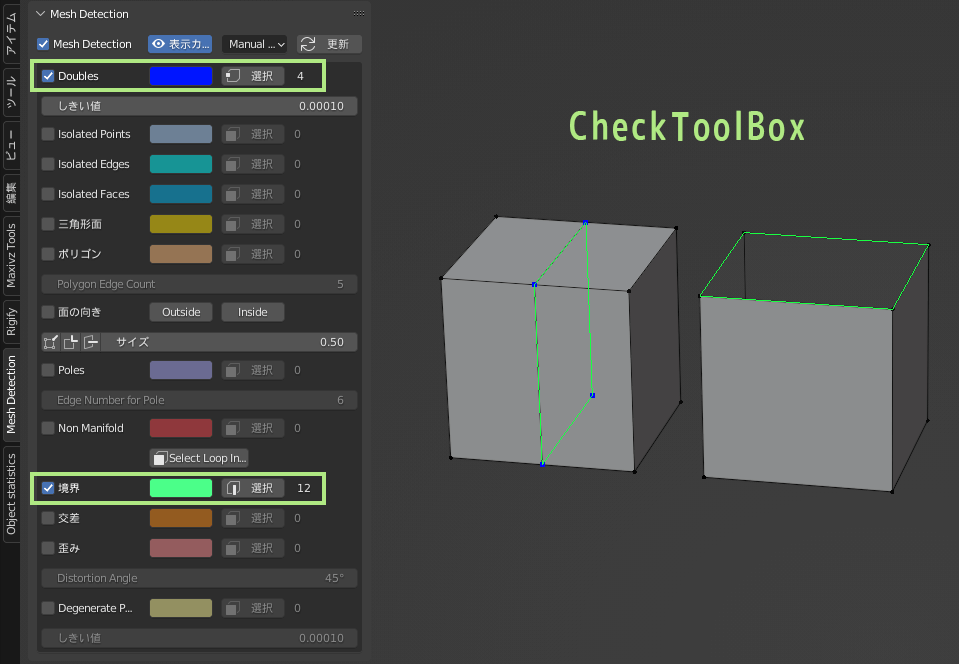
A feature-rich add-on to help you check out the finished model.
Check “Boundary” to see the boundary edges. If you check “Double”, you can also see double vertices. But it is a bit annoying because it is not displayed until you enter the edit mode of the object.
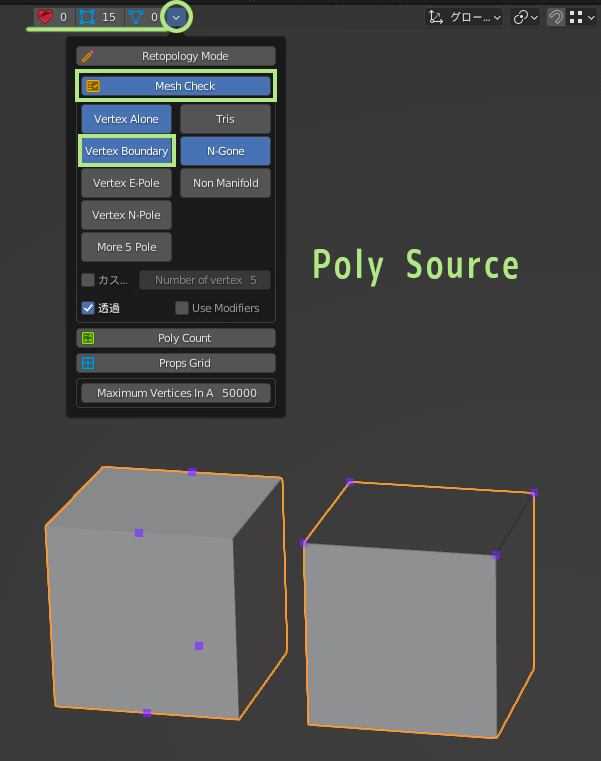
An add-on that displays the number of polygonal polygons, etc. with a simpler UI than CheckToolBox.
When the option Mesh Chack is turned on, vertices and other objects at the boundaries are highlighted. This option is good for immediate confirmation as it is highlighted even in object mode.
Maya
Maya has a setting that allows boundary edges to be displayed thicker for clarity.
Open Maya’s preference settings and check Boundary Edge Highlight from the Polygon menu. Increasing the Edge Width value will always make the boundary edges appear thicker than normal edges.
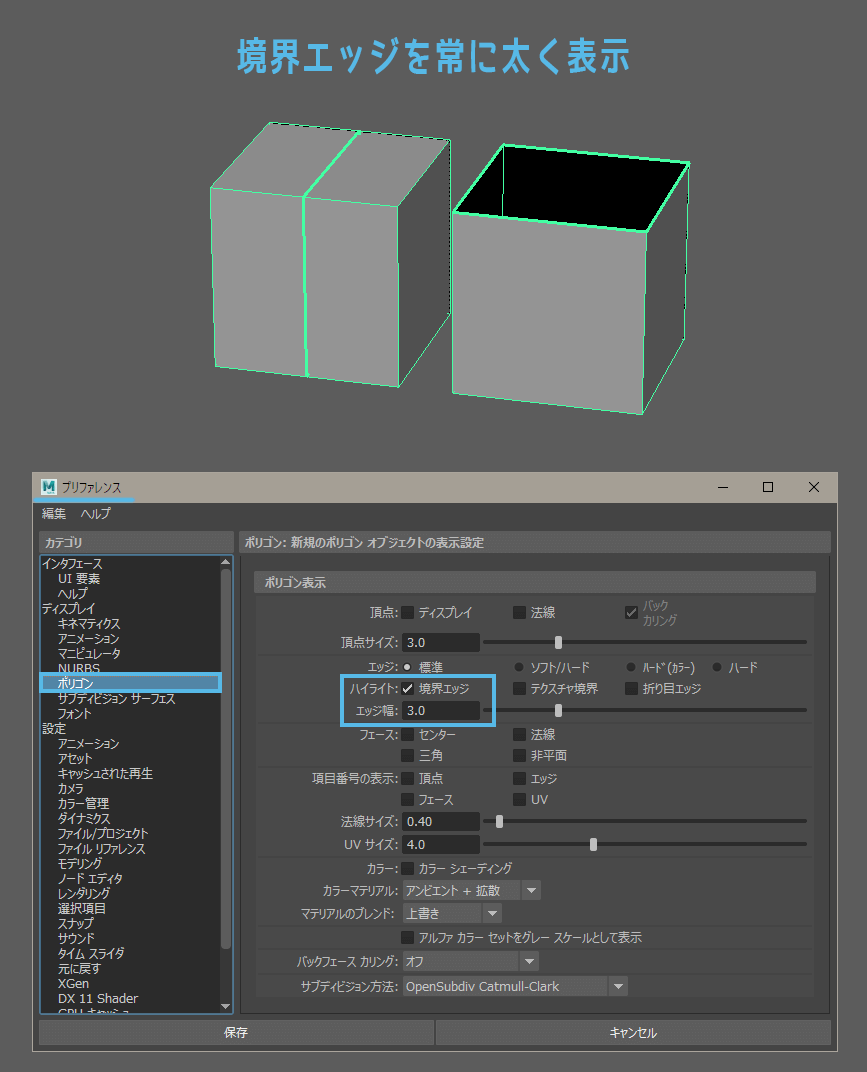
Note that once the boundary edge thickness is set, Maya must be restarted once for the setting to take effect.
During modeling, parts are sometimes broken into smaller pieces to make the work easier. Finally, they are merged, but sometimes only the objects are merged and the vertices are forgotten to be merged.
Such areas will be immediately obvious because the mesh will be broken and the boundary edges will appear thicker.
– 3D Paint
Blender
Blender allows 3D painting of objects in texture painting mode.
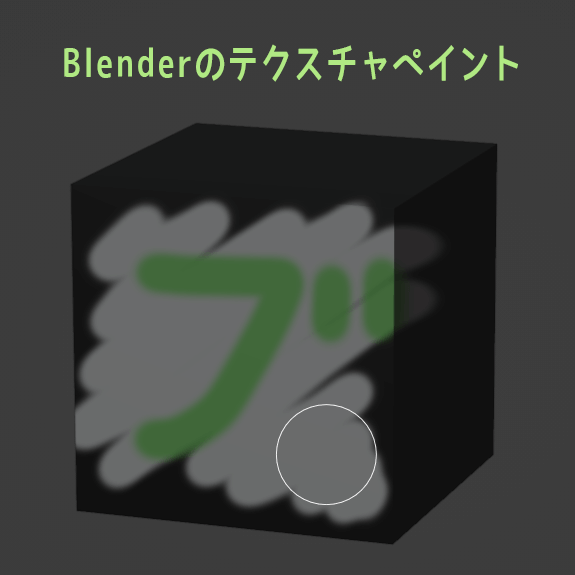
Before texture painting, you need to assign an appropriate texture from the texture slot in the Tools tab of the sidebar.
But it’s nice to be able to draw quickly and easily.
There are also many dedicated add-ons for 3D painting in Blender, such as HAS Paint layers and Pbr Painter.
At the moment, Toha does not include any add-ons for 3D painting in 3DCG software, as it is sufficient to draw rough sketches. For serious 3D painting, I use SubstancePainter.

Maya
Maya allows 3D painting with the 3D Paint tool in the texturing menu.
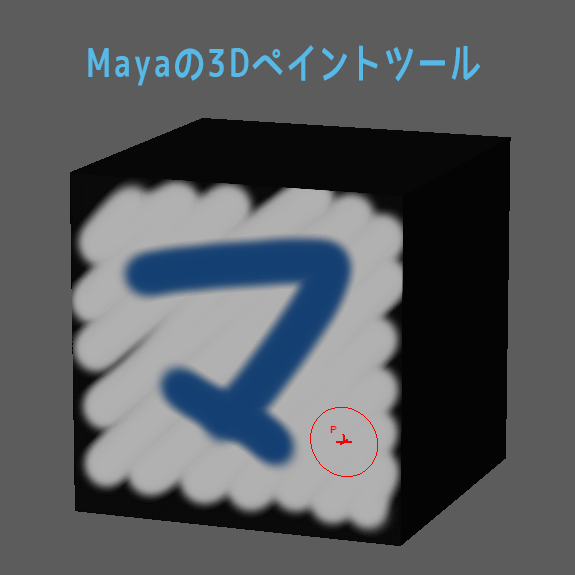
Maya’s 3D painting is not very pretty, so it is not suitable for serious 3D painting.
I think it could be used to draw a base or hit in 3D to draw 2D textures nicely.

– Delete History
Blender
It is not necessary to delete history in Blender.
Where do folks from Maya do things like delete histories? Is it okay if I don’t delete it? I think so, but it’s probably OK.
As I wrote in Whether unused materials etc. are automatically deleted, Blender is supposed to be designed to prevent unneeded data from remaining.
Maya
For 3D models made in Maya, you should delete the history as appropriate.
As I wrote in Whether unused materials etc. are automatically deleted. Maya objects keep a history of your work history, so if you accumulate too much, Maya may start to get heavy.
Especially for character models that are created by repeatedly extruding polygons and moving vertices, there is little use for the history even if it is kept. It is no problem to delete it.
In Maya, it is also a promise to do history deletion when the model is completed.
Compare UV Editing

Let’s compare the tools and editors used to edit UVs after UV expansion.
– UV Editing Tools
Blender
You can read more about Blender’s UV expansion in the article How To Manually Unwrap UVs.
In conclusion, since it is time-consuming to edit UVs using only Blender’s standard functions, it is still a good idea to use add-ons for this as well.
Three add-ons are introduced in the article: UVToolKit 2.0, TexTools, and MagicUV.
We have also compiled a list of other things to keep in mind when editing UVs in Blender, so please take a look at the article~!
Maya
UV editing in Maya is mostly accomplished using the standard UV toolkit and UV editing menu.
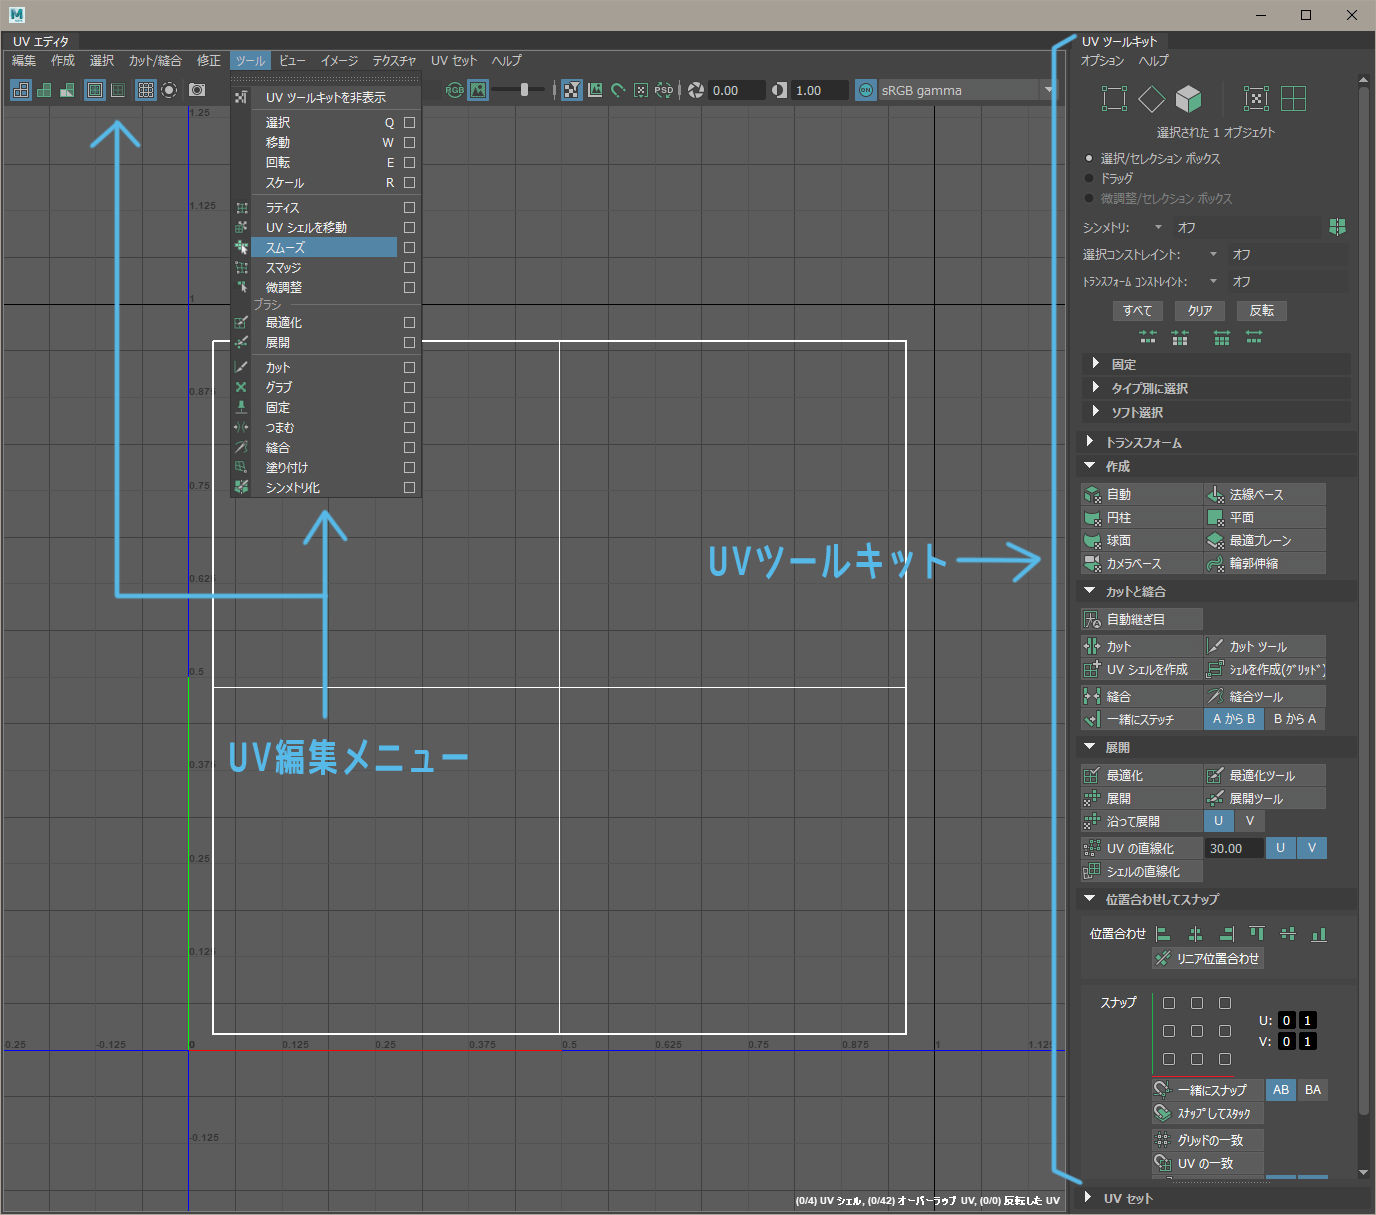
This UV toolkit was not in the old Maya.
UV editing in Maya at that time was very difficult, so I used a plug-in UV editor or another software for UV development.
But Maya has evolved a lot since the old days.
The modeling toolkit was originally an external paid plug-in too, but Autodesk bought it (?) and made it a standard feature of Maya. and became a standard feature of Maya. It has a history.
For the parts where the standard Maya functions are not enough, we use scripts by Maya Time, a CG self-study room.
I often use MEL of aligns UVs on a grid and MEL of straighten UVs.

– Darken the texture displayed in the UV editor
Blender
モWhen editing the UVs of a model, you may want to display the model’s texture in the UV editor. If the texture is displayed as is, it may be too bright to see the UVs, so you may want to darken it.
In Blender, darkening a texture in the UV editor requires a few extra steps.
The procedure is as follows.
- Displaying textures in the UV editor
- Turn on “Apply to View as well” from the Image tab in the sidebar of the UV Editor.
- Darken by adjusting color management in the Render property of the Property Editor.
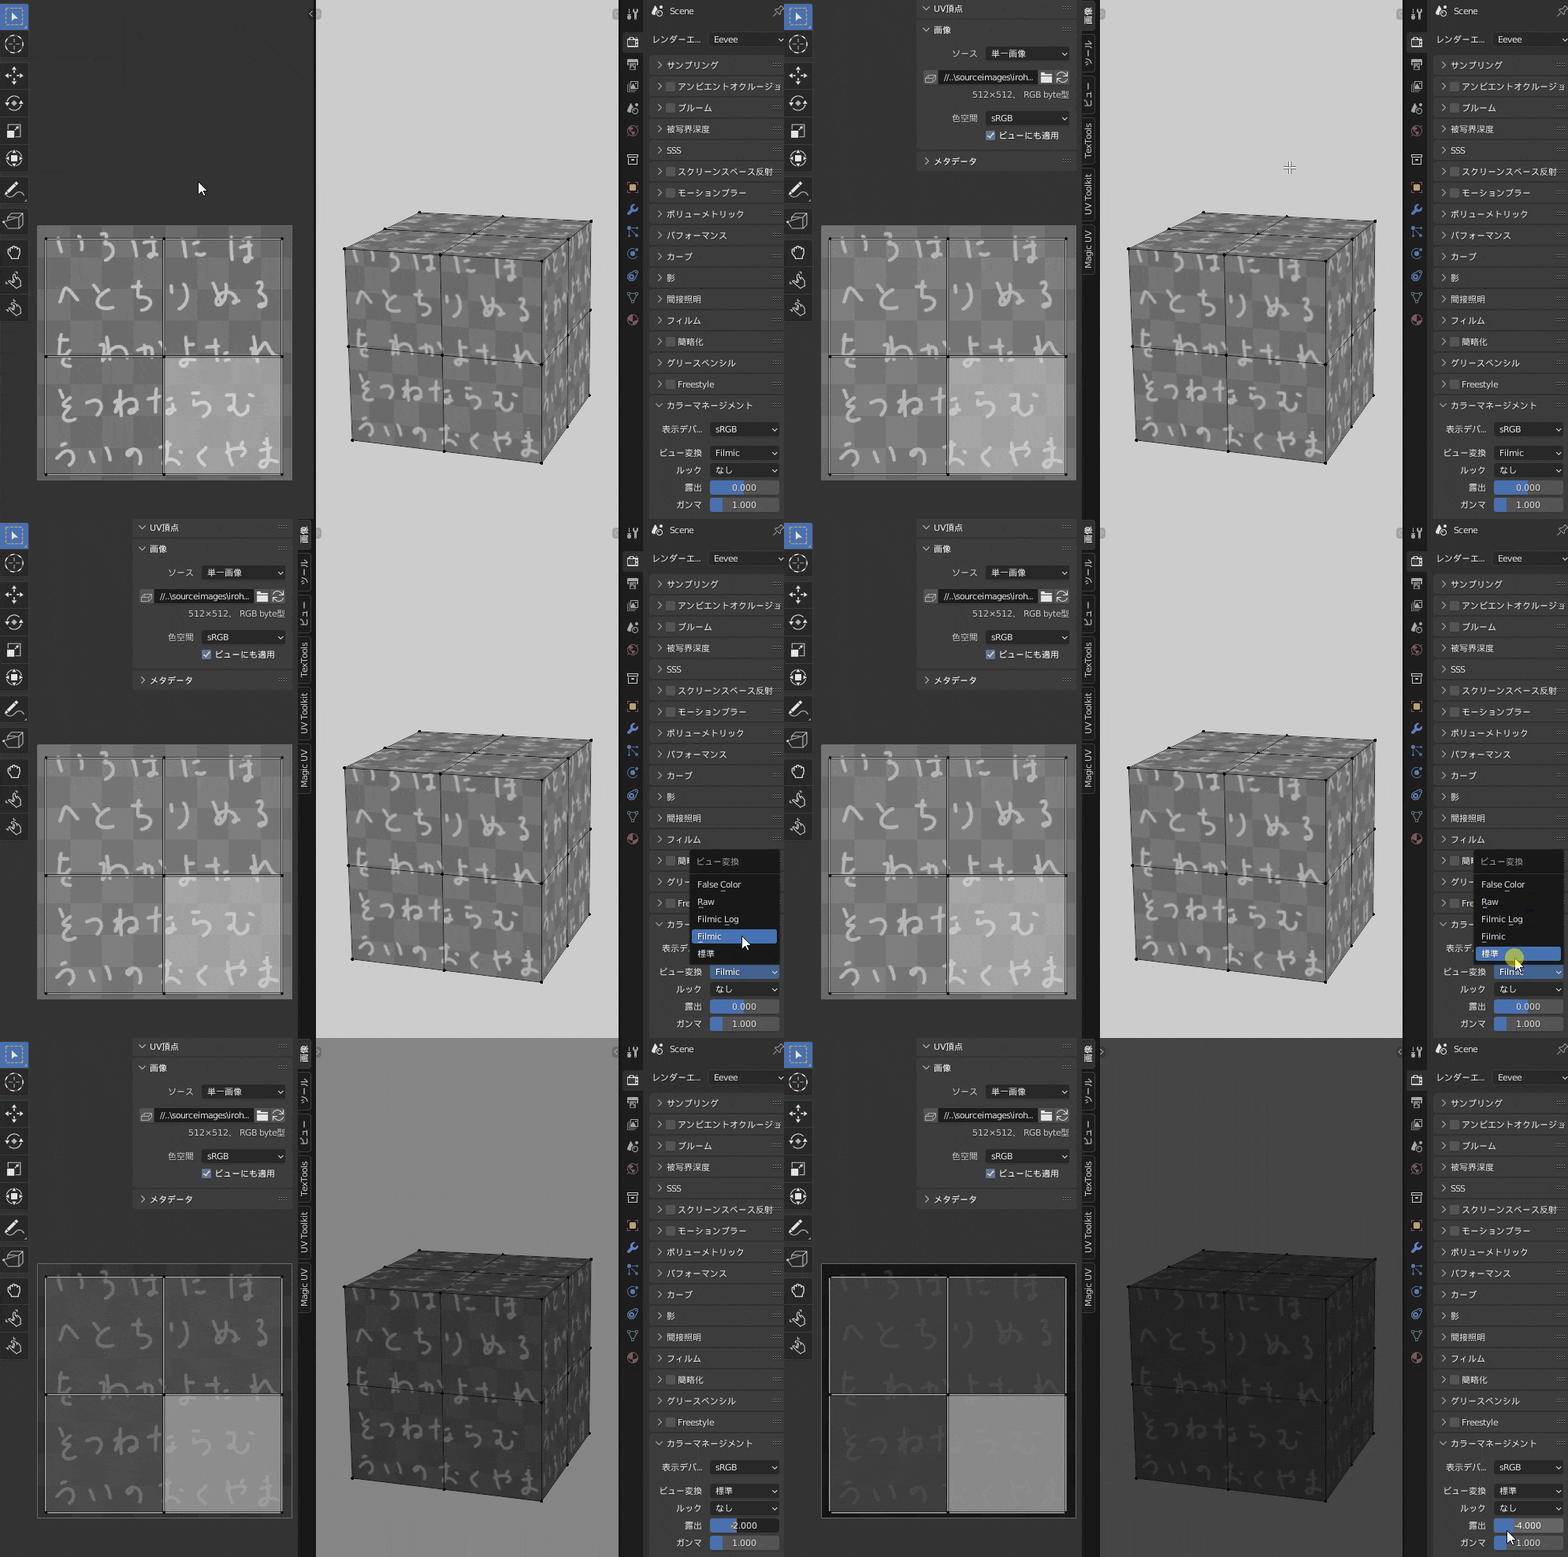
I looked around for a way to do this somehow and unearthed this method from an exchange with BlenderArtists that I found in an English search. Note that it changes the color settings of the rendering, so be careful there.

■ Postscript ■
There is a function called “Exposure Adjustment” in Mio3 UV, which is available as a Blender extension, which allows you to darken the texture color in the UV editor more easily and conveniently!
I’m glad! It’s a great add-on that is easy to use and fully documented with other features as well!

Maya
In Maya, the UV editor has a button to show/hide textures and a slider to change the brightness of the displayed texture.
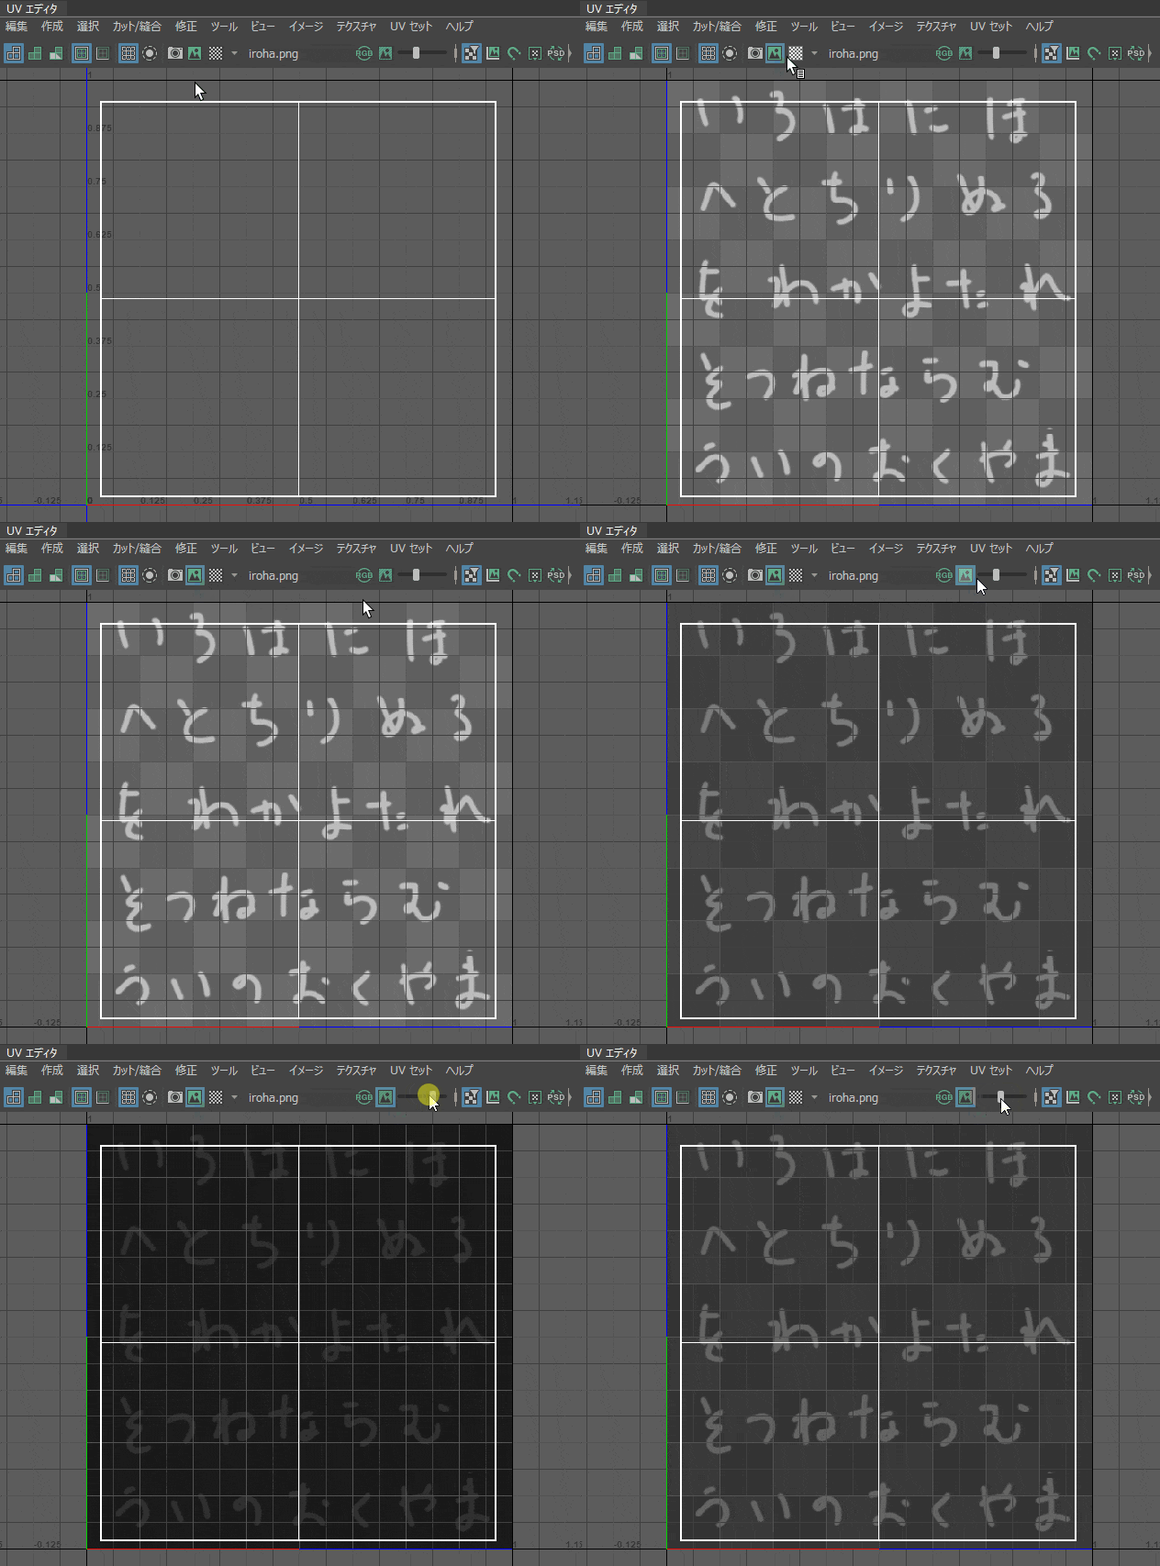
It’s useful. It would be great if the same thing could be attached to Blender’s UV editor.
Compare Rig / Setup
I will compare the bones that are put into a character model and how to set skin weights.
– Armature creation and bone creation
Blender
What bones and joints are in Maya are called armatures in Blender.
It is like saying that each bone is a bone and a group of bones is an armature.
Blender’s armature features three modes.
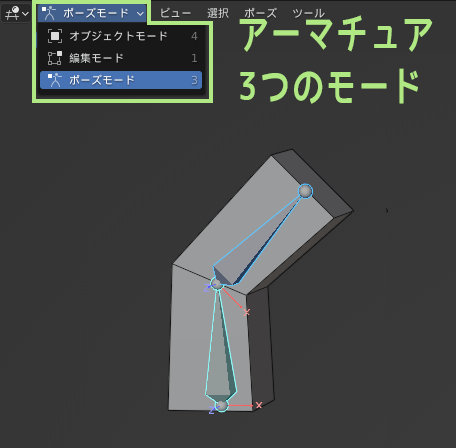
- Object mode: for selecting the entire armature
- Edit mode: for increasing the number of bones and adjusting their positions
- Pose mode: for creating poses and movements by rotating, etc.
You need to switch between each mode depending on what you want to do.
There are also differences from Maya’s bones, such as the fact that the axis of the bone’s direction of travel is fixed to the Y-axis. After the bones are created, it is possible to adjust their positions more flexibly than with Maya’s bones.
I’m still learning a lot about armature relationships!
Maya
The armatures in Blender are Maya’s bones (joints).
When creating bones in Maya, just be meticulous.
In Autodesk’s column, Games There is a Creating skeletons in games. It’s an old article, but you still need to be careful, especially with Scale. Bones have to be made really nicely or you will cry later.
(It is sometimes better not to “throw away the joints without skin weights” in the column.)

By the way, here is the method that Toha recommends for creating beautiful bones in Maya.
- Freely edit the positioning guide bones to adjust the position of the bone
- Once positioned, put the guide bone into the display layer and lock the selection.
- Turn on the snap setting and create the production bone at the position of the guide bone.
When I am creating armatures in Blender, I may think, “Is it OK to edit the bone positions so much later?”. But it’s maybe fine.
– Rigify and HumanIK
Blender
There is an add-on for Blender called Rigify. It is like Maya’s HumanIK.
You can create a human armature with a single click, edit the position and number of bones to fit the model, and take it to the point where you can attach the rig to the model for animation creation.

Rigify is a fairly high-performance rig.
Rigs for facial expressions can be added, and there are also templates for quadruped armatures for animals.
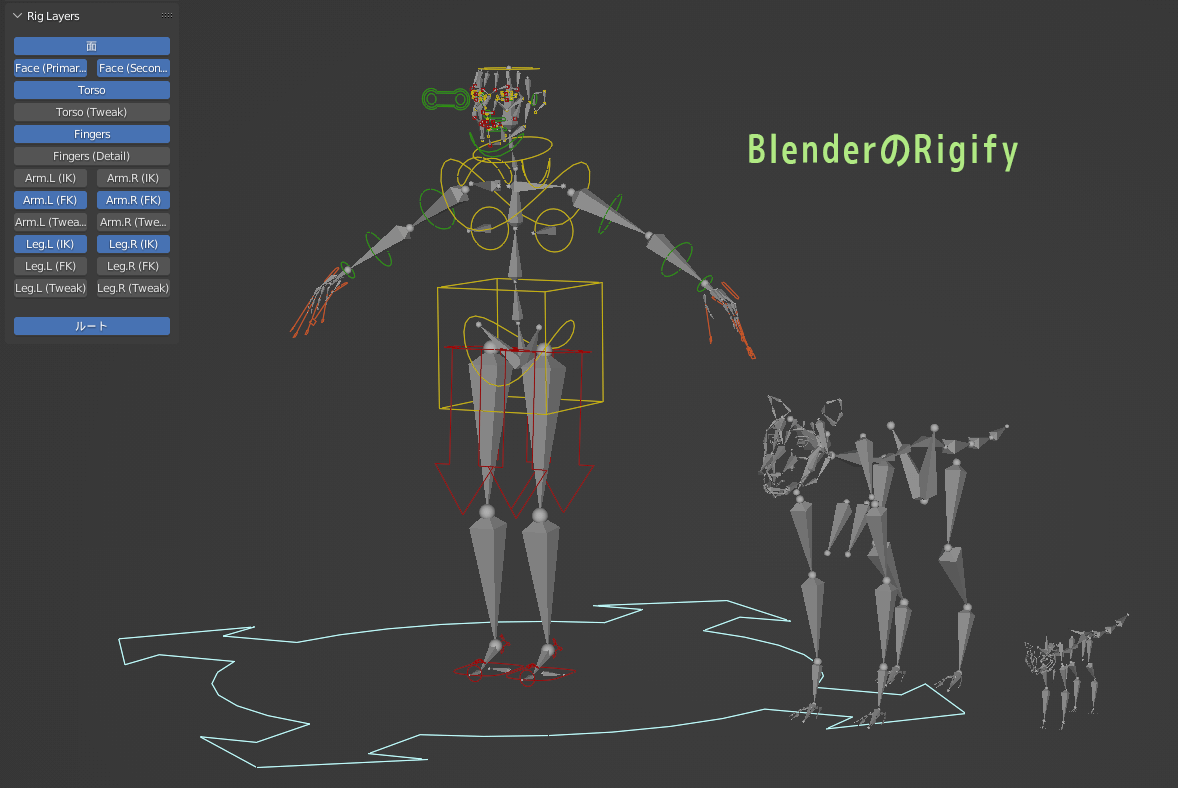
However, if you want to use character models set up with Rigify in a game engine such as Unity, paid add-ons such as BetterFBX or GameRigTools, as described in the FBX export section, are almost mandatory.
Exporting a Rigify model in Blender’s standard FBX will spit out a large number of bones for the rig, resulting in data full of useless bones, making it impossible to use Unity’s Humanoid, etc.
Other well-known character model rig add-ons that have replaced Rigify include AutoRigPro.

Maya
A feature similar to Blender’s Rigify is called HumanIK in Maya.
Here, too, you can create a humanoid skeleton with a single click, adjust the number and position of bones, and finally attach the necessary rig to the character model for animation creation.
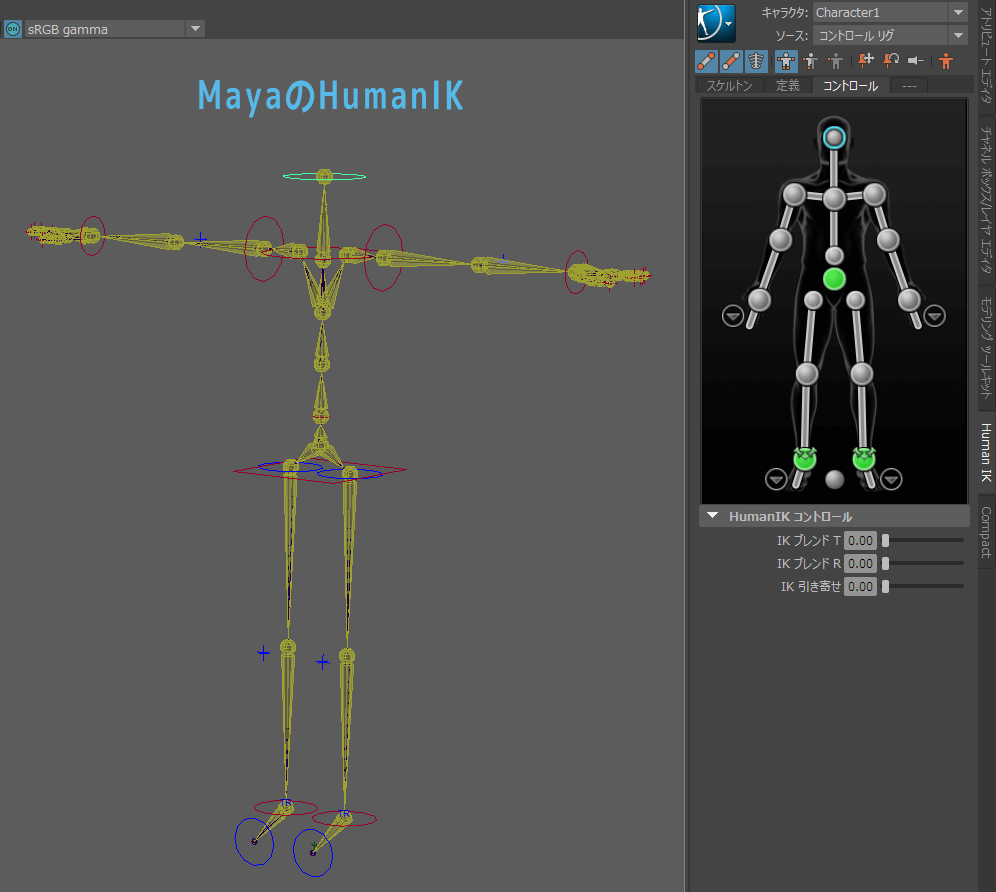
Where it differs from Rigify is in the…
- HumanIK cannot create rigs for facial expressions.
- It’s a bit of a hassle to accommodate a four-legged walker.
- If you export FBX as is, you can use it immediately in Unity’s Humanoid.
Such as.
Some motion designers who work with Maya say that Maya’s HumanIK rig is a bit difficult to use, but since Toha is not familiar enough with rigs to make a comparison, he does not know the truth.
– Numerical input of weights/checking weight values for multiple vertices
Blender
Blender offers a weight paint function to set weights, but sometimes you may want to enter weight values directly on selected vertices rather than painting them.
In the case of Toha, it is rare to use weight paint, and almost all weight values are entered directly.
Although Blender’s standard functionality allows you to enter numerical values for weights, Blender does not have a function similar to Maya’s component editor that allows you to see the weight values of multiple vertices at a glance.
Blender now has a spreadsheet, but I don’t think it is yet at a level where it can be used practically.
Since it is not possible to enter values from the spreadsheet, and it is not possible to hide unweighted bone columns, it is honestly difficult to use even for checking weighted values.
Currently, if you want to see the weight values of multiple vertices at a glance, the paid add-on Lazy Weight Tool is almost the only option.
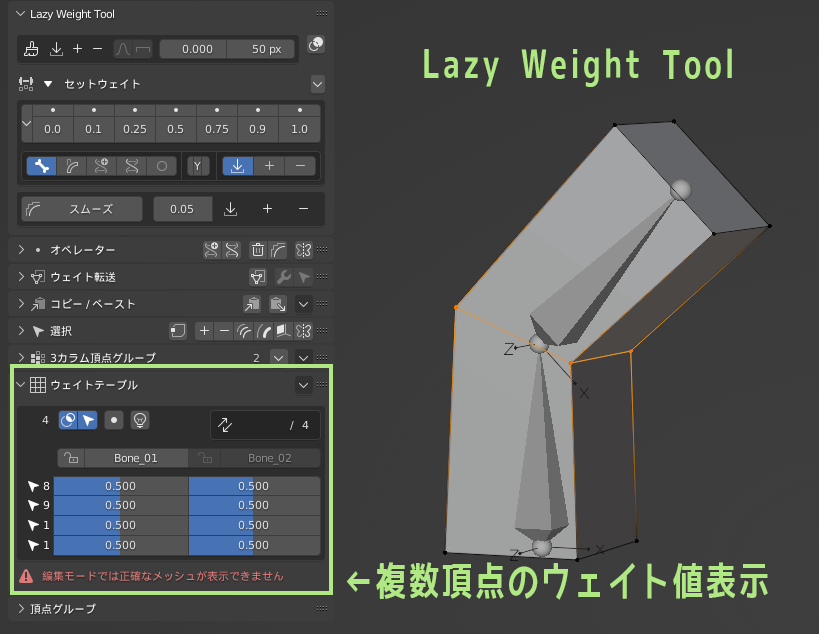
Note, however, that the Lazy Weight Tool’s weight tables do not work accurately in edit mode.
Select vertex in edit mode → Switch object or weight paint mode to update the weight table
This requires a single step of “I’m sorry, I’m sorry. You can use shortcut keys such as TAB to switch modes. Toha often changes the mode while working with weights in Blender.
That is the only inconvenience with the Lazy Weight tool, and it is a recommended add-on with a variety of useful features.
An add-on to assist in entering weights in edit mode is Handy Weight Edit.
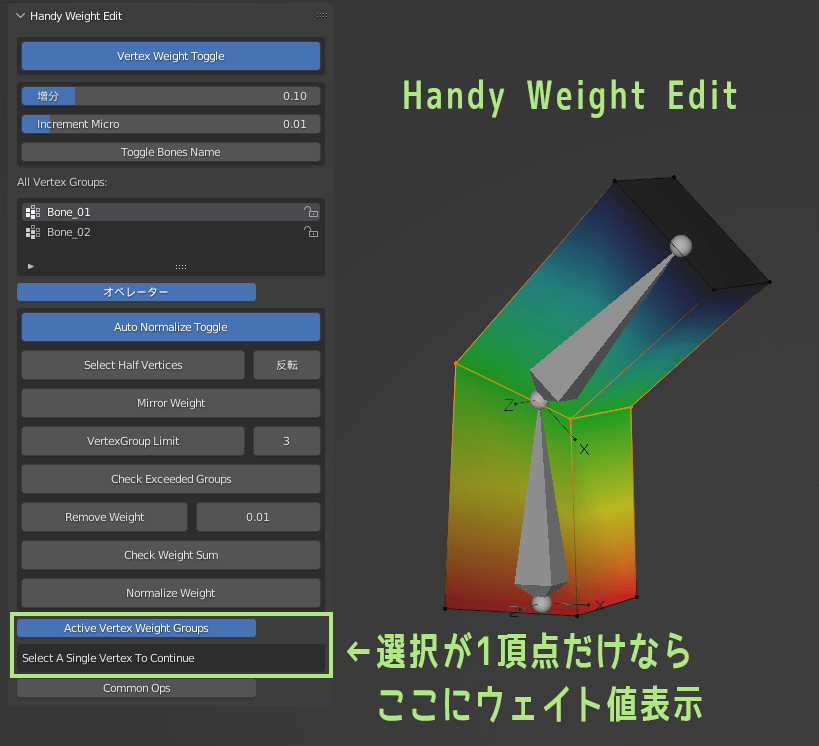
This one is mainly for weight adjustment in edit mode, so you don’t need to switch modes.
However, Handy Weight Edit does not have a table function to check the weight values of multiple vertices at once.
If you select only one vertex, you can check the weight value using either Handy Weight Edit or the standard Blender function.
I think that the only way to list weight values for multiple vertices would currently be the Lazy Weight Tool’s weight table or, although a bit difficult to use, Blender’s spreadsheet.
I look forward to the future evolution of Blender in this area.


Maya
In Maya, use the component editor to enter weights numerically.
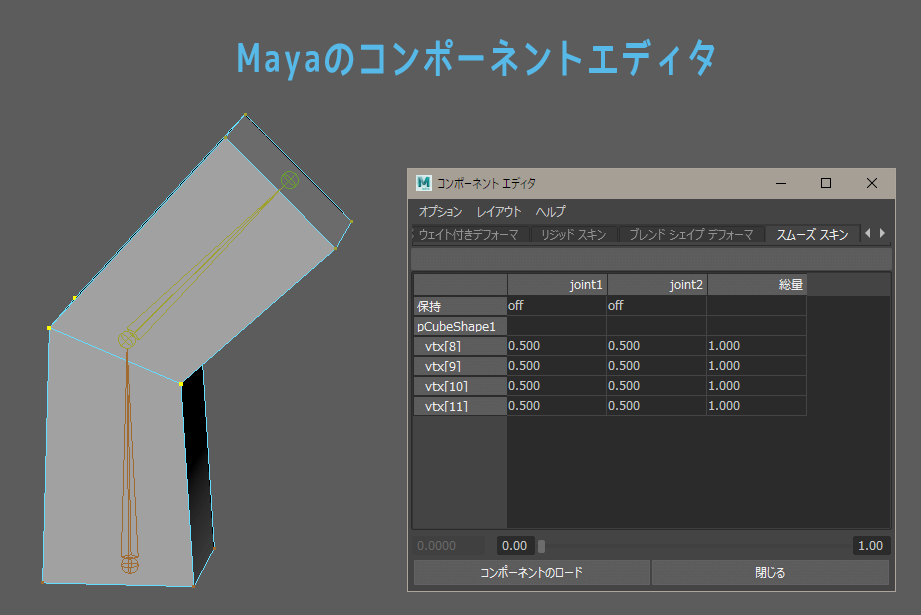
You can check the list of weight values, enter values directly from the editor, and at least this much with Maya’s standard features.
However, if you want to input weight values in Maya, please use this SIWeightEditor.

Not only can weights be entered numerically, but the system is fully equipped with useful functions such as rounding to the nearest whole number, setting MAX-influence, and double-clicking on a column to lock the weight value for that column.
In addition, areas with incorrect weights are highlighted in red or yellow, making them very easy to see.
After installing SIWeightEditor, I feel much more comfortable working with weights in Maya than before.
The most ideal thing for Toha would be to have an editor with similar functions in Blender.

– Retention of weight values
Blender
Once weight values are set in Blender, they remain on the object side even after skin weighting is removed.
In Blender, vertex group value = weight value, but the vertex group is held by the object’s vertices themselves, so it does not disappear when the armature or skin weight is deleted.
For example, the models of the costumes sold in my BOOTH hold the vertex group.

Since the vertex group = weight values remain, there is no need to re-set the weights on the costume side when combined with the corresponding armature-included body model.
Simply pair the armature of the element with an empty group.
This is a bit unthinkable in Maya, and I think it is a great thing about Blender.
Also, editing an object with skin weighting applied rarely corrupts the weight values. If you create a new vertex on an object, a nice weight value will be added by itself.
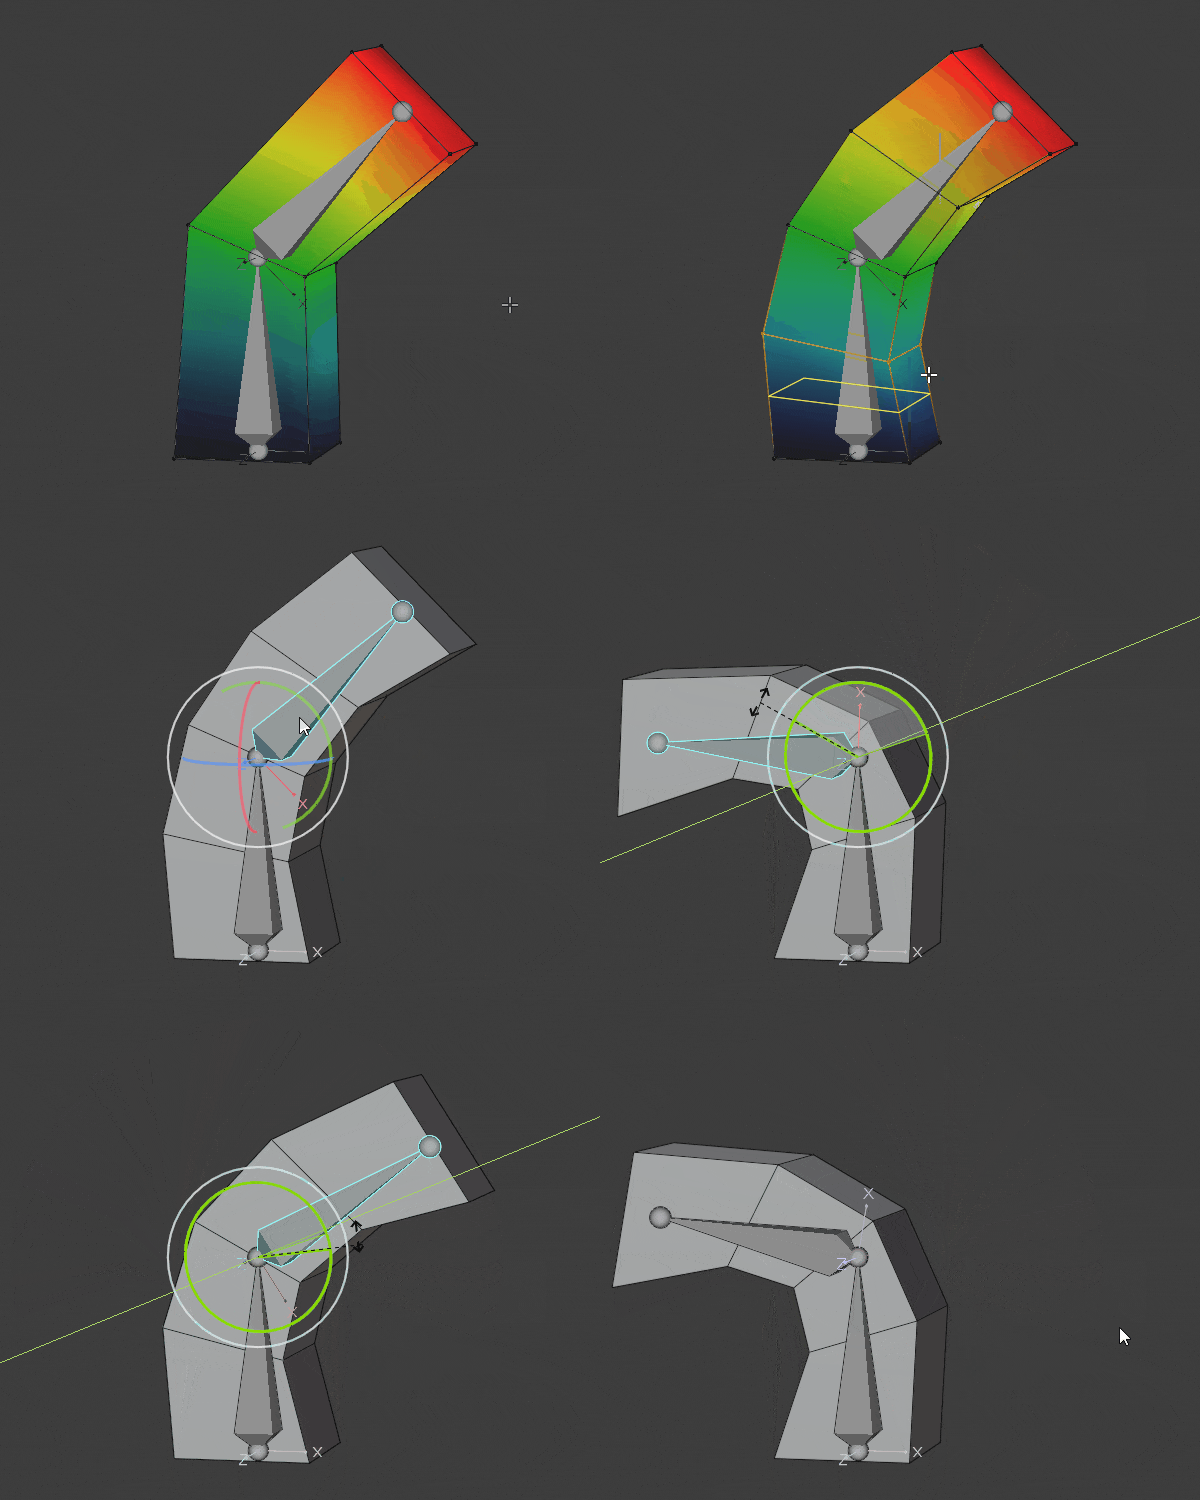
It’s crazy awesome, Maya users will be impressed.
Maya weights seem to break down quickly, so I’m afraid to cut an object with skin weights on it.
The fact that the weight values remain even after skin weighting is removed is a Blender-specific feature, so the weight values will disappear when the object is exported to FBX. Please be careful about this.
Maya
In Maya, when skin weighting is removed, any weight values that have been set for that model will disappear.
It is also dangerous to continue moving vertices or cutting polygons while skin weights are applied. The weights set on the model may break, and the movement of the bones and the mesh may become misaligned.
For this reason, Maya’s weighting work uses the
Apply skin and adjust weights ⇔ Remove skin and adjust objects
I often go back and forth between the two.
Since the model weights disappear once the skin is removed, we would like to save the weight values we set somewhere and load the saved weights when the skin is reapplied.
A plugin that works great here is DoraSkinWeightImpExp plugin.
DoraSkinWeight allows weight information to be saved as external data, making it much easier to export/import weights in Maya.
The standard Maya function of weight copying is not too bad in accuracy, but it cannot be used unless the object with the weights to be copied from is left behind. Toha uses both DoraSkinWeight and the standard copy.

Incidentally, if you create a new vertex on a skin-weighted object in Maya, that vertex will not have weight information; if you look at it in SIWeightEditor, it will have red text indicating an incorrect weight.
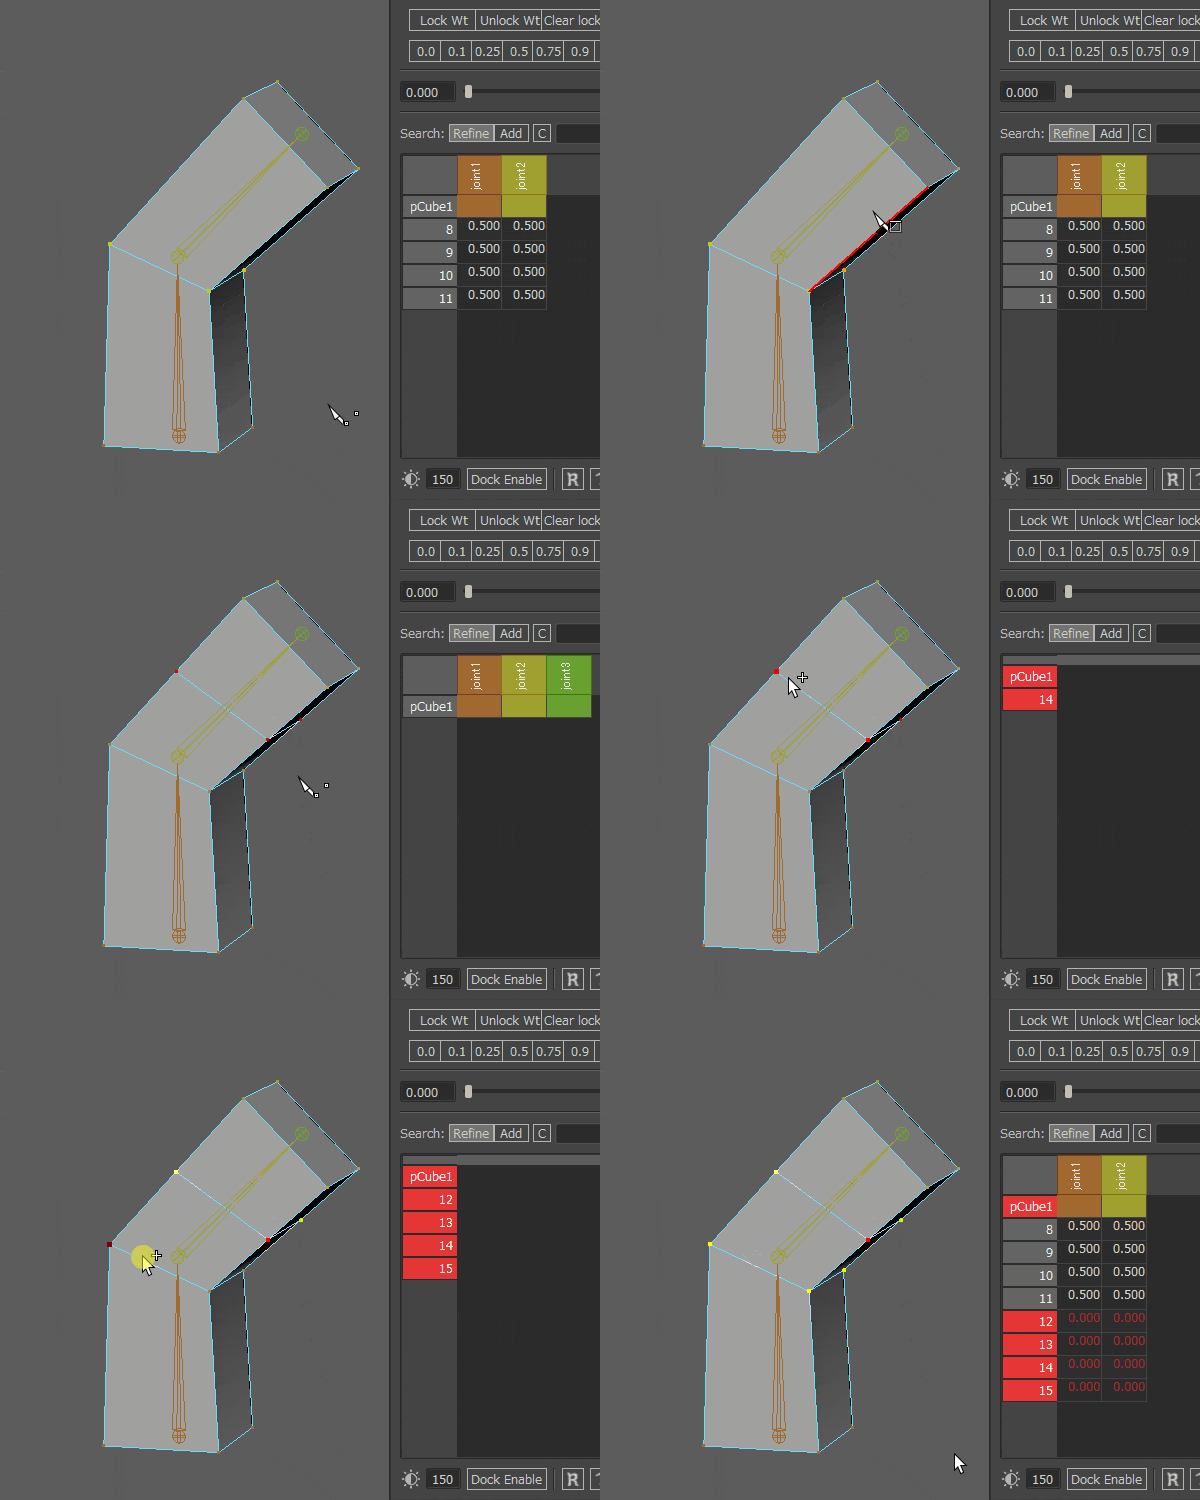
!
– Create intermediate blend shapes (shape keys)
Blender
What corresponds to a blendshapes in Maya is called a shape key in Blender, and setting intermediate shapes to this shape key is very tricky in Blender.
Blender does not currently have a feature like the addition of intermediate blendshapes in Maya.
While scouring overseas, I found an add-on that allows intermediate shapes to be set only within Blender: BsMax, which is available on GitHub. (*Introduction to the intermediate shape creation feature here)

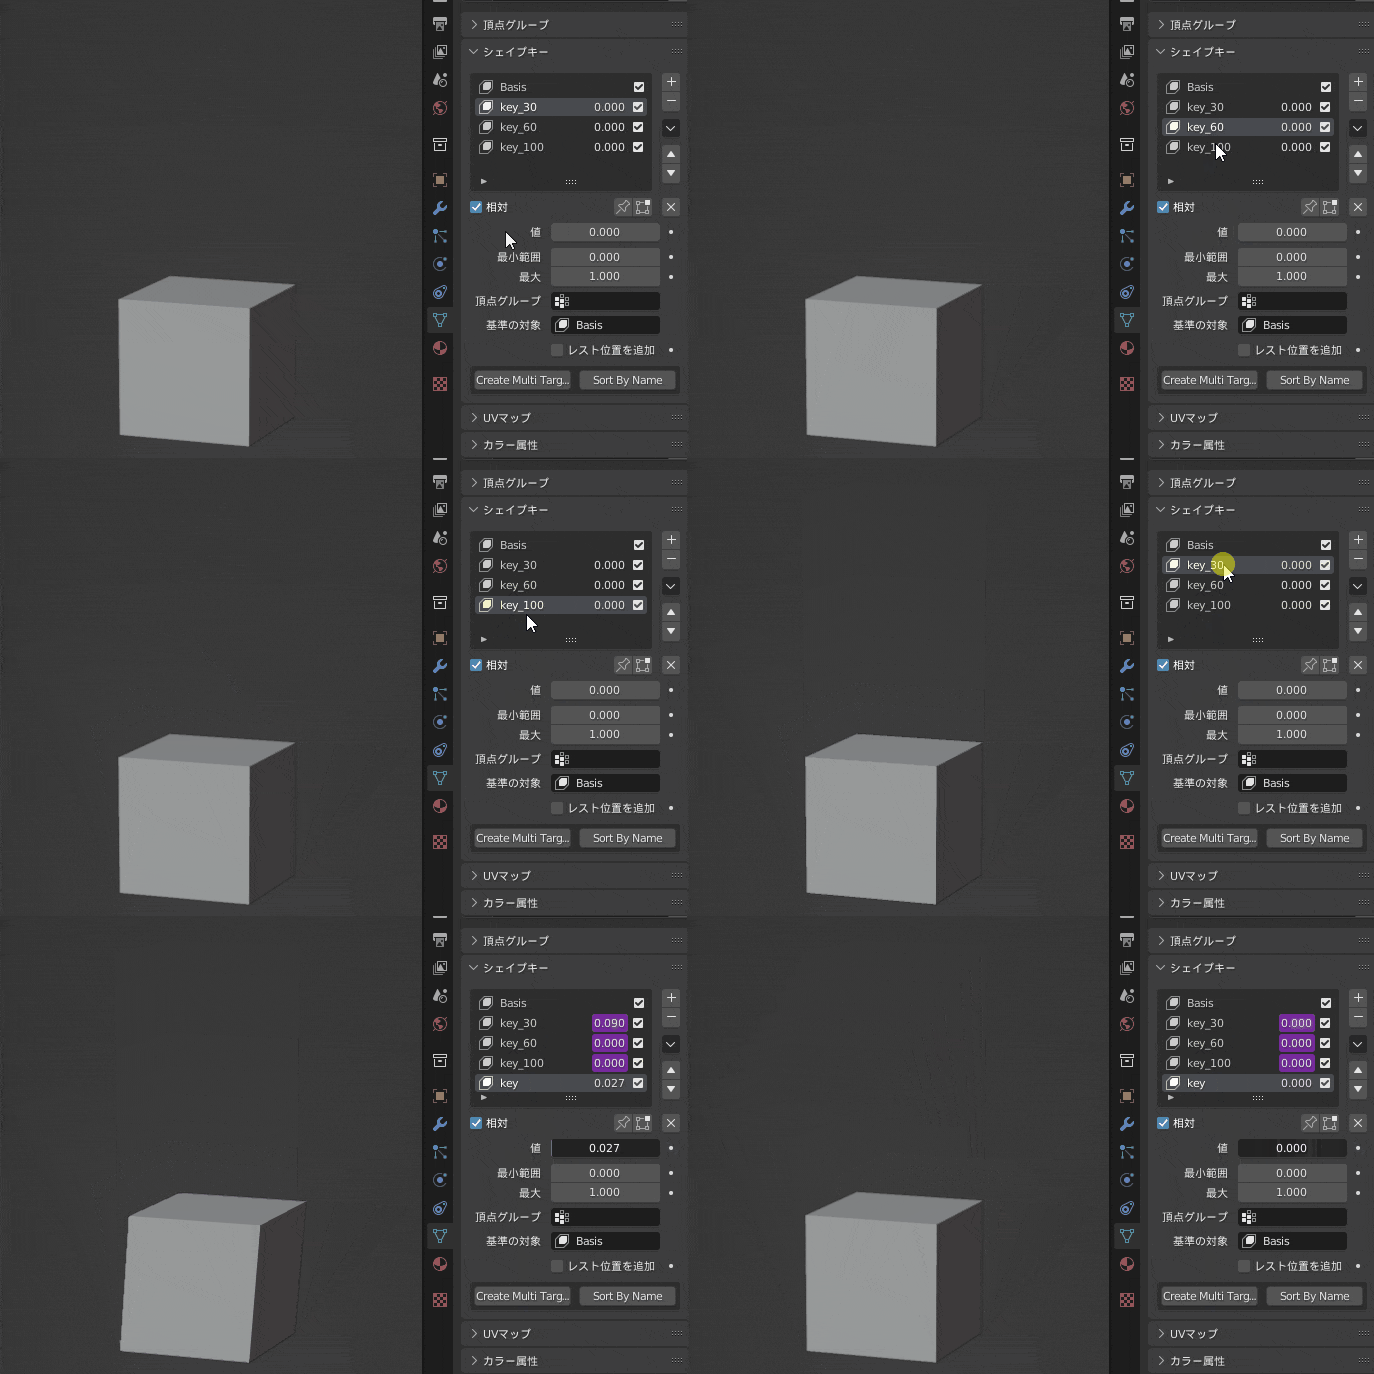
When I found this add-on, I was delighted that it would solve the intermediate shape problem in Blender…! Unfortunately, this intermediate shape only works correctly in Blender.
As I have talked about many times in this article, the 3D model of the game will eventually be output to FBX or similar.
When I output this to FBX, I simply got the respective blendshapes as they are. Sad.
When controlling blendshapes in Unity, a single slider movement must also pass through intermediate shapes, or the intermediate shapes will not make sense.
I look forward to the day when intermediate shape keys can be set in Blender.
Maya
Setting up an intermediate shape for a blendshapes in Maya is easy.
The procedure is as follows.
- Duplicate the base model and create a model of the final and intermediate shapes
- Select the final shape model and the base model and perform blendshapes creation
- Select a blendshapes created in the Shape Editor and move the slider to the middle
- Select the intermediate shape and perform “Add Selection as In-Between Target” from the Shape Editor
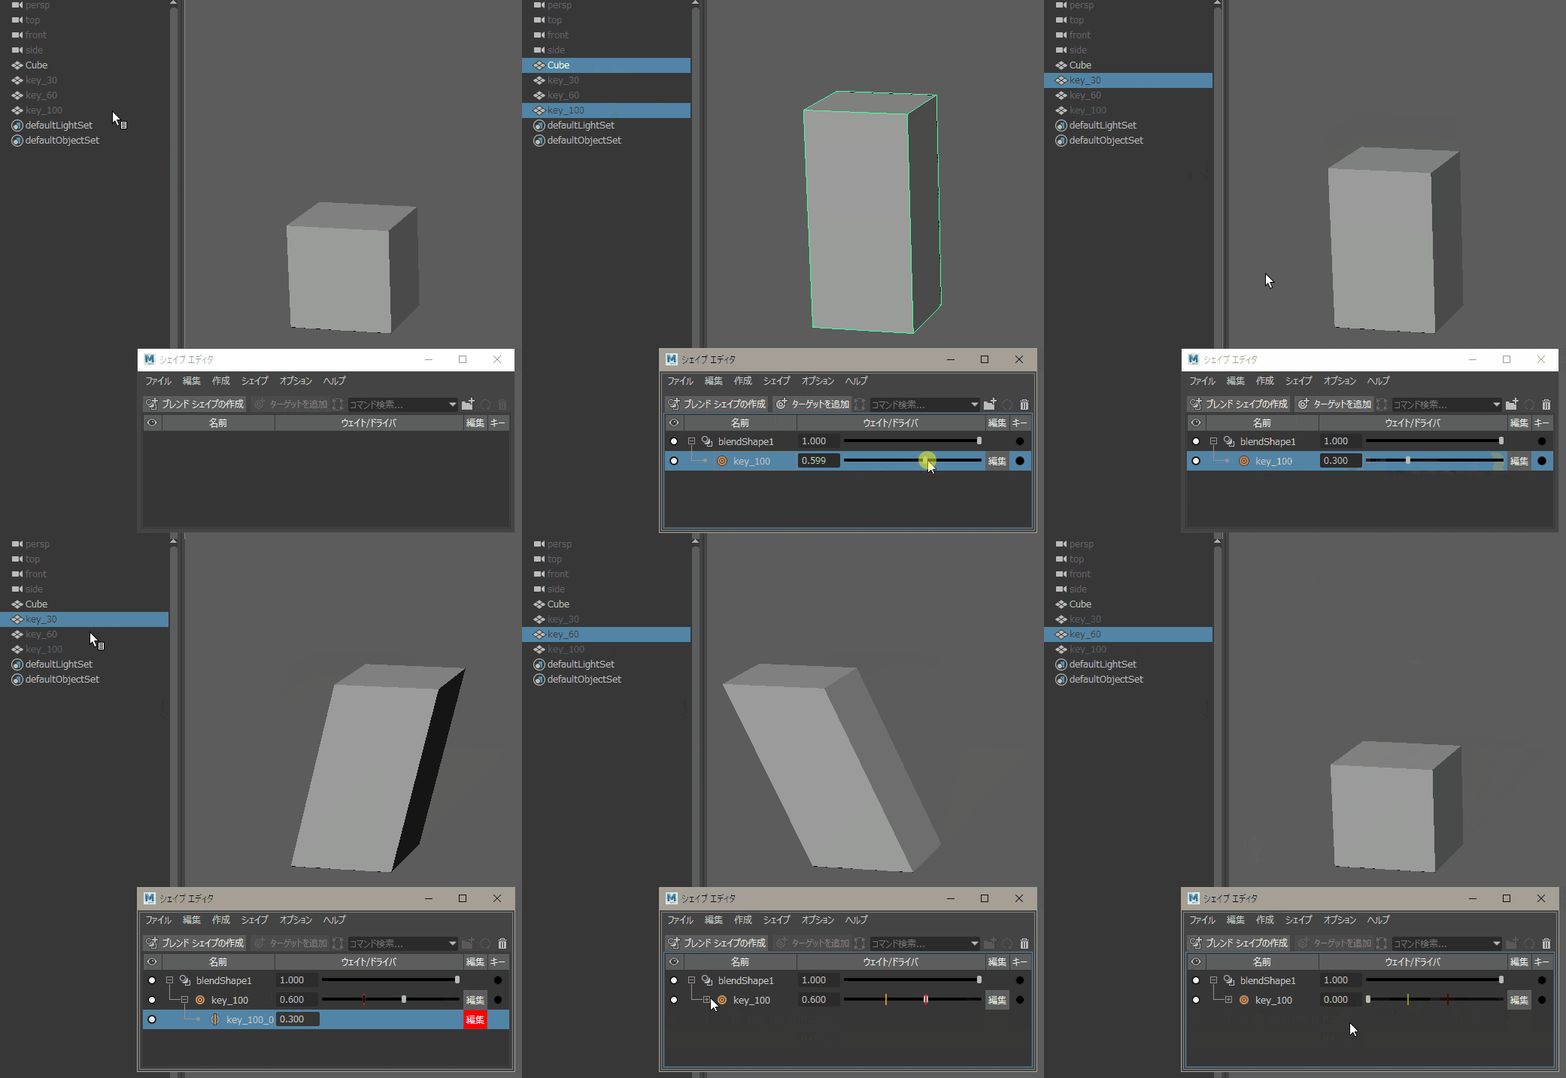
Now you can output to FBX and still create blendshapes that deform via intermediate shapes.
If it is in this state in FBX, it can be brought to Unity via intermediate shapes with a single slider. I would be very happy to be able to set up intermediate shapes, as they can be quite useful in game models.
Some people on the international forums were talking about wanting Blender to have the ability to set intermediate shapes as well.
I am sure that one day it will be a standard Blender feature or there will be an add-on that will allow it.
Compare Motion Creation

Let’s compare this and that when adding motion to a character model and moving it.
– Action
Blender
In Blender, you can create something called an action.
Multiple actions can be created and switched to create multiple motions within a single scene.
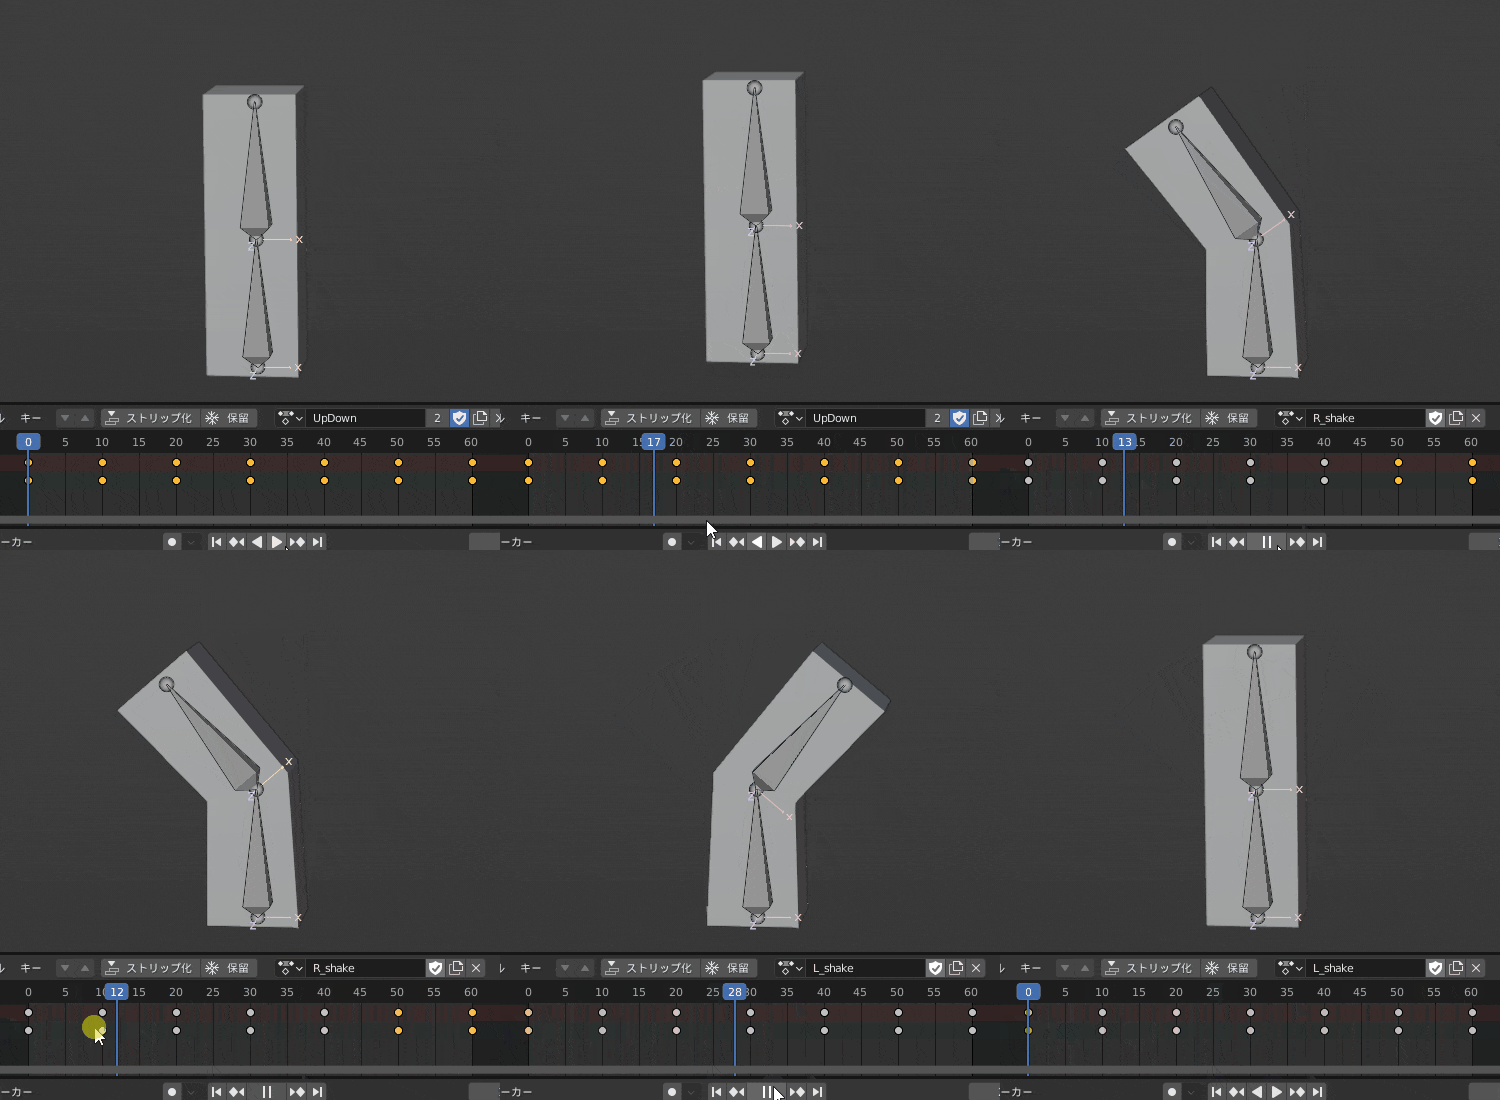
For example, for a game motion, it would be possible to use a start frame as a standby pose and then create a derived motion from the standby pose in an action.
When outputting motion data from Blender to FBX, the standard exporter also has a Better FBX also has an option called “All Actions” that allows Multiple actions can be output in FBX at once.
Also, you can create multiple actions in one scene, but actions that do not have a fake user set up are in danger of being automatically deleted. Don’t forget to set the fake user for the required actions.
For more information on creating animations in Blender using actions and other tools, please refer to this article.

Maya
Maya does not have anything like Blender’s actions.
When creating motion for games in Maya, we often separate Maya scenes for each motion.
When multiple motions are created in a scene, they are separated by frames for management purposes, and multiple motions are created by connecting them.
Multiple consecutive motions can be handled by separating the motion data when outputting to FBX or separating the motion data when loading to the game engine side.
– Animation Layer
Blender
Blender has NLA (non-linear animation), a feature that corresponds to the animation layer in Maya.

NLA is the ability to manipulate actions, allowing multiple created actions to be The ability to combine or blend multiple actions you have created to create different motions.
However, the operation method is a bit confusing and non-intuitive, so the feel is quite different from that of Maya’s animation layers.
If you want something like Maya’s Animation Layers for easy motion adjustment, you can use a paid add-on named Animation Layers, which is a paid add-on.
As you can see in the introduction video, it is just like Maya’s animation layer, and I think it is an add-on that will greatly help motion creation in Blender.
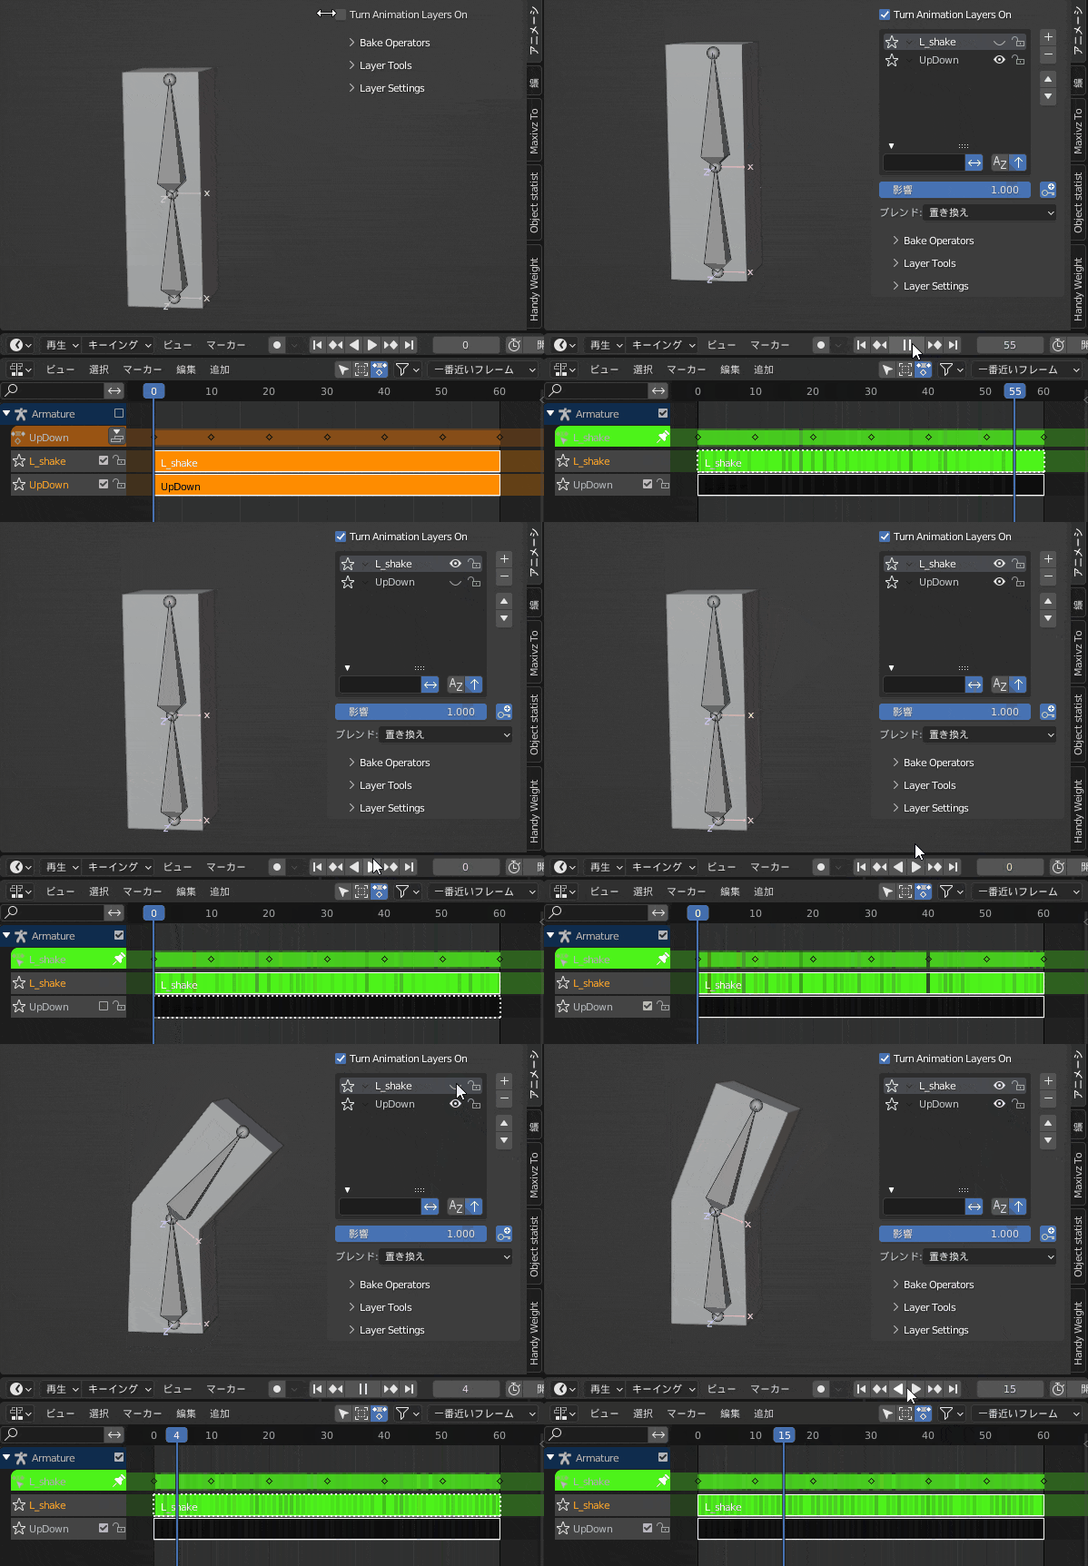
The Animation Layers add-on is powered by the NLA.
For this reason, it is not possible to use Blender’s NLA and Animation Layers at the same time.
Somehow, I think NLA is suitable for motion blending (e.g. lower body + upper body) and Animation Layers is suitable for adjusting and modifying a single motion. I would like to use them both.

Maya
Maya has a standard animation layer feature.
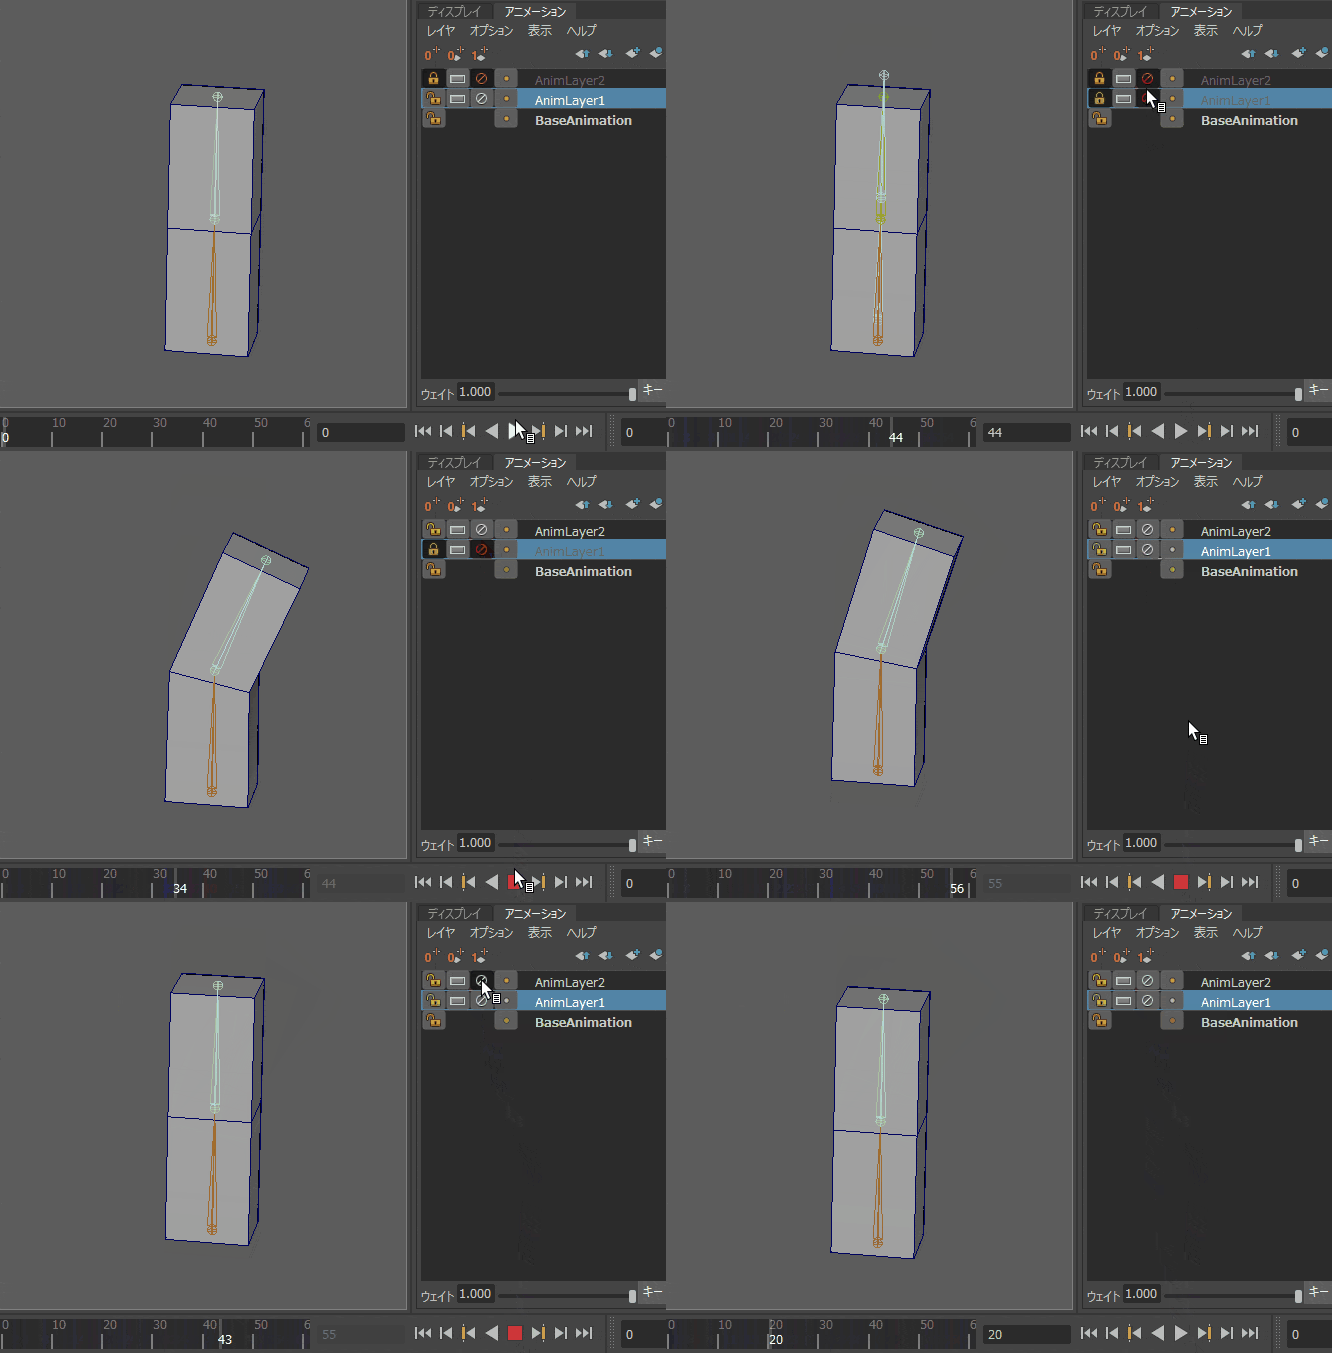
Although Toha is not a motion expert, he learned about a useful feature in Maya called the animation layer when he was learning various things from a senior motion designer.
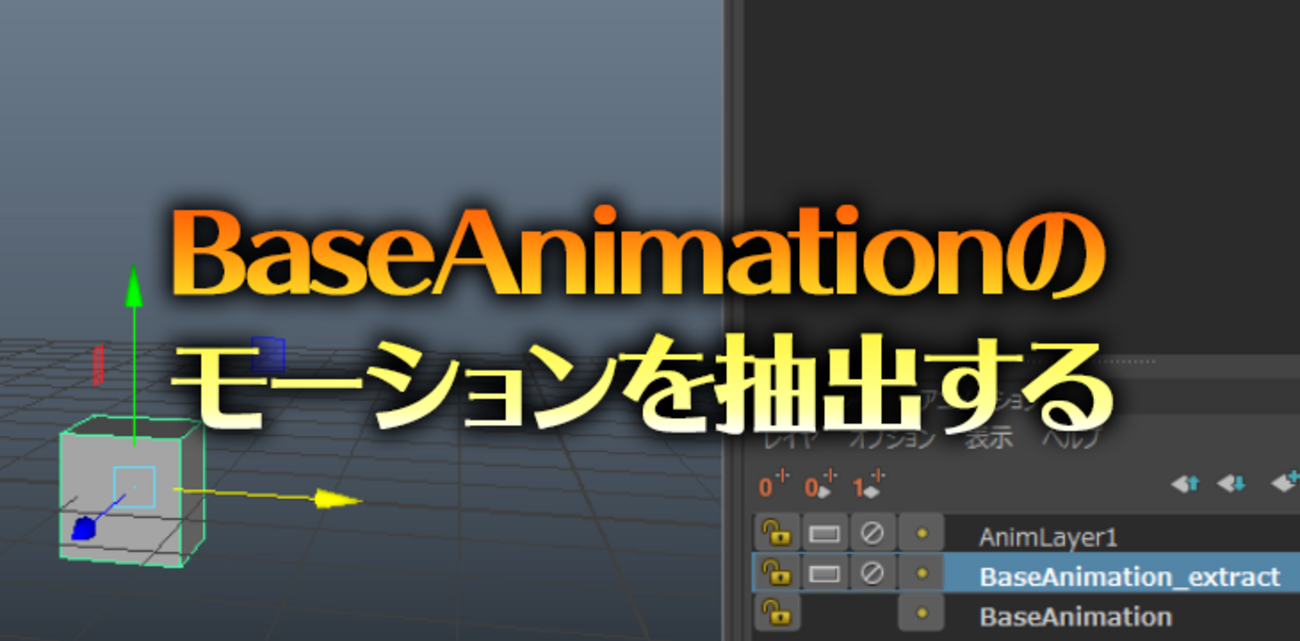
For more information on how to use the animation layer, please see the articles by Animlog and D Diary.

☆
– Quaternions and XYZ Euler
Blender
When an armature is created in Blender, the bone rotation method is quaternion.
You can also change to Euler angles in the Bourne settings.
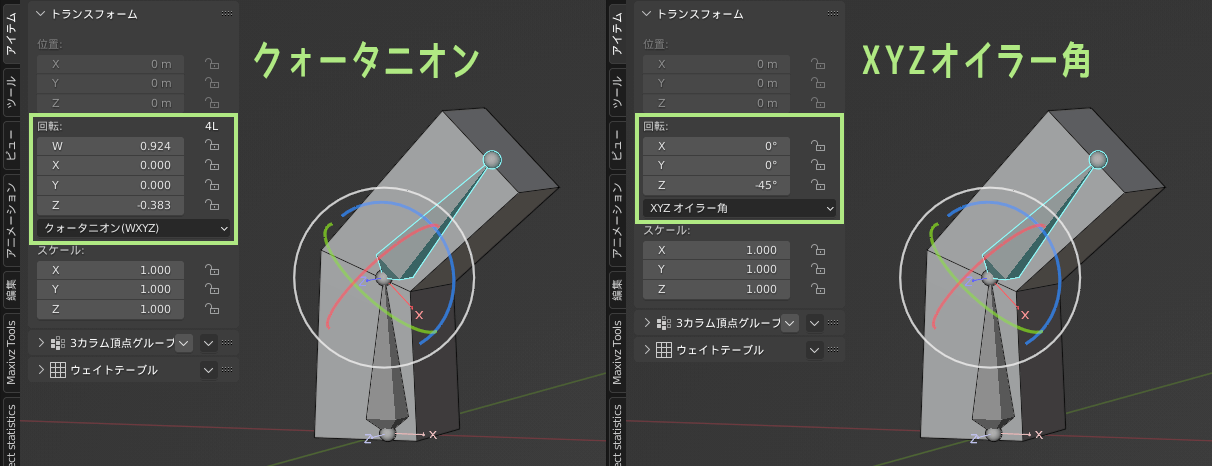
For more information on the difference between quaternions and Euler angles, please check the article on this site.
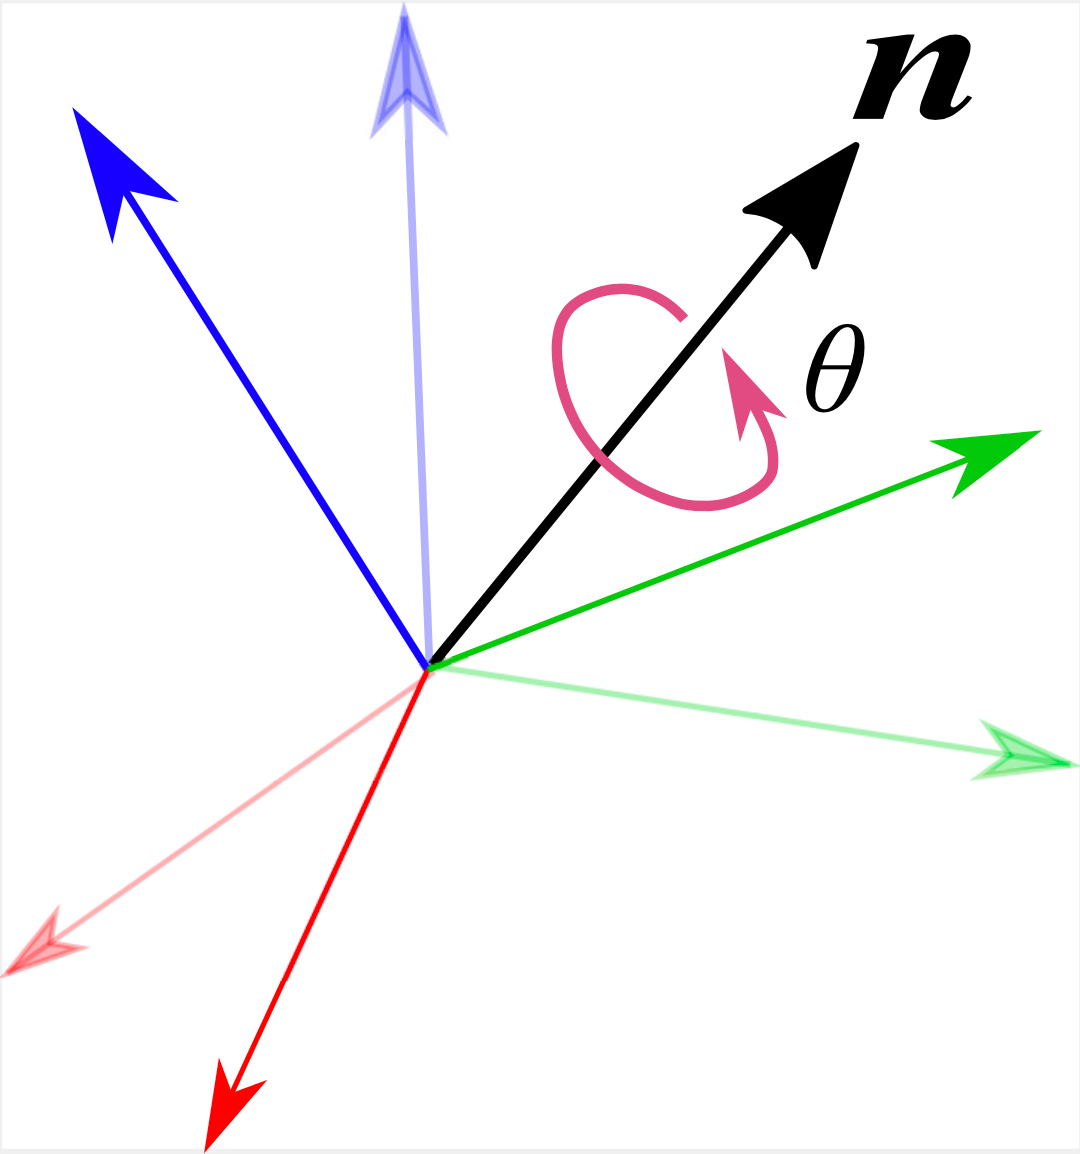
Quaternions have the advantage of not causing gimbal lock, but it is tricky to know how much it is rotating by looking at the numbers. It is a little difficult when creating motion.
The procedure for changing the rotation method of multiple bones from quaternions to Euler angles is as follows.
- Entering armature pause mode
- Select all bones for which you want to change the rotation method
- On the Item tab of the sidebar, Alt+Left Click on the “Quaternion” section and select “XYZ Euler Angle” from the pop-up that opens.
dskjal’s site has an answer to the question of whether to use quaternions or Euler angles when creating motion in Blender. Please take a look at this site as well.

Maya
Basically, quaternions are not available in Maya.
Euler angles in XYZ order is the default setting, but the order of the rotation axes can be changed from the Attribute Editor.
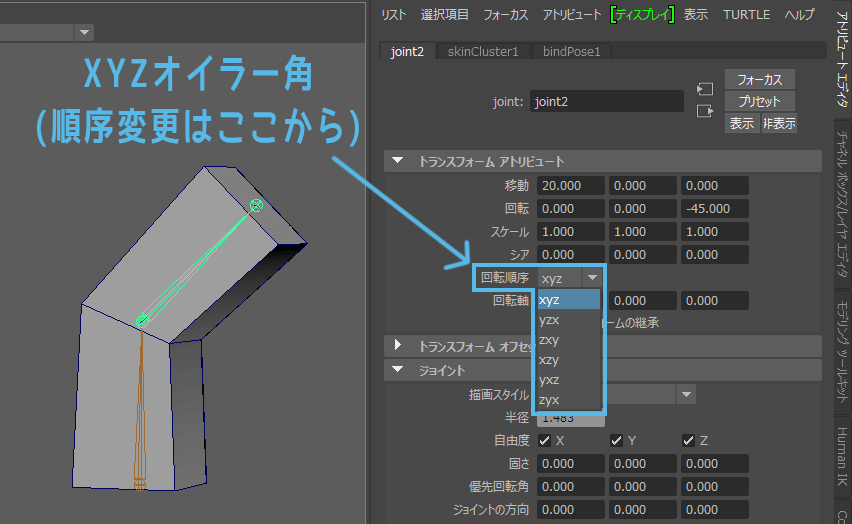
Euler angles have the advantage of making it easy to see which direction and how much the camera is rotating by looking at the numerical values, but they can cause a problem called gimbal lock.
Gimbal lock…I still don’t understand it well enough to explain it.
For a detailed explanation of gimbal lock problems that can occur in Maya motion creation, please refer to Wakasugi Monogatari’s article. Click here!

Incidentally, when I looked up what is going on in Unity, I found that “Internally, it uses quaternions, but Inspector displays them with equivalent Euler angles”. This is getting more and more complicated.

Compare Other

I will compare and verify the licensing costs and other things that are of concern.
– Software licensing costs
Blender
Blender is a free 3DCG software. There is no license fee for commercial or non-commercial use.
But then, where does the money come from to develop and maintain Blender? Various companies are currently supporting Blender’s development fund, including Google and Amazon.
That is why Blender is completely free to use, but we, the general public, can also support Blender. And there is a very easy way to support Blender daily.
It is to use Blender Market.
Blender Market is a Gold Member of the Development Fund and a portion of the proceeds will be automatically donated to the Blender Development Fund. In other words, when you purchase add-ons from Blender Market, you are supporting Blender.
After learning this, I try to buy add-ons from BlenderMarket as much as possible.

Maya
As of 2024, Maya licensing costs are as follows
| classification | Price | license system | target group | on business | functional restriction |
|---|---|---|---|---|---|
| Maya | Annual \286,000 Monthly \36,300 1 day \2,574 | subscription Annual or Monthly Contract Or pay-as-you-go 6 tokens/day | anyone | OK | none |
| Maya Indie | Annual amount \47,300 | subscription Annual contract only | Annual gross income of 15 million yen or less Restrictions on users such as | OK | none |
| Maya Creative | 1 day \429 | pay-as-you-go 1 token / 1 day | anyone | OK | have |
| Maya Student Edition | free | none | Students and faculty only | NG | none |
The normal Maya license fee is quite expensive, about ¥280,000 per year. It is not easy for an individual to afford.
However, Maya indie, released in 2020, costs about $40,000 to $50,000 per year. there are detailed requirements to be eligible to use Maya Indie, Q&A here carefully!
Please note that while regular Maya allows month-to-month contracts, Maya Indie only offers annual contracts.

And in 2022, Maya Creative was released.
This is a low-cost version of Maya LT, which was announced after the service was terminated, and is a pay-as-you-go system where you only pay for what you use. There is a slight limitation of functions, but you can use it for one day with one token.

The name of the token is Autodesk Flex, and it seems that every Autodesk product is now also available on a pay-as-you-go token consumption basis. Here is the list of tokens required for each software.
However, the minimum purchase unit for tokens is 100 = the minimum purchase amount is ¥42,900.
Tokens that are not used up in a year will expire, so I think Maya Indie is fine for personal use, but if you have a team of several people who want to use Maya a little bit at a time, it might be a good idea.
hum~
– Impact of Version Upgrade on Add-ons
Blender
Blender is a frequently updated software.
Every time a version of Blender is updated, new features are added or bugs are fixed. And some internal things that are not visible to the average user are also changed.
For this reason, when the version of Blender is upgraded, the add-ons you have been using may no longer be available.
In this article alone, which you are reading now, we have introduced many add-ons for Blender.
Currently, to use Blender comfortably, add-ons are used everywhere. But the more add-ons you use, the more the risk of “it might not work someday” increases.
If the add-on creator is willing to support Blender version updates, the problem will be solved someday if you wait for the update.
But who knows if that add-on will continue to be updated for years to come.
It is important to remember that there are concerns about the use of add-ons in Blender.
As something that reduces these concerns, Blender has LTS version.
LTS versions are promised two years of support; since LTS updates are bug fixes only, it is safe to continue using that version for two years.
Since the software specifications have not been changed for two years, it will be easier for the add-on side to support LTS.
Maya
A major version upgrade of Maya is once a year.
Unlike Blender, Maya is already fairly mature software, so there are no major changes in appearance or functionality with version upgrades.
For this reason, it is unlikely that a plugin that was working will stop working after an upgrade.
Well, sometimes it happens~
But the premise is that we rarely use the latest version of Maya for work.
We generally use a stable version of Maya that is a little older, and when we raise the version of Maya, we often discuss it with the entire project team and then upgrade the version at the right time for everyone.
In work, I see that stability and solidity are sometimes more important than novelty.
– Footwork to incorporate new technologies
Blender
Blender is amazing in this regard. This is what surprised me just when I was writing this article.
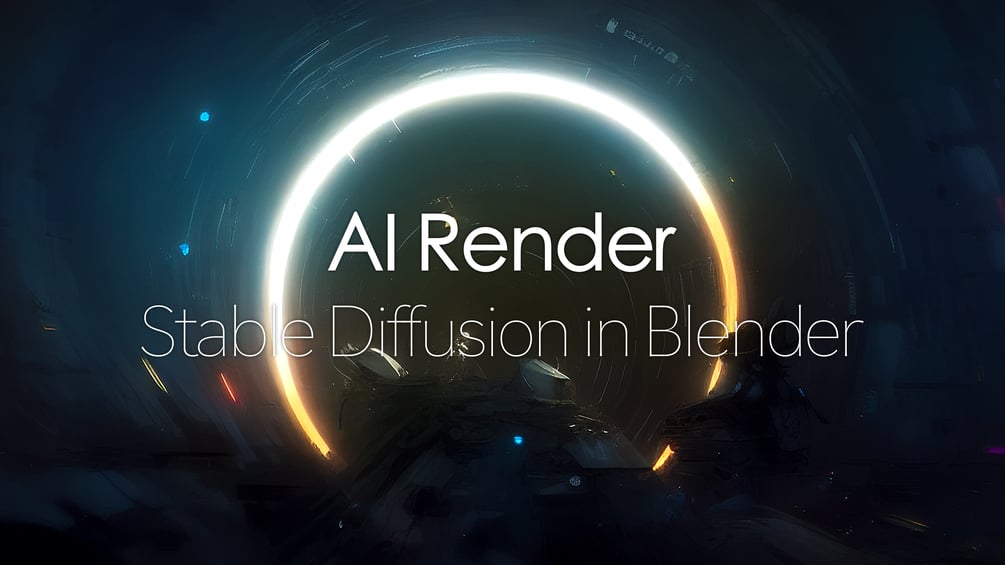
AI Render is an add-on that applies image-generating AI Stable Diffusion to rendering results.
I’ll let you watch the linked video for more details, but wow – and it came out so fast!
Since Blender is open source, many people around the world are creating add-ons for Blender. Some of them are very fast and furious to make the latest technology usable in Blender.
Leaving aside the pros and cons of image generation AI, I think it is genuinely exciting and a dream come true.
Maya
There is a conflict between responding quickly to new technologies and keeping the system stable.
That’s why I don’t think I see much that is new in Maya News.
But this is only especially true in the Japanese-speaking world, and many people around the world make Maya plug-ins. A little research shows that some people are doing Connect to Stable Diffusion from Maya .
There may actually be some interesting plug-ins made by individuals if you look for them.
As a side note, the amount of information that can be searched in Japanese is less than that in English. If you cannot find the information by searching in Japanese, we recommend that you try searching in English.
If you like, you can use this Goolge. It’s the best one for English searches that Toha has bookmarked.

Summary: Blender & Maya each have their ease/difficulty of use
Do you prefer to use Blender or Maya for making 3DCG?
Sometimes I am asked. When Toha answers such questions,
Do you prefer scissors or a cutter knife for making Cutting Art?
I often use the analogy that.
If you can make the cutout you want to make, you can use either tool and if you want, you can use different tools at different points in the process.
I think the most important thing is “what kind of cutting art you make” and not “what kind of tools you use.”
And this is the same when making 3DCG.
Blender and Maya each have their ease of use/difficulty, but both offer many useful features for creating the 3D models you want to make.
I would be happy to use either, and if you want, you can use them at different points.
I’ve only used Blender, or I’ve only used Maya, but I’m interested in both software.
In such cases, I hope this article will be of some help!

Last but not least, this article comparing Blender and Maya was very hard to write~
29,000 words are too long – but I spent more time researching and verifying than writing. I did my best to write this article, so if you found it good or useful, please feel free to tweet me with your thoughts.
Also, you can support Toha by throwing money or PixivFANBOX.
I look forward to working with you!
Thanks for reading!
- Coments - コメント一覧