
If you want to use Blender with a Maya-like feel, you can install add-ons.
This article is about the “Maya Config Addon For Blender”, an add-on that Toha uses.
I will write about three points.
If you are interested in the Maya Config Addon For Blender, please read on 🙂
I also wrote an article comparing various aspects of Blender & Maya! Please read it!
Features: Maya Config Addon For Blender is such an add-on

Maya Config Addon For Blender is an add-on that allows you to change the feel of Blender to be more Maya-like.
Not only does it change the operation to be more Maya-like, but it also adds a few useful menus. In summary, it looks like this.
- 3D viewport operations and frequently used shortcuts will be Maya-like
- A convenient dedicated menu is added below the toolbar.
- A dedicated pie menu appears with the space key or right-click.
- Shift + right-click brings up the Special Tools menu
The following is an introduction to the order in which they are presented.
– 3D viewport operations & frequently used shortcuts become Maya-like
First, the 3D viewport controls and commonly used shortcuts are nearly identical to those in Maya.
This is almost the same as using the “industry compatible keymap” that comes standard with Blender.
For Maya-like controls & their shortcuts, see START Blender 4) – Basic Operations! The First Thing to Learn. The explanation is given in the following section. For details on how to operate the system, please click here~
– A convenient dedicated menu is added below the toolbar
When you install the Maya Config Addon For Blender, a dedicated menu is added under the Blender toolbar. This is what Toha likes the most.

Especially useful is the ability to quickly change between
Maya-like / Blender / Industry Compatible keymaps at the touch of a button.
When I look at Blender-related information and tutorials, I often find that they are explained based on the standard Blender keymap; when I use Maya-style keymaps, the operations don’t match.
In such a case, just press the Blender button from the dedicated menu under the toolbar, and you can quickly switch to the Blender standard keymap. Very convenient.
In addition, industry-compatible keymaps are easier to use than Maya-style keymaps when editing UVs, so it is convenient to easily change keymaps using the Industry button here as well.
Other button menus are also quite useful. Here is a brief introduction.

By the way, you can collapse additional menus by clicking on the top portion of the menu. You can make it smaller if it is too much of a nuisance.

– The dedicated pie menu is displayed by pressing the spacebar or right-clicking
Another great addition to the Maya Config Addon For Blender is the dedicated pie menu.
When you press space or right mouse click, a dedicated pie menu will appear respectively.
Pie menu for 3D view operation (displayed by pressing the space key)
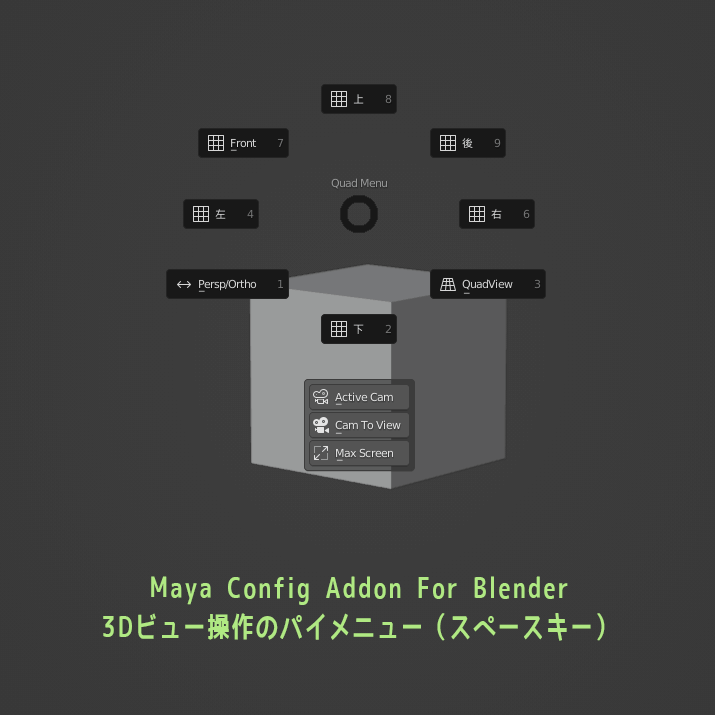
This makes me a little happy because when Toha was using Maya, he used to press the space key a lot. The numbers on the pie menu are shortcuts, so you can also use space + 3 for a four-part display.
Mode selection, smooth/flat shade pie menu (right-click to view)
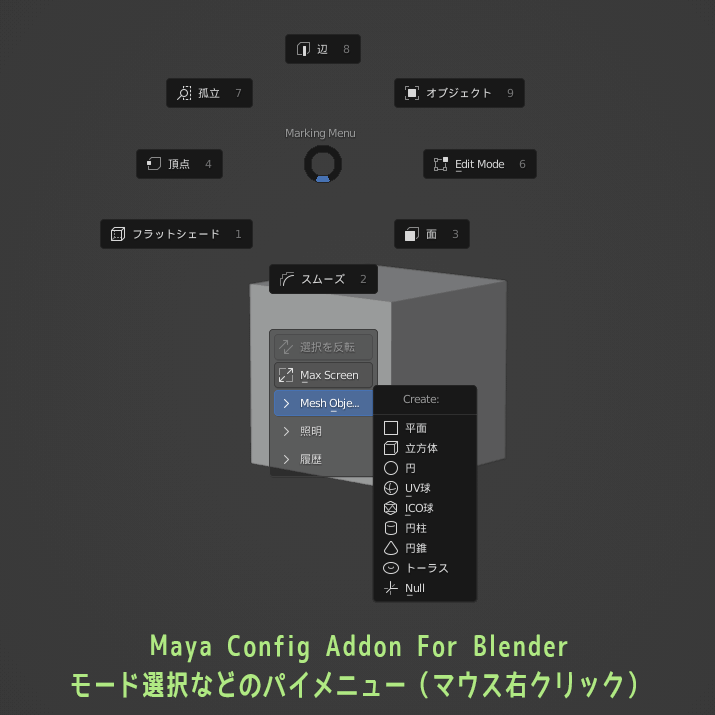
This will be useful for those who often use the pie menu when operating Maya. You can also invert selections, add objects, and turn the 3D viewport into a max-screen display.
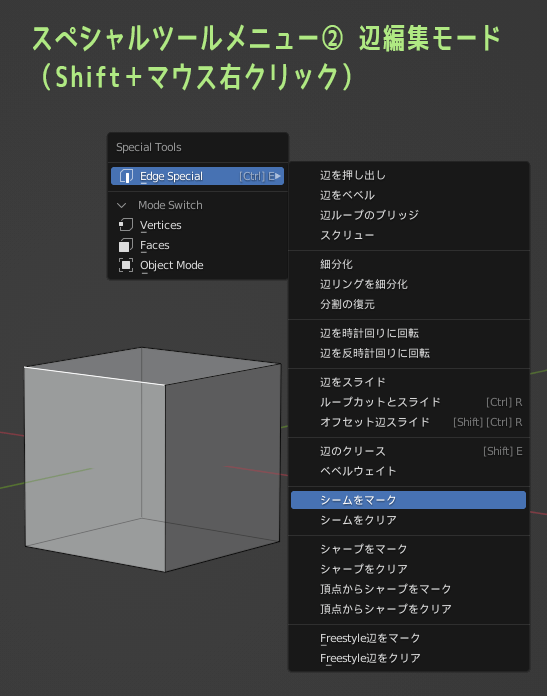
– Shift + right click brings up the Special Tools menu
When in vertex, edge, or face edit mode, Shift + right mouse click will bring up the “Special Tools Menu”.
Special tools menu in vertex edit mode

Special Tools menu in Edit Edge mode
Special tools menu in surface edit mode
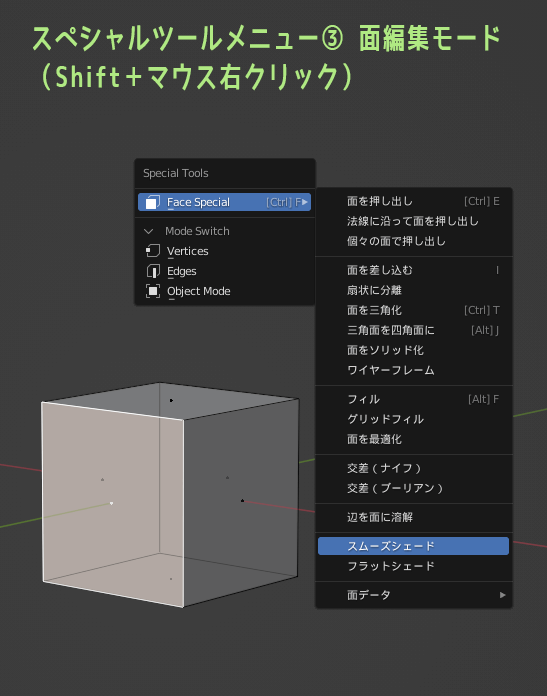
This is another convenient menu that is organized and easy to use.
That’s it for the Maya Config Addon For Blender. Next, we will introduce how to install it.
Maybe something looks good? Maybe I should try this add-on? If you think so, please read the rest of this article.
An upgraded paid add-on called Maya Config Pro has also been released.
If you are interested, please click here.

How to install: Install Maya Config Addon For Blender

This section describes how to install the Maya Config Addon For Blender.
After considering the easiest and least problematic introduction method possible, this article will proceed with the following steps.
- Download Blender 4.2 as zip file
- Create a new folder for Maya-like operation Blender
- Download Maya Config Addon For Blender
- Copy the data to the Blender folder you created and install it.
- Launch Blender and install a dedicated keymap
We will look at them in turn.
(1) Download Blender 4.2 as zip file
First, download Blender as a zip file go ahead and download it.
The reason for the zip file is that the method of installing the Maya Config add-on to the installed version of Blender is a bit complicated & may cause problems due to the administrator rights on the computer.
With Blender in zip format, if you keep the original data, you can restore the original state immediately if a problem occurs, so I think you can rest assured.
Now, let’s start with Blender download page. From this page, you can download the latest version of Blender that has been released.
Click [other versions] below the download button, and a pop-up window will open, listing the Linux version, the zipped version, etc.
Click on Windows Portable(.zip) from the pop-up that opens to download.

You can also download each LTS version of Blender from this page.
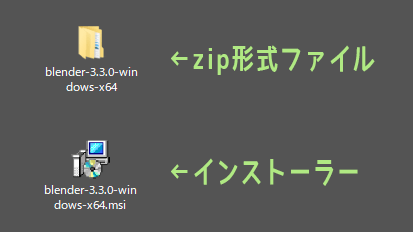
The zip file you downloaded has an icon that looks like a yellow folder with a zipper. If the icon looks like a computer, it is the installer.
When you unzip the zip file, you will find an executable file called “blender.exe” inside. Double-click it to start Blender.

(2) Create a new folder for Maya-like operation Blender
The explanation from here on is based on the introduction explanation video uploaded by the add-on creator of Maya Config Addon For Blender. Click here to see the video.
URL:.https://youtu.be/i7a8HjV9-kk
URL:.https://youtu.be/eJGliDhBCq8

Next, create a new folder on the desktop as a folder for Maya-like operation Blender.
Give the new folder a name that identifies it as “Blender with Maya-like operations. (*Do not use double-byte characters.)
Toha is named “Blender 4.2LTS_Maya4.0”. You can use any name you like.
In the named folder, copy all the Blender 4.2 data from the unzipped zip file.

From now on, Maya Config Addon For Blender will be installed to the Blender data copied to the new folder. You can close the original Blender folder.
If you want to start Blender without any add-ons, just start the executable file in the original Blender folder.
(3) Download Maya Config Addon For Blender
Now that the Blender side is ready, go download the add-on data.
On the Gumroad Go to the Maya Config Addon For Blender page.
Enter a price of $0 or more in the price field in the upper right corner, then click the button.

Enter your e-mail address on the screen that appears and click the button again. (If you set a price of $1 or more, you will also see a place to enter your payment information.)

If you jump to the Maya Config Addon For Blender page, you can download the addon from there.

Maya Config Addon For Blender is also downloaded as a zip file, so unzip it to your desktop.
(4) Copy the data to the Blender folder you created and install
Now that everything is ready, we will install the Maya Config Addon For Blender.
Open the Blender folder you created in step (2) and Open the unzipped Maya Config Addon folder.

After opening the two folders, follow the steps below to copy the data from the Maya Config Addon folder to the Blender folder.
Note here!
The location of the configuration files for the portable version of Blender has changed since Blender 4.2.
Before starting Blender, manually create a new folder named “portable”. Configuration files will be created in this portable folder.

If you start Blender before creating the portable folder, the Maya Config Addon cannot be successfully installed because the configuration file is automatically created in another location on the computer.
Details are provided in the Transferring Preferences article, so if your Maya Config Addon is not installed successfully, please check if the configuration file has already been created.

After creating the portable folder, follow the steps below to install the Maya config Addon into Blender 4.2.
- Blender
Click on the newly created portable folder to open it.
- Maya Config
addonCopy the config folder directly below to the portable folder.

- Blender
Click on 4.2 -> scripts -> startup startup folder.
- Maya Config
addonCopy all the data with the extension .py directly below to the startup folder.

- Blender
Click 4.2 -> scripts -> presets -> theme, and open the interface_theme folder.
- Maya Config
addonOpen the Theme folder and copy all the data inside to the interface_theme folder.

- Blender
Create a new folder named scripts in the portable folder.

- Blender
4.2 -> in scripts. Move the presets folder into the newly created portable→scripts folder. (Move, not copy)


This concludes the installation of the Maya Config Addon For Blender by data copy.
Double-click “blender.exe”, which is located directly under the Blender folder, to start Blender with the add-on installed.
Take over Blender preferences As I wrote in the article, Blender’s config folder contains a variety of preferences data.
If you were also using the Maya Config Addon in an older version of Blender, you can copy the “config folder” from the older version of Blender, not from the Maya Config Addon folder.
It is a little easier because you can take over the environment settings and prepare to install add-ons at the same time.
Note that if you copy the “config folder” from the Maya Config Addon folder that you have downloaded, the initial settings will be reset.
(5) Launch Blender and import a dedicated keymap
After starting Blender, import the keymap for Maya-like operation.
From the Maya Config Addon For Blender toolbar menu, press the Prefs button to open the Preferences window.
Select “Keymap” from Preferences and click the Import button in the upper right corner.

A screen for selecting data to be imported will open.
Since we want to select the data in the Maya-like operation Blender folder, proceed to where the folder is located. If the folder is on the desktop, click Desktop on the left to make it easier to find.

After opening the Blender folder, go to 4.2->scripts->startup.
From the startup folder, select fa_hotkeys.py and press the “Import Key Configuration” button to import the Fa Hotkeys keymap into Blender.

You can now press the Maya button in the menu below the toolbar to immediately switch to a Maya-like keymap (Fa Hotkeys) at any time.

That completes the installation of the Maya Config Addon For Blender!
Then you can actually use it and see for yourself if it looks good or not!
Maya-like colors can also be changed from “Themes” in Preferences.

Incidentally, if you install the Maya Config Addon For Blender, the display name of the Workspace tab will change to look like Maya. The display name and the order of the tabs are changed a little, but there seems to be no change in the content of the tabs.

Note: When using the Maya Config Addon For Blender

The Maya Config Addon For Blender is a useful add-on, but sometimes Maya-like operations do not work when editing with certain tools or modes.
The part of the add-on that behaves strangely is fixed every time the add-on is upgraded, but it does not work perfectly every time, so you need to be a little careful about that.
If the add-on’s Maya-like operation does not work, here are two ways to solve the problem.
- If there is a conflict with an existing keymap, fix it manually.
- Use Industry Compatible keymaps for your situation.
– If there is a conflict with an existing keymap, fix it manually
Sometimes the shortcuts that are originally registered in Blender and the shortcuts that are newly registered in the Maya Config Addon overlap and do not work properly.
In such cases, you can go through the registered shortcuts and customize them manually.
How to do this is described in Blender Modeling [addendum], How to check for existing shortcuts.
For example, if there is an operation that does not work well when in weight paint mode, search for the following.

Shortcut keys are shown on the right side, so check here and uncheck any shortcuts that seem to conflict with operations that do not work well.

I’ll see if the Maya Config Addon works well with the checkbox unchecked. If it works, it is OK. (*The unchecked one will not be able to operate the shortcut.)
– Use Industry Compatible keymaps for your situation
Another solution is to use industry-compatible keymaps.
Maya Config Addon For Blender and Industry Compatibility Key map, both of which allow you to use Blender with Maya-like operations, so you can use whichever is easier to use depending on your situation.
If you want a Maya-like feel, Maya Config Addon For Blender!

This concludes the introduction of “Maya Config Addon For Blender”, an add-on that makes Blender feel like Maya~.
It is an add-on that not only provides Maya-like operation but has a variety of other useful functions.
I like Maya Config Addon For Blender very much and would like to continue using it, so I have made a small donation.
If you read the article and think it might be kind of nice? If you think it might be a good idea, please give it a try anyway.
It could be used in many ways.
Try it!
Go to the Getting Started with Blender series of articles, please click here.

- Coments - コメント一覧