Promotions may be included in the article

START Blender 4) - Basic Operations! The First Thing to Learn

START Blender 4) - Basic Operations! The First Thing to Learn

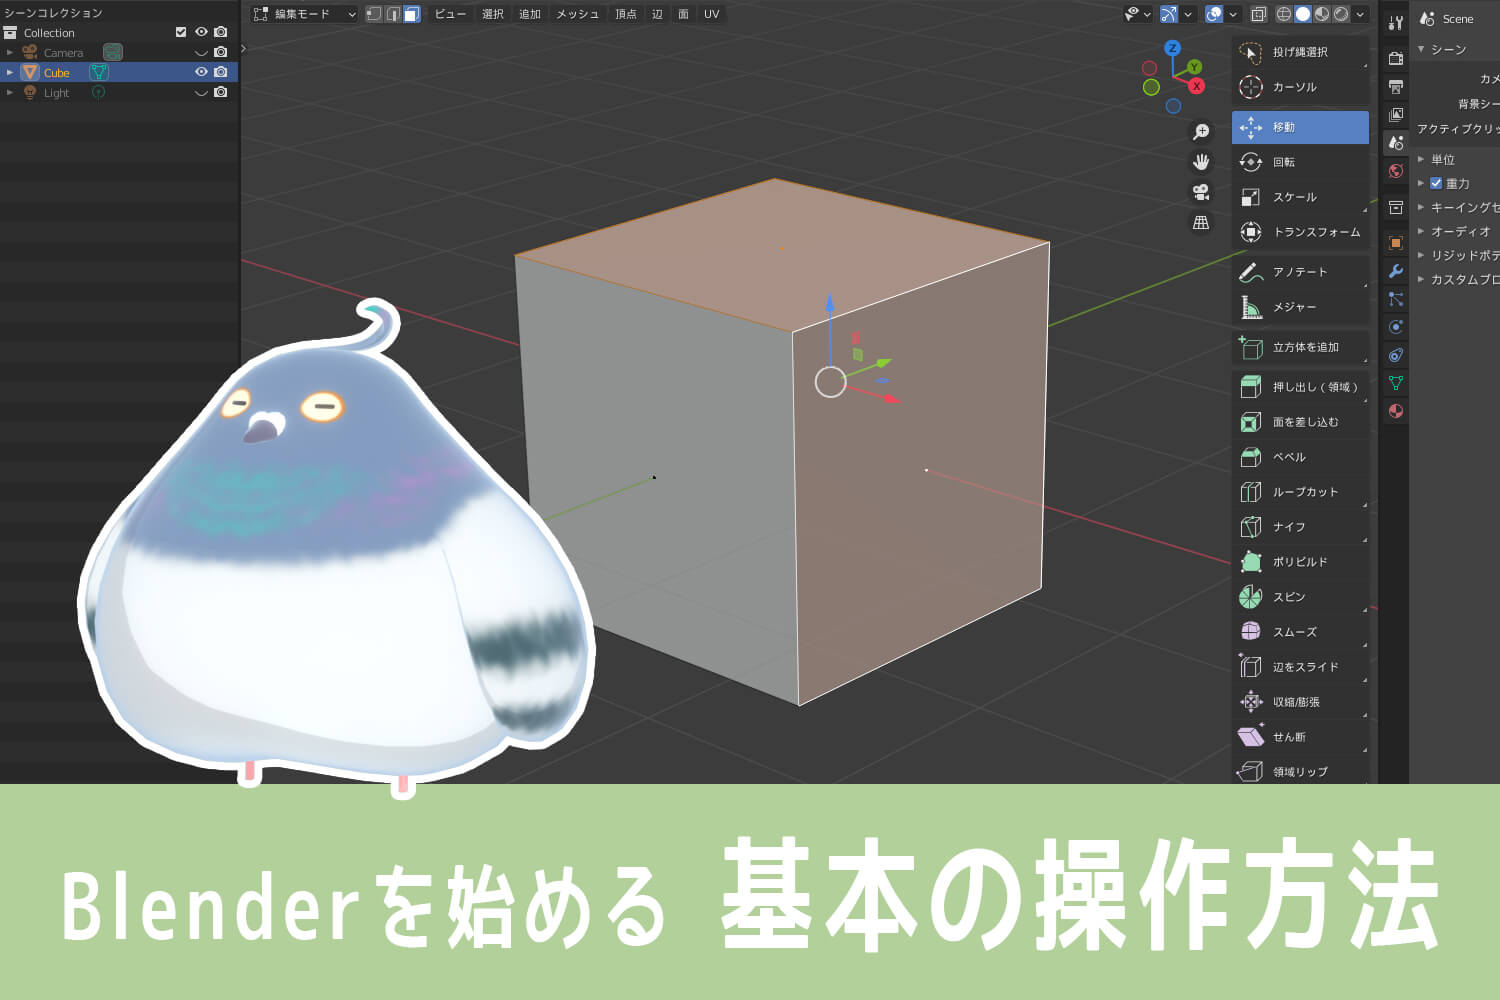
This article summarizes Basic Blender Operation.

Even if you want to create something with Blender, if you don't know the basic operations, you won't be able to create what you want.

If you get the basic operations right the first time, the stress of operating Blender will decrease and you will be able to use it comfortably.

First, you should be able to move the cube object that is displayed when you start Blender at will.

So, let's take a look at how to operate the basics of Blender.


This article corresponds to the long-term supported version Blender 3.3 LTS.


Things to check before operating Blender

!

Before trying the basic operations of Blender, please review the following

(1) Blender has a Japanese menu display?

All content in this article is based on the Japanese menu.

If the Blender menu you have launched is in English, please refer to Change Blender's menu to Japanese for reference.


(2) Workspace, mode, and 3D viewport axes

Look at the top of the Blender screen when you start up and see what each one looks like.

Check Blender workspace and mode and axis display

Is Modeling selected as the workspace tab? If not, click on the Modeling tab to select it.


Is the mode set to object mode? If not, click the ▽ next to the mode and select object mode from the pop-up.
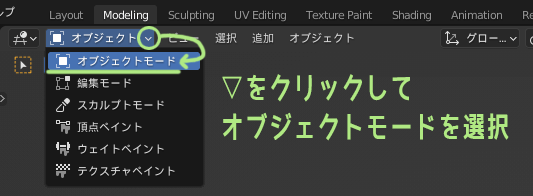
Click on ▽ to select object mode


Are the axes in the 3D viewport set to interactive navigation? If not, go to Edit → Preferences → Viewport and change the 3D viewport axes to interactive navigation.
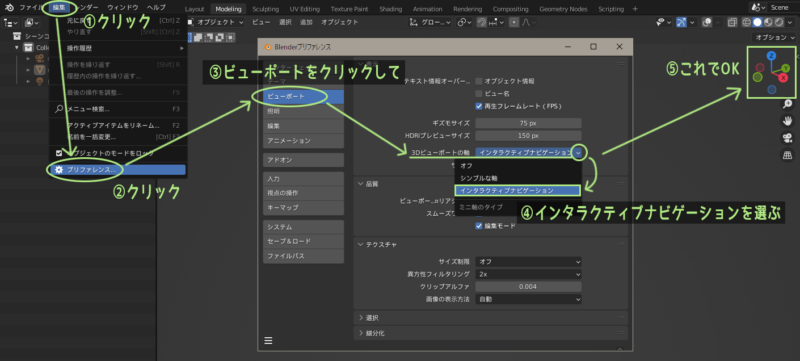
Select Blender Edit→Preferences→Viewport→3D Viewport Axis→Interactive Navigation


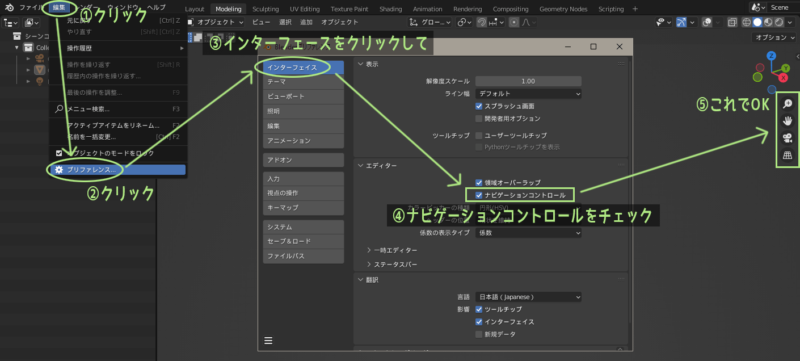
If you do not see a magnifying glass or a hand symbol near the axis, go to Edit→Preferences→Interface and check the Navigation Controls checkbox~.

Blender Edit→Preferences→Interface→Check Navigation Controls


(3) Blender screens be different depending on the customization

The Blender used by Toha is customized to Toha's liking.

In this Getting Started with Blender series (1) - (3), we have made various changes to make it easier to use.

If the Blender screen image used in this article is different from your Blender screen, this is the reason.

If the screens are too different to understand, please refer to the Getting Started with Blender series (1) - (3).


(4) Basics explain "how not to use shortcuts"

Blender has a variety of keymaps, and the shortcut keys are different between the standard Blender keymap and the industry-compatible keymap.

Since keymaps vary from person to person, we will basically explain the "no shortcut method".

Shortcuts are only a convenience feature, and most things can be done without using shortcuts.

So, please get to know how not to use shortcuts first, and if it becomes inconvenient, use shortcuts if you prefer~!


(5) Shortcuts, etc. introduced in this section are assumed to be Maya-style keymaps

Because Toha has been a Maya user for many years, he uses Maya-style keymaps.

All shortcuts and operations introduced in the article are Maya-specific.
Sorry if you are using the Blender standard keymap.

The add-on that Toha has installed is called "Maya Config Addon For Blender", but the keymap will be almost the same if you use the "Industry Compatible Keymap" that comes standard in Blender.

For more details, see another article, Maya-like operation of Blender

Now, let's move on to the basic operations of Blender.


Sponsored Links


3D viewport operations (rotation, translation, zoom)

GOGO

The first step is basic operation of the 3D viewport. Without these operations, nothing can be done.

(1) Rotate Viewport

Click and hold on an axis in the interactive navigation and move the mouse to rotate the viewport.
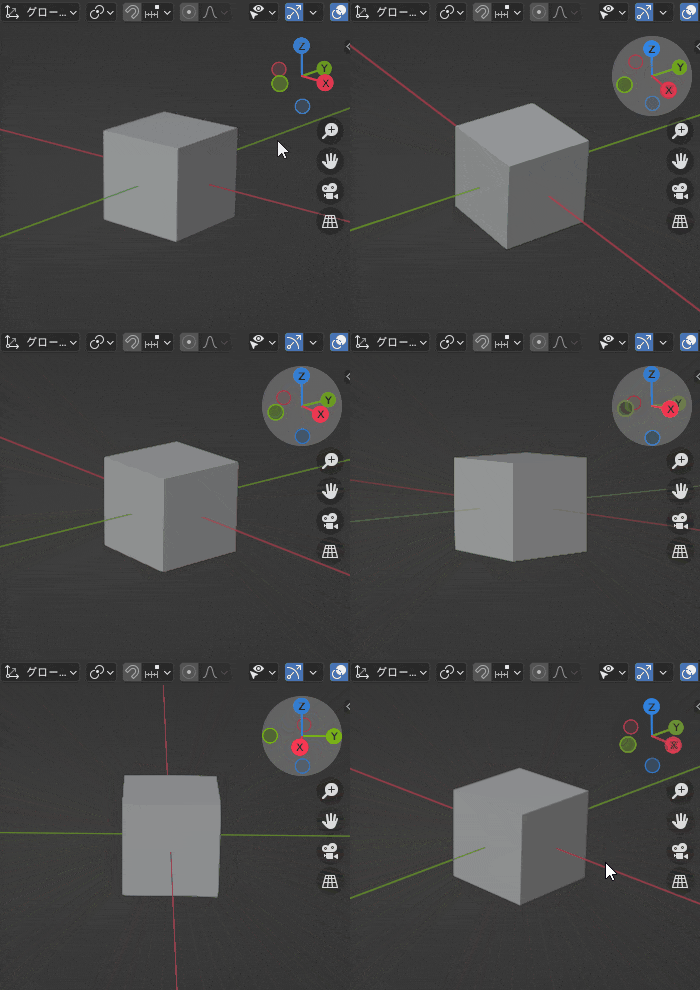
Rotate Blender 3D View

How to rotate the view using the mouse and keyboard without interactive navigation ↓

check

Rotate Viewport
Alt+mouse left click & move


(2) Move Viewport

Click and hold the palm symbol on the navigation control and move the mouse to move (pan) the viewport.
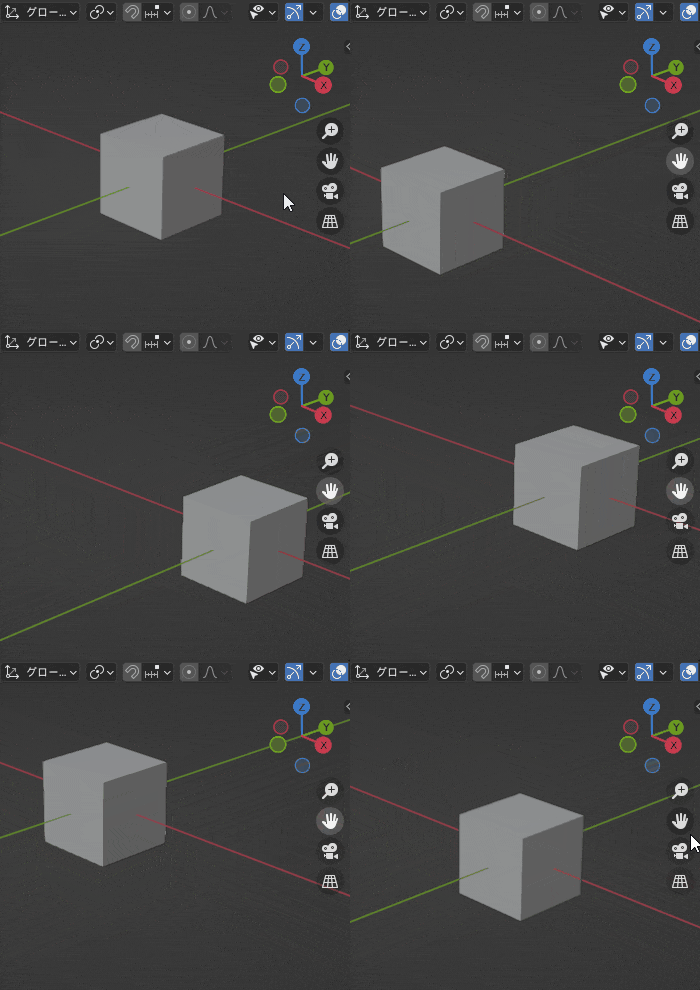
Moving (panning) the Blender 3D view

How to operate the view using the mouse and keyboard instead of using the navigation controls ↓

check

Move viewport
Alt+click & hold middle mouse button to move


(3) Zoom viewport

Click and hold the magnifying glass symbol in the navigation control and move the mouse to zoom the viewport.
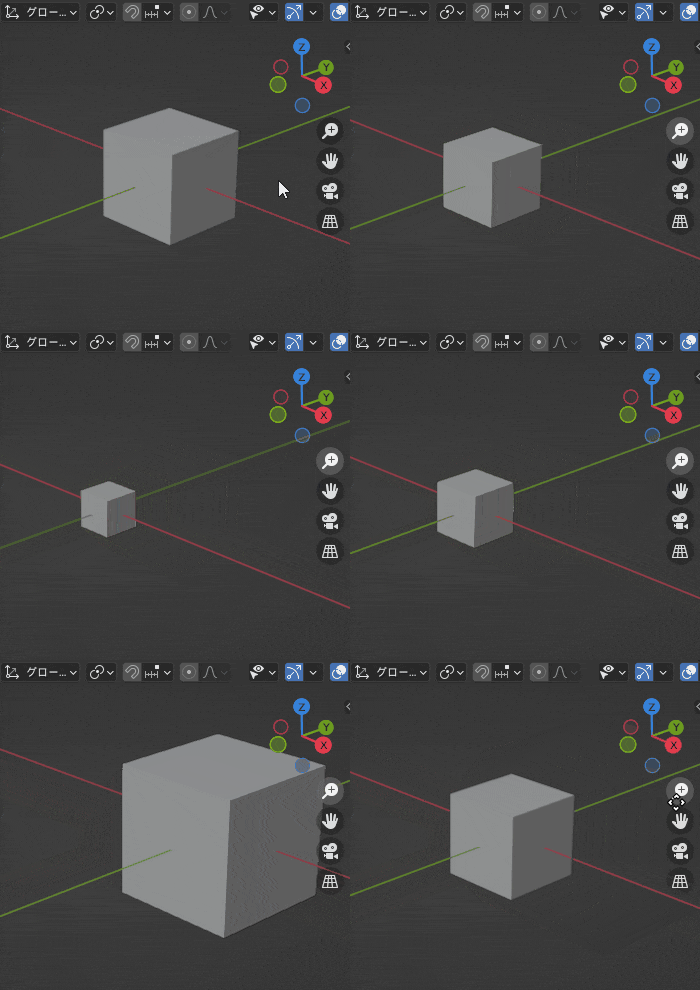
Zoom in Blender 3D View

How to zoom the view with the mouse and keyboard instead of using the navigation controls ↓

check

Zoom on view
Alt+right mouse click and hold to move
or use mouse wheel to scroll


Sponsored Links


Object manipulation (selection, movement, rotation, scaling)
bicorn

The next step is basic object manipulation. Once this is done, you can move the object.

(1) Selection Object

Select "Select Box" from the toolbar, and then "left-click and drag" the object you wish to select. You can also select an object by simply clicking on it.

Box selection is possible even while using other tools such as moving or rotating.
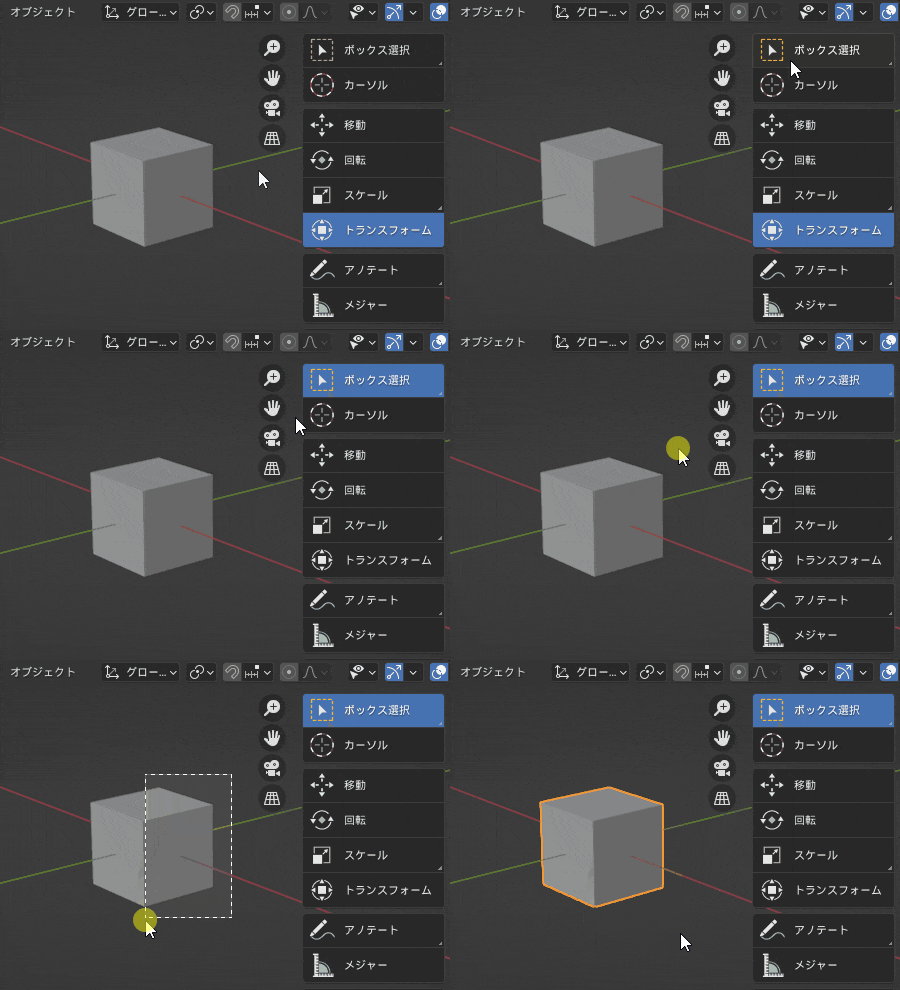
Box selection of Blender objects

How to select "Box Selection" as a shortcut ↓

chack

Box selection for object
Press Q on the keyboard


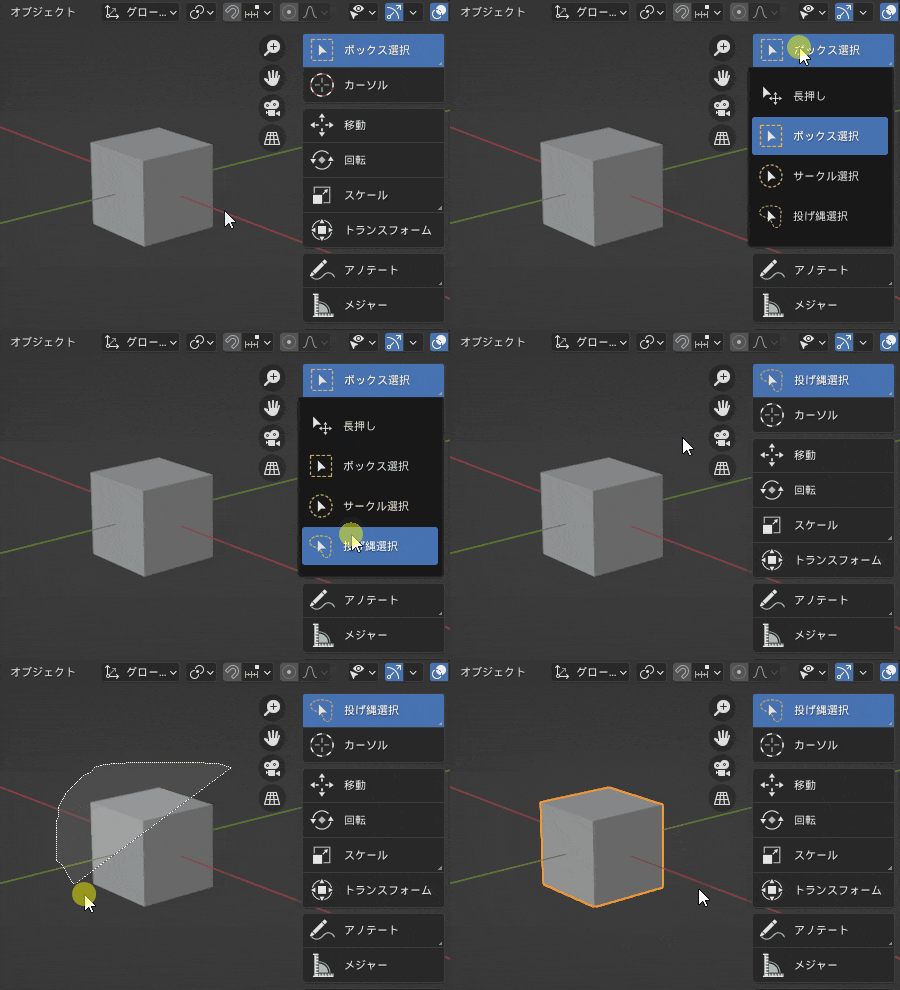
You can also select other selection methods by [left mouse click and hold] on the "Box Selection" toolbar.

Lasso selection of Blender objects

To deselect, [left mouse click] anywhere in the view except the object.


(2) Move Object

Select "Move" from the toolbar, and click on the object to display the arrow (move gizmo).

  • If you grab the arrow part with the mouse and move it, you can move it only in the direction of the arrow's axis.
  • If you grab the square between the arrows and move it, you can move it only in the direction of that plane.
  • Grab and move the arrow middle circle to move it freely in all directions.
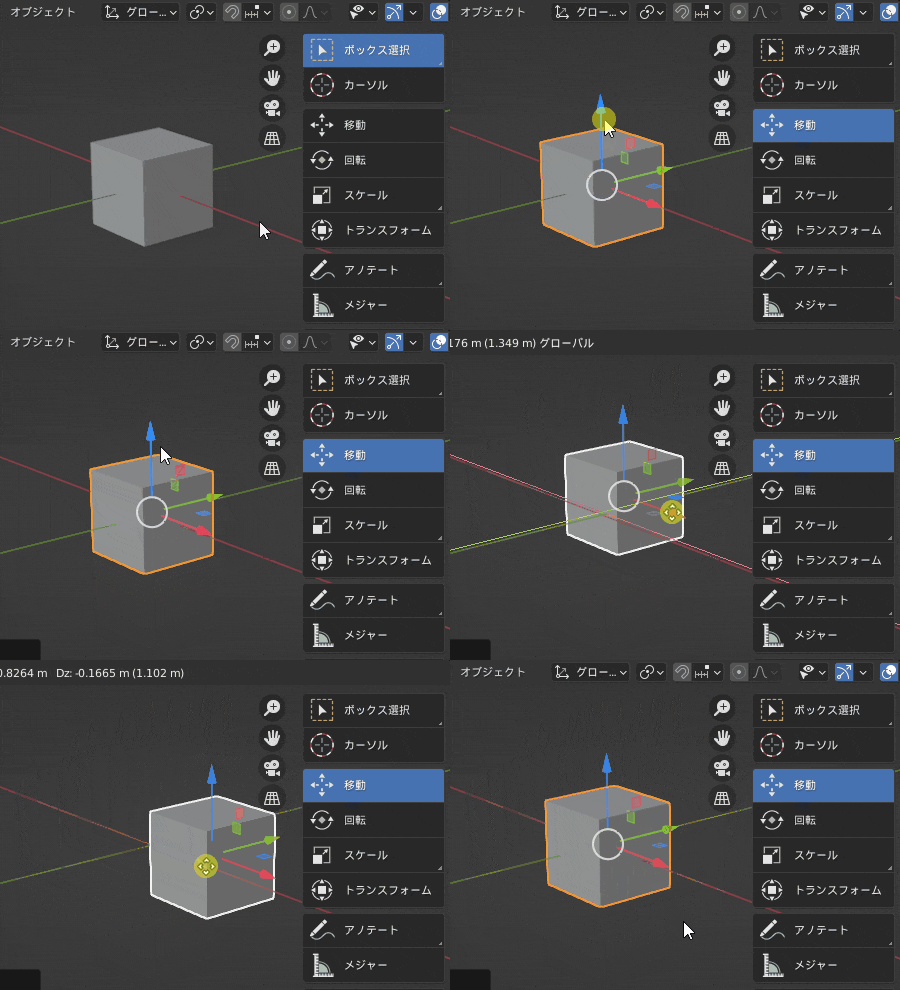
Moving Blender Objects

How to select "Move" as a shortcut ↓

check

Move object
Press W on the keyboard.


(3) Rotate Object

Select "Rotate" from the toolbar, and click on the object to produce a circle (rotation gizmo).

  • If you grab the edge of a circle with the mouse and move it, you can rotate the circle only in the direction of its axis.
  • If you grab and move the circle except for the edge part, you can freely rotate it in all directions.
  • Grab and move the edge of the white circle to rotate it relative to the direction you are viewing in the view.
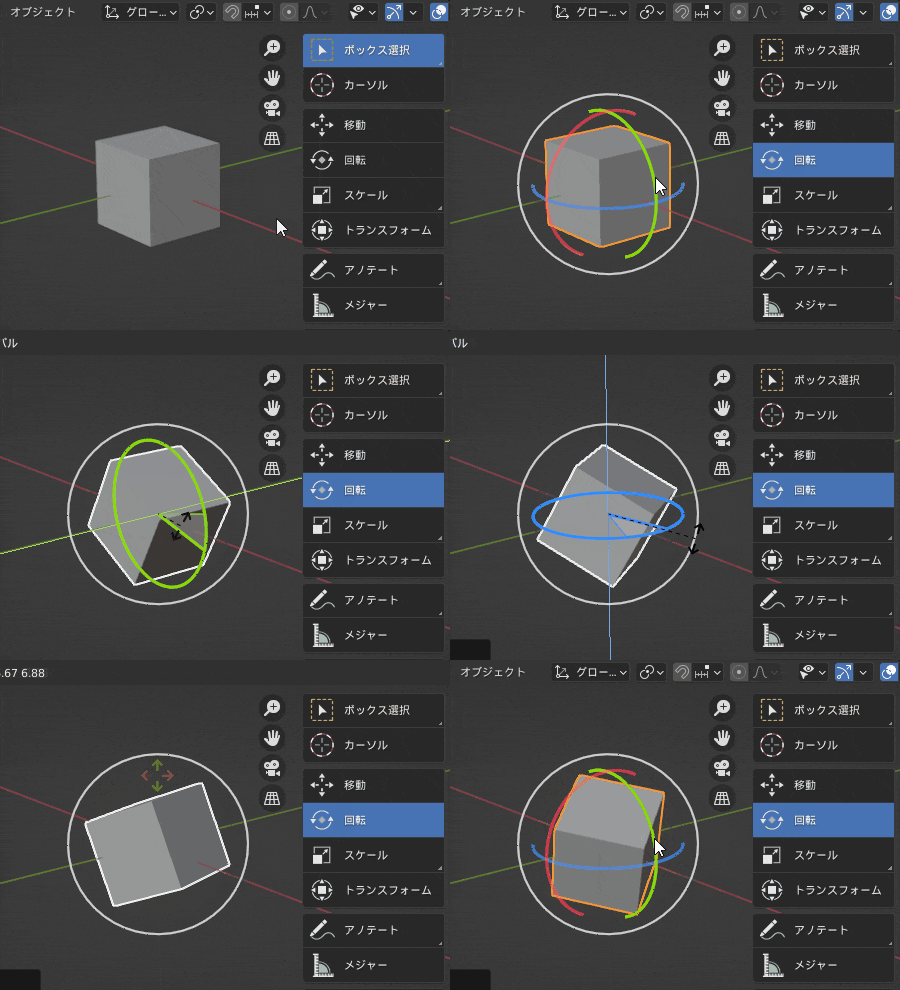
Rotating Blender Objects

How to select "Rotate" as a shortcut ↓

check

Rotate object
Press E on the keyboard


(4) Scaling Object

Select "Scale" from the toolbar and click on the object to bring up a square bar (scale gizmo).

  • If you grab the square bar with the mouse and move it, you can scale it only in the direction of that axis.
  • If you grab and move the square between the square bars, you can scale only in the direction of that plane.
  • Scale in all directions at the same time by moving around a white circle.
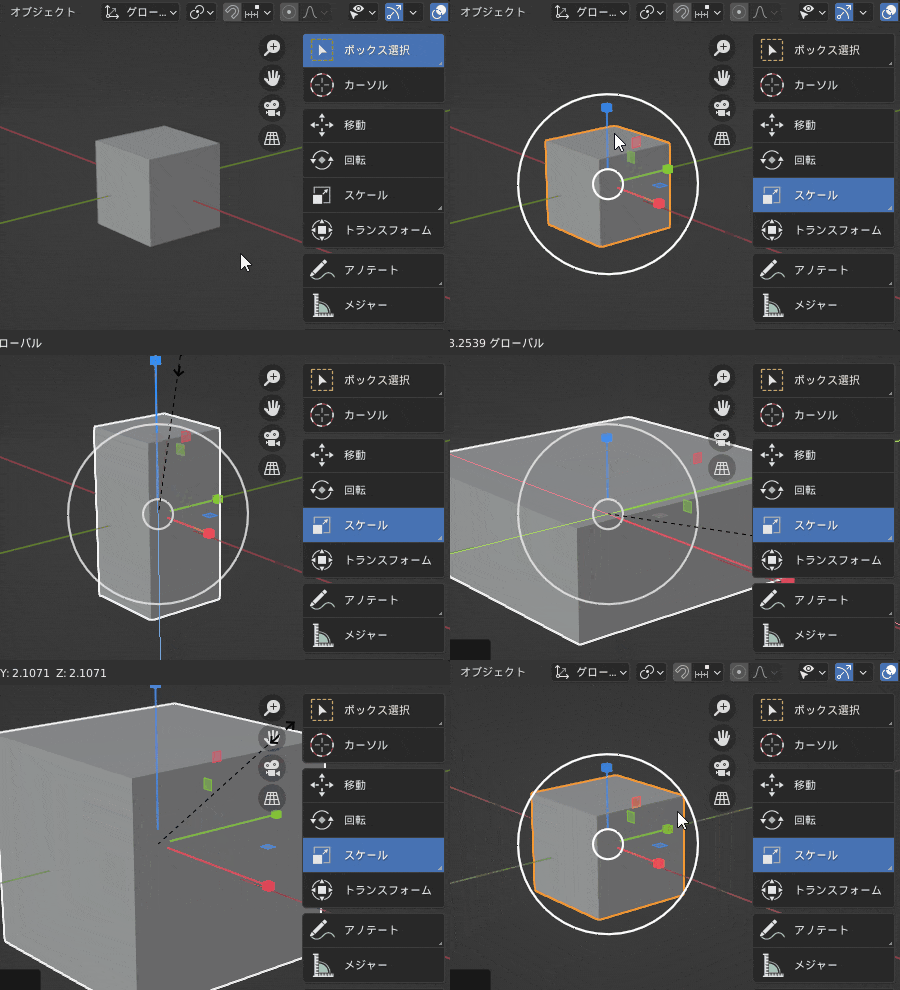
Scaling Blender Objects

How to select "Scale" as a shortcut ↓

check

Object Scale
Keyboard.radiuspress


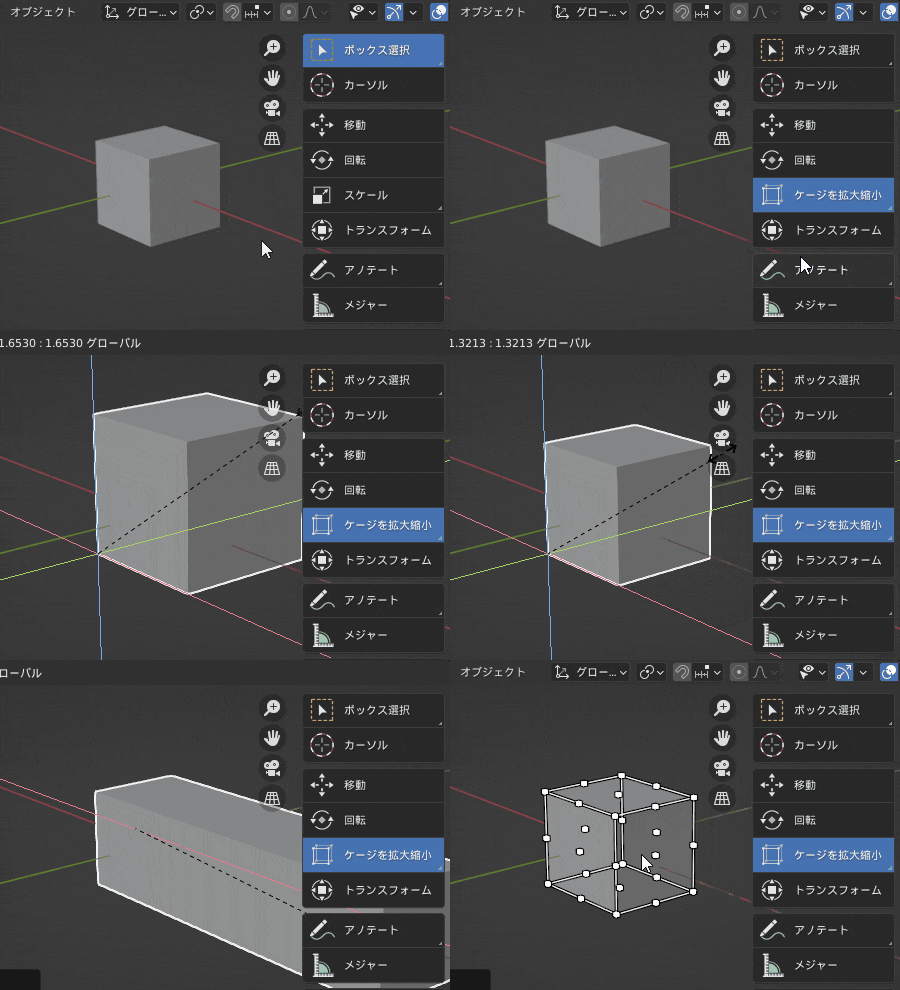
You can also select "Scale Cage" by [left mouse click and hold] on the toolbar's [Scale].

Scaling the cage of a Blender object

"Scale" scaled the cage around the gizmo, but "Scale Cage" scaled the cage in the direction it was moved.


(5) Move, rotate, zoom in/out while holding down [Shift]

When using the move, rotate, scale tools, hold down the Shift key on your keyboard while moving the gizmo to reduce the amount of change caused by the tools. You can reduce the amount of change caused by the tool.

If the movement of movement, rotation, or scaling is too large, the Shift key can be used together for fine control.

Blender [Shift] while moving


(6) Undo and Redo

When you perform an operation in Blender, you can undo it by pressing Ctrl+Z.

If you want to undo an undone operation, you can use Ctrl + Shift + Z with to return.

Each can undo/redo an operation as many times as the key is pressed.

check

Undo (undo an operation)
Press Ctrl+Z on the keyboard
Redo (redo the undo operation)
Press Ctrl+Shift+Z


The default Blender setting for the number of undo is 32.

If you prefer to be able to undo more, increase the number of times you can undo back


(7) Switching between global and local coordinates

In manipulating objects, it is also important to switch between global and local coordinates.

To learn more about the difference between global & local coordinates, please Basics of 3D Models 1) - The 3DCG World is Managed by Coordinates.


Whether you are using global or local coordinates will change the result of manipulating the object.

Movement of objects with different global and local coordinates
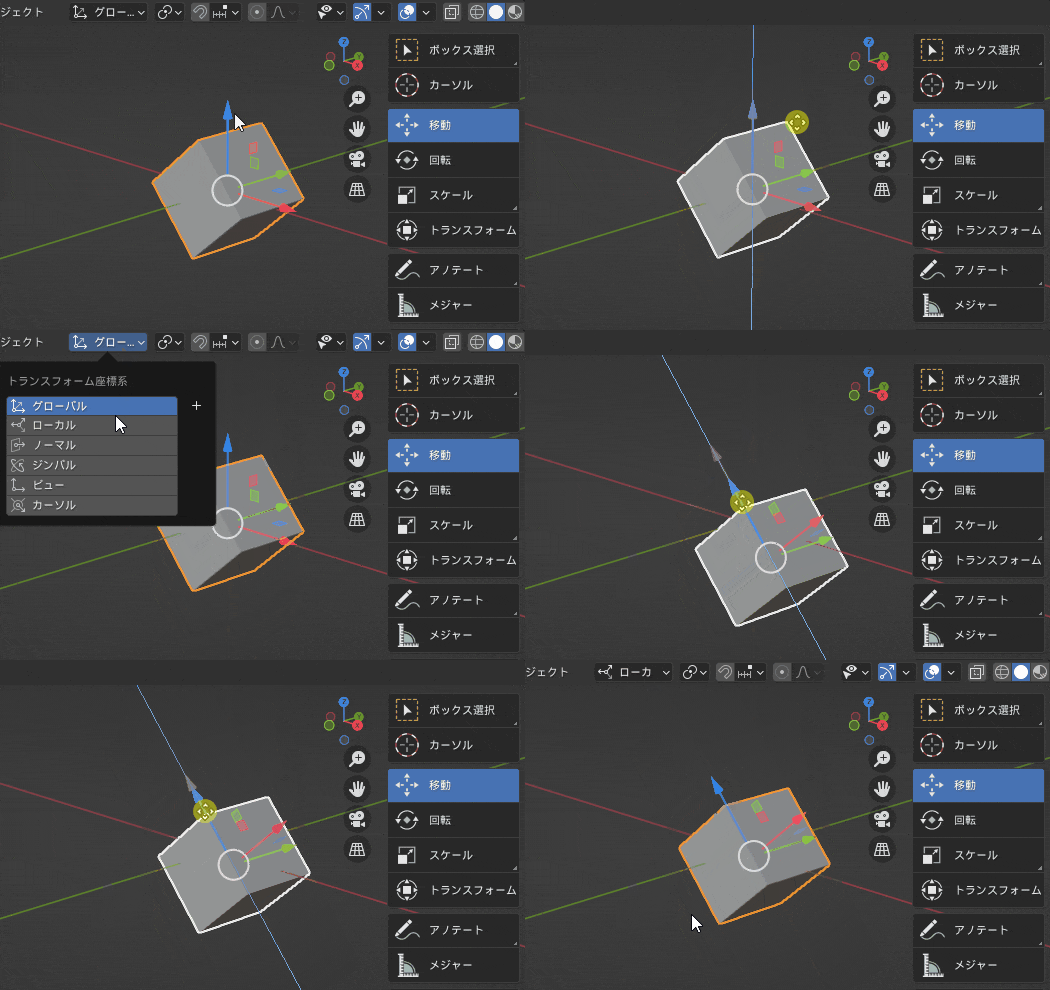
Blender Object movement with different global and local coordinates

Object rotation differs between global and local coordinates
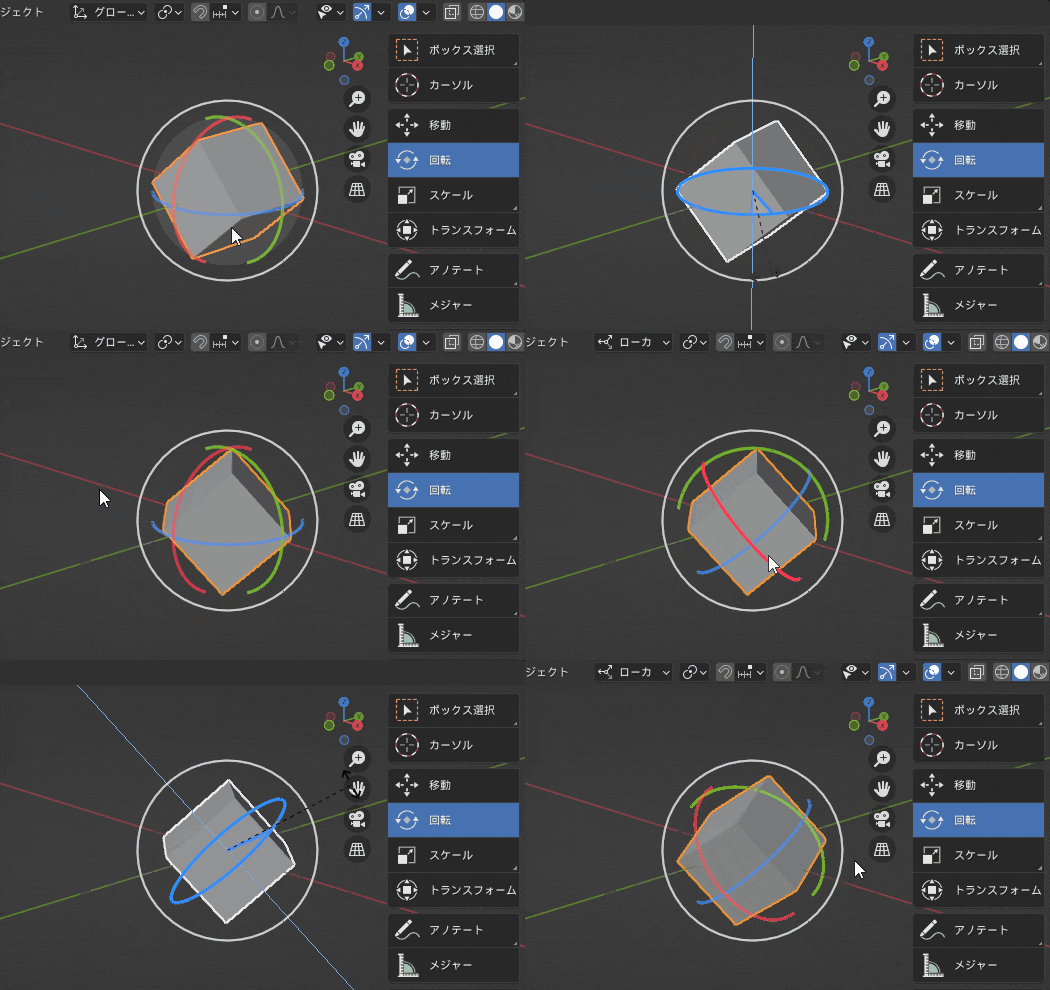
Blender Different object rotation in global and local coordinates

Object scale differs between global and local coordinates
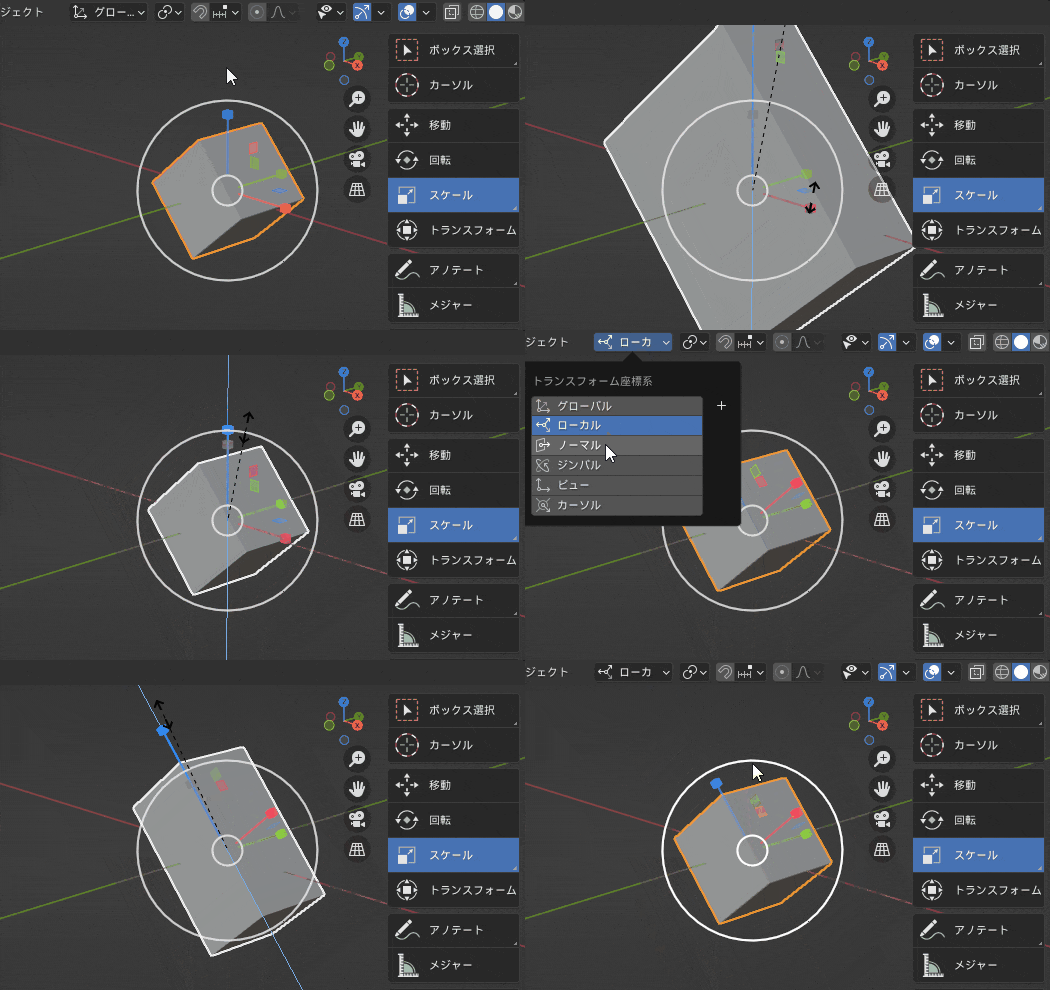
Blender Different object scales in global and local coordinates


Sponsored Links


Edit Mode Operations (Vertices, Edges, Faces)
Hm-hmm...

To create a 3D model using Blender, you need to manipulate the vertices, edges, and faces of an object.

(1) Object mode → Edit mode

To manipulate an object's vertices, edges, or faces, change to Object Mode → Edit Mode.
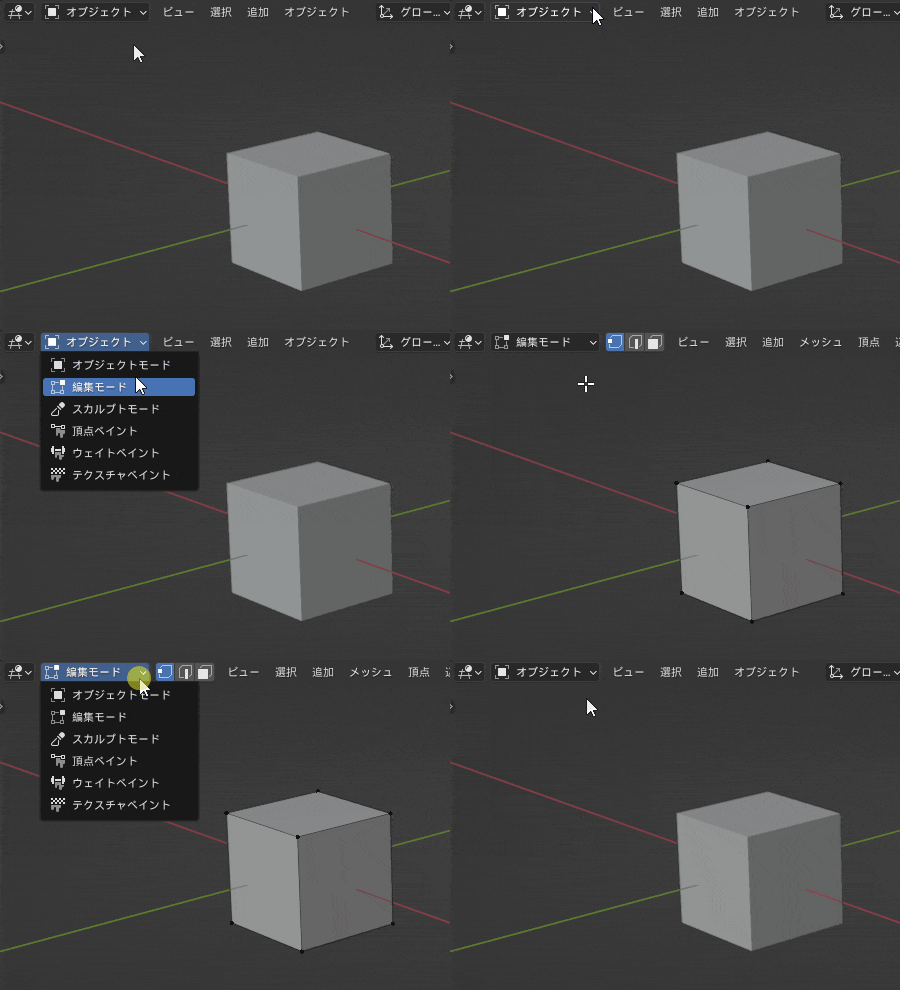
Switching to Blender Edit mode

How to switch between object mode & edit mode with a shortcut ↓

check

Switch to edit mode
Press TAB on the keyboard
----------
*In the industry compatible keymap, the search is registered on the TAB key, but 1 2 3 keys directly switch to edit mode to vertices, edges and faces. (4 for object mode)


(2) Operation in vertex edit mode

To manipulate a vertex in edit mode, select the left-most icon next to the mode selection.
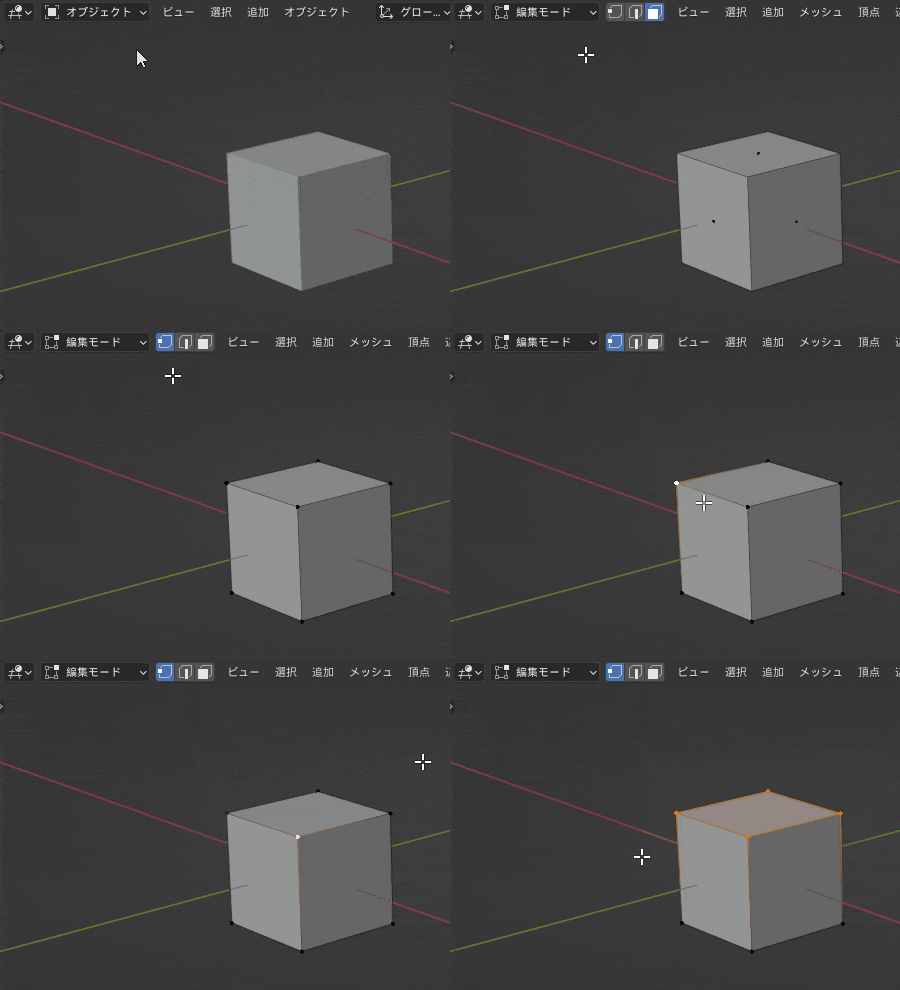
Blender Vertex edit mode

Shortcut to vertex edit mode ↓

check

Enter vertex edit mode
While in edit mode, press 1 on the keyboard.


(3) Operation in edge edit mode

To manipulate an edge in edit mode, select the middle icon next to the mode selection.
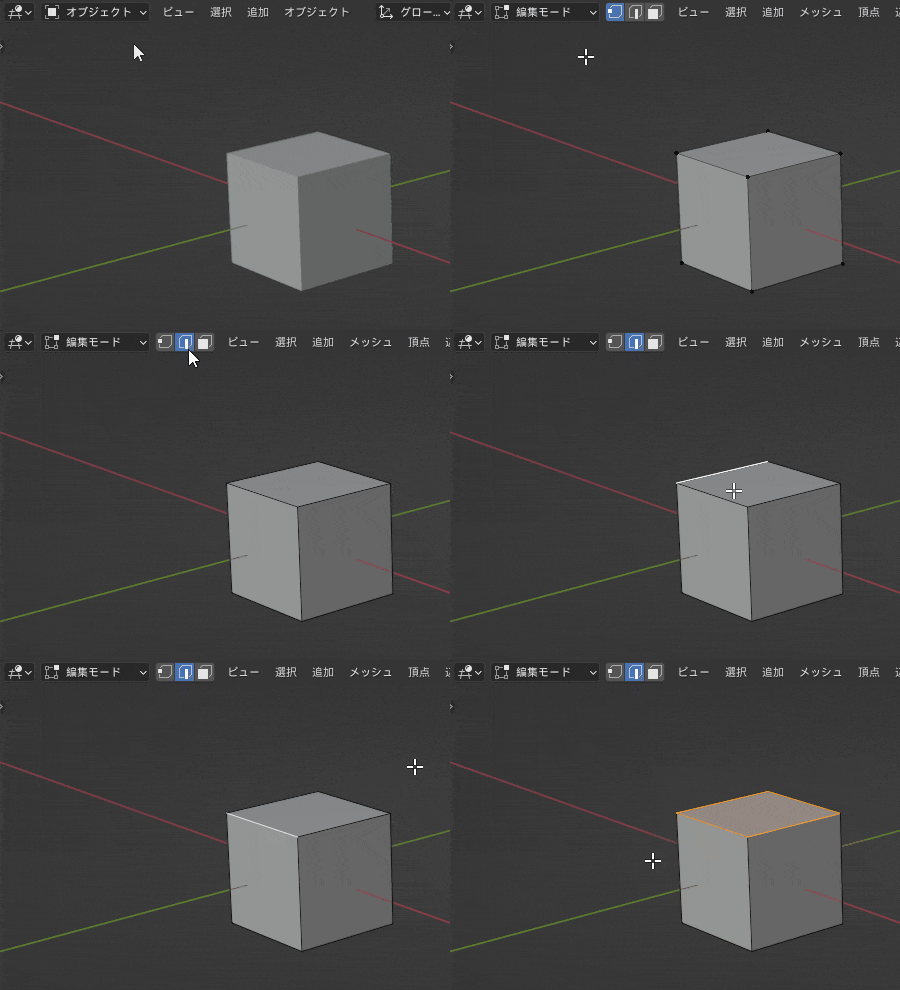
Blender Edit Edge Mode

Shortcuts to edge edit mode ↓

check

Enter edge edit mode
While in edit mode, press 2 on the keyboard.


(4) Operation in surface edit mode

To manipulate a surface in edit mode, select the far right icon next to the mode selection.
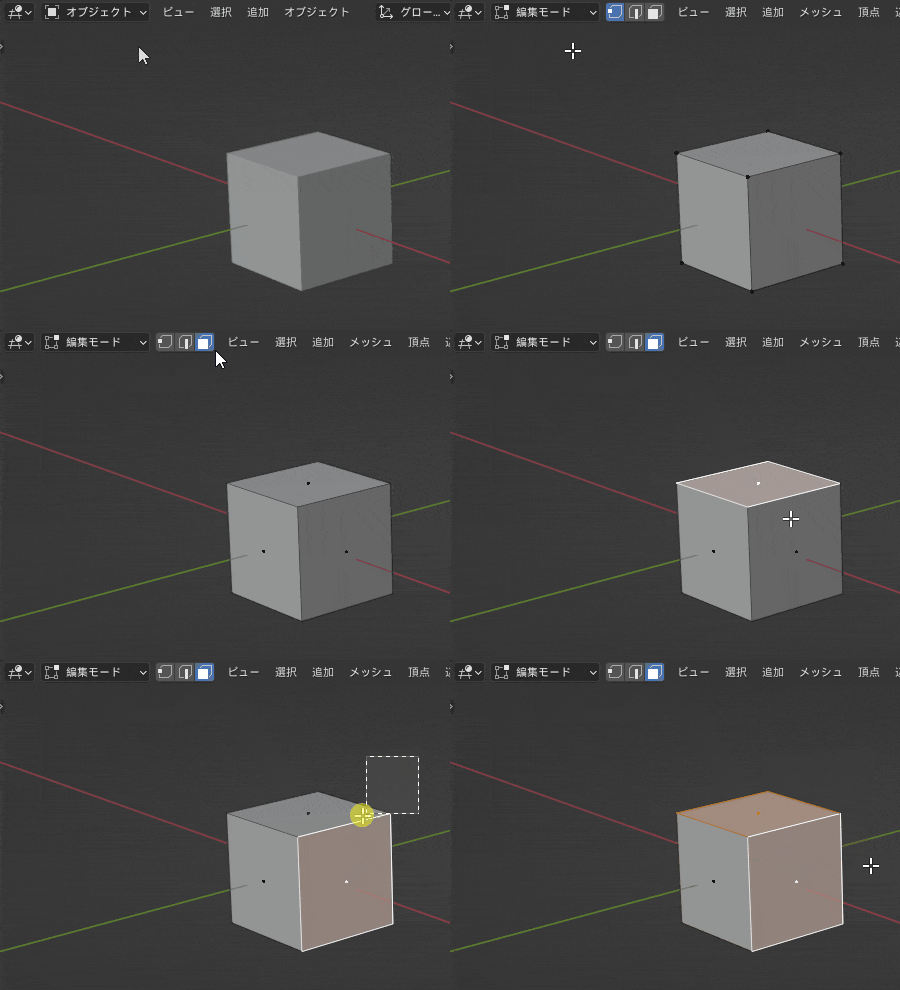
Edit mode for Blender faces

Shortcut to edit face mode ↓

check

Enter surface edit mode
While in edit mode, press 3 on the keyboard.


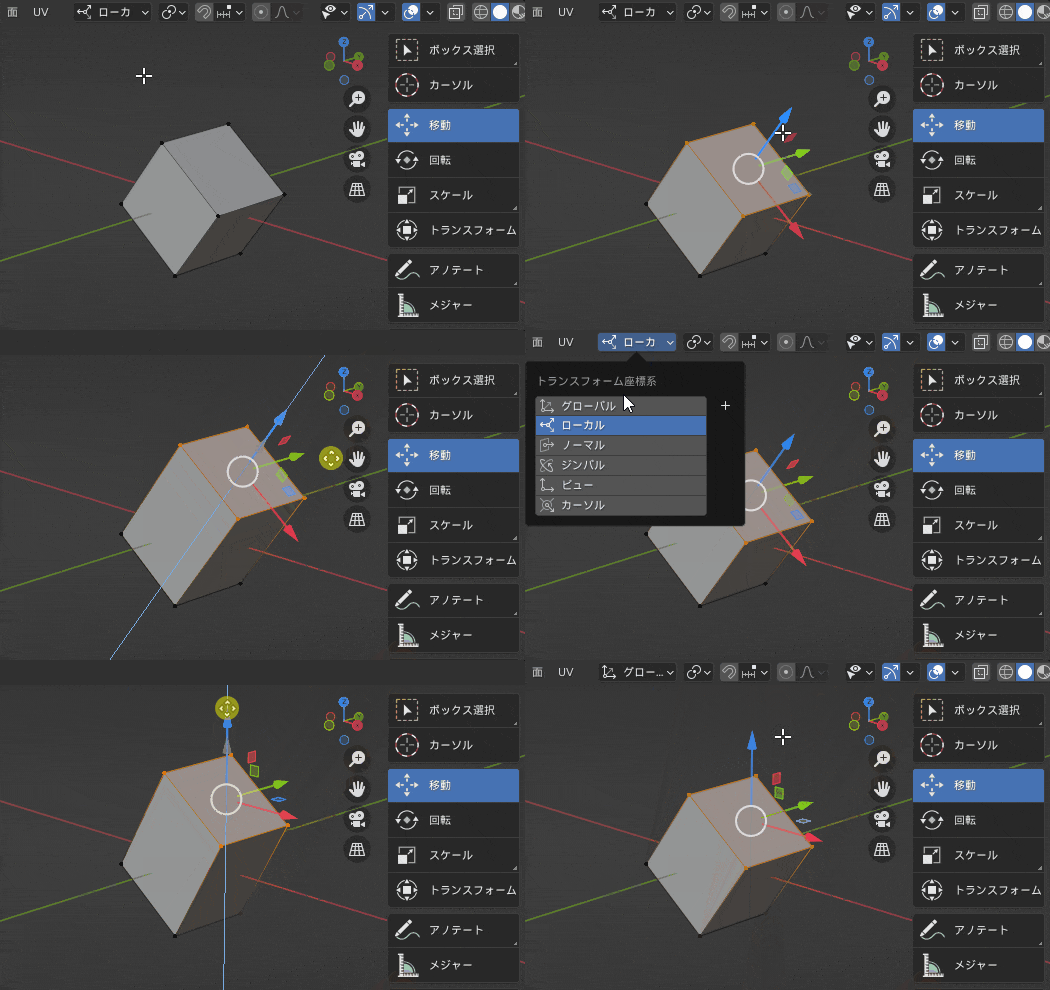
(5) Switching between global and local coordinates

Switching between global and local coordinates is also enabled in edit mode.

The local coordinates of the object's vertices, edges, and faces reflect the local coordinates of the object itself. It is convenient to use differently if necessary.

Blender Edit mode operation with different global and local coordinates


(6) Use transparency to select the backside

In Blender, basically, you cannot select vertices or edges that are not visible on the backside.

If you want to select vertices and edges on the backside, use transparency. To do so, press the Transparency button in the upper right corner of the viewport.
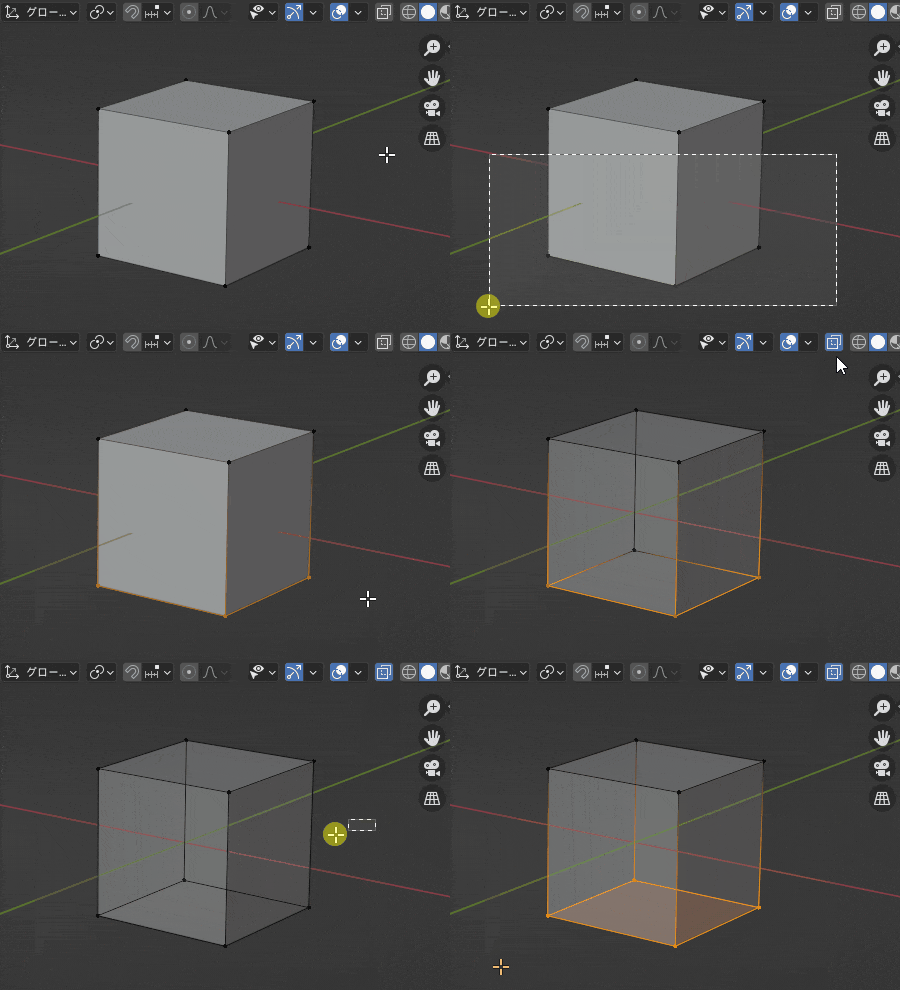
Transparent display of Blender objects (vertex selection on the back side)

Now you can select the vertices on the backside.


Summary: Try some basic Blender operations and get used to it!

OK

This is the basic operation of Blender.

Can you now move the cube object in the 3D viewport at will?

The best way to understand how to operate Blender is to actually operate it with your hands. Please refer to the article and try operating Blender yourself~.


The basic operations described here are the first basic operations.

If you make 3D models in Blender, it is ideal to be able to perform these operations as if you were breathing. Please try various operations and get used to the basic operations of Blender.


Once you have the basic operations down, it's time to get to modeling!

There are two articles about modeling in Blender, [Knowledge] and [Practical], so please read the one you prefer.

Toha
Toha

I recommend starting [Knowledge]~

List of comments

  1. やまぐち says:

    Hello, I am a beginner who started to use Blender from 2.8. I've been using your website as a reference because it's easy to understand.
    If you want to specify the size of an object numerically in the window that appears in the lower left corner of the screen, instead of using the handles in the "Scale Objects" section, you can do so by clicking on the
    I understand that you can put a numerical value in each of XYZ, but when you want to specify the same numerical value for all of XYZ at once, you can use the
    I don't know how to fix or link the 3 coordinates. Thank you in advance.

  2. MAU says:

    I have been searching the net for some time to work on Blender 2.8 and came across your website.
    I have an image of the work, but I have not been able to move forward because I do not have basic knowledge.
    But with the help of this site, we will be able to get started.
    It is really helpful because it is explained in a really gentle and detailed way.
    Thank you very much.

    • Toha トハ says:

      MAU, thank you very much for your comment~!
      When you say that, it makes me very happy that I wrote this blog!
      We hope we have been able to help MAU's creative process in any way we can. Please keep on creating your own creations!
      We hope that MAU will be able to complete the work that you have imagined, and we are supporting you~!

  3. まちゅ says:

    My name is Machu. I am learning a great deal.
    There is something I don't understand in Blender 2.8.

    (1) Operator panel that appears in the lower left corner of the screen when mesh → torus is added (indicated as "add torus").
    Once the "+" disappears, can the window for numerical manipulation of its torus shape be reappeared?
    I checked and it seems that I can get the last window from Edit -> Adjust Last Edit.
    https://www.youtube.com/watch?v=RaT-uG5wgUw&t=140s

    (2) I would like to know how to add more items to the sidebar.
    I'm watching a video by a gaijin and I see a tab called "screencast keys" and I want to use it.
    https://www.youtube.com/watch?v=SBtDix7xGOg&list=FLrabtb20Iyudx_w7sfn8stg&index=7&t=45s

    • Toha トハ says:

      Thanks for your comment, Machu-san~!
      We will answer your questions to the best of our knowledge.

      (1) The most recently opened operator panel can be redisplayed. For details, see theModeling in Blender 2.8 [Knowledge] at the Operator PanelPlease check there as it is written in the following section.

      I think that the increase of items in the sidebar is usually the result of some add-on being installed, and I found an add-on that came up when I looked up "screencast keys", so I think you can use it if you install this one.

      Addon : Screencast Keys (add-on to screencast standard keystrokes)
      https://www.cgradproject.com/archives/5495/

      That's all I have to answer. Best regards~

      • まちゅ says:

        Thank you very much.
        I think it's still too early to add add-ons and such, so I'm going to learn the basics and give it a try!

  4. にゃろめ says:

    I've started learning Blender, but I'm not seeing the magnifying glass or the hand symbols... it's a little thing, but I was having a hard time moving forward (googling didn't help), but Toha's blog helped me figure it out! Thanks a lot! I'm going to work hard from now on again. I look forward to more of your articles and your projects, Toha!!!

    • Toha トハ says:

      Thank you for your comment, Nyarome~!
      I'm glad that Toha's blog was able to help you with your bug glasses and palm prints ^^^.
      Thank you for visiting our blog!
      I'm trying to write articles and make games at my own pace.
      Please come back and see them again~!

  5. まちゅ says:

    My name is Machu, I asked a question before. Please allow me to ask another question.

    I am currently working on a gun FREE 3D data DL (OBJ data) and importing it to Blender format.

    The data is for a gun called M416, and when I click on it, everything is selected.
    I want to create a design with partially different colors, so I select each part in edit mode, then select "Select" with "P
    Separate them one at a time.

    The problem is that when I select a part called A and color it from the material, the same color is applied to other parts.
    I do not know how to color the parts as separate.
    Is this done using a node?

    Please teach us.

    M416
    http://3dmag.org/en/market/item/6759/

  6. まちゅ says:

    Sorry. This has been resolved.
    We look forward to working with you again next time.

    • Toha トハ says:

      Machu-san, sorry for the delay in replying to your comment.
      I am glad to hear that the problem was solved without any action on the part of THOA.

      We reply to all comments we receive, but if your question is not about the content of the article, it may take us longer than usual to reply.
      This is because we cannot give answers to questions that we do not understand unless we have done a lot of research by searching on the Internet or actually trying things out in Blender.
      I need time to look into it, so I can only reply when I have some time to get it together.
      I apologize for not being able to answer your comments, but I would appreciate your understanding. ><

      • まちゅ says:

        Never mind.
        I'm glad it resolved itself.
        Otherwise, you may not be able to learn it.

        If you don't do it for a while, you will forget about this software very easily.

  7. きゅうた says:

    Nice to meet you, Mr. Toha, and thanks for all your help.

    When I select a box, I can only select the front side of the box, and I have to use circle selection to rotate the viewpoint.

    I'm also having trouble with loop selection.
    I've checked the shortcuts in the preferences and followed them, but I can't select them properly.
    Is there anything else I need to check?
    If you know of any, I would appreciate it if you could let me know.

    • Toha トハ says:

      Kyuta, nice to meet you and thank you for your comment~.
      Let me answer your question.

      About the box selection only being able to select the front side of the box
      In this article.(6) Use transparency to select the backsideCan I only select the front side if I try to do this? At the moment, the only way to select the back side that TOHA knows of is to use the transparent display~.

      Loop selection is not available
      When using Industry Compatible keymaps or Maya Config Addon For Blender 2.8 keymaps, loop selection can be done by double-clicking as described in the article. However, when using the Blender 2.8 standard keymap, double-clicking is not possible; with the Blender standard keymap, [Alt]+[left click] ([Alt]+[right click] if this is not possible) is the loop selection operation.
      The keymap in use can be checked and changed at Edit→Preferences→Keymap from the top menu, so please check it once and try it~.
      If you still could not select a loop, I am a little unsure. > <

      Sorry for the late reply to your comment at the beginning of the year, but please accept my best regards~!

  8. ひつじ says:

     Nice to meet you.
     My name is Sheep.

     I am a complete beginner. I installed blender 2.8 last year but have not touched it much.
     I have just started using it for a reason...

     I was practicing typing text and suddenly I could not change the font.
     The first time I selected a font, I was able to select either one that came by default on my PC or one that I downloaded from an external source, but the next time I went to the font loading screen, I could not see any fonts other than the first one I selected.

     I have looked into blender text relationships, but my understanding of the terminology is not sufficient and I have not been able to find a similar case.
     I thought it might be a problem with my PC rather than blender, but I am stuck because other applications work fine.

     The PC used is a MacBook Pro with Mojave 10.14.6 OS.
     I would like to know if you know anything about this.

    • Toha トハ says:

      Sheep, thank you for your comment~!
      However, it seems that this is not something I can answer to you.
      I don't know anything about Mac fonts as I'm a Windows user and I'm not sure I can help you...
      I am sorry, but thank you for your cooperation in the above.

      • ひつじ says:

        Thanks for the reply.
        Sorry for the delay in confirming.

        Yes, sir. I will try various things somehow~.
        This article has helped me a great deal and I will continue to refer to it. (_ _ _)

  9. プラスチック缶 says:

    Hello, my name is Plastic Can.
    When I was looking for a 3DCG software other than blender because I could not adapt to the operation of the previous version, I found out about Ver. 2.8 on your website and have been using it as a reference.
    I was about to give up on both 3DCG and production itself without fully understanding the operations, but thanks to the very clear explanations and easy-to-understand website layout, I found hope.
    Thank you so much.

    • Toha トハ says:

      Thank you, Plastic Can, for viewing and commenting on my blog~!
      I'm glad that Toha's blog was helpful to you, Plastic Can!
      We will be updating the site slowly, but we hope to add articles on other topics as well.
      If you don't mind, please keep up the good work.

  10. ボビー says:

    Nice to meet you, Toha!
    I always refer back to you when I need help!

    I would like to ask you a question about the operation of the surface selection in the edit mode... I need your help!
    https://www.youtube.com/watch?v=obQEsWXl5SA

    This is about the operation from 6:35- a few seconds into this video.
    I'm using a Mac, so I can't use "shift + alt (option) + left click" to do the ""Select all" -> "Select all" as shown in the video. → "Select columns consecutively" as shown in the video, and I am having trouble (crying).
    I thought this operation would be especially convenient if it could be controlled by modeling, but I couldn't find any results when I looked into it.
    For now, I am fooling around with "shift + alt (option) + left click" grid selection lol.
    Is this symptom a problem with the default settings? Or is it a specification of the update?

    I would appreciate it if you could let me know. m(_ _)m

    • Toha トハ says:

      Bobby, thank you for the blog reference & comment~!

      Regarding your question, it seems that you are making a "loop selection" if you look at the relevant part of the video.
      Once here, theHow to check for existing shortcutsto find out the current shortcut key by searching for the name "loop selection".

      You will see multiple items for loop selection, but if there is no [Shift]+[Alt]+[Left Click] in the loop selection displayed in the mesh column, you cannot use this shortcut to select a loop.
      I think it should be possible to do this by using the loop selection shortcut keys that I have found through research, or by changing the existing shortcut or registering a new shortcut.

      We can't tell you about Mac operations here, so I'm sorry, but please check the current shortcuts in your environment - thank you in advance.

Toha
Toha

Please feel free to comment~!

タイトルとURLをコピーしました