
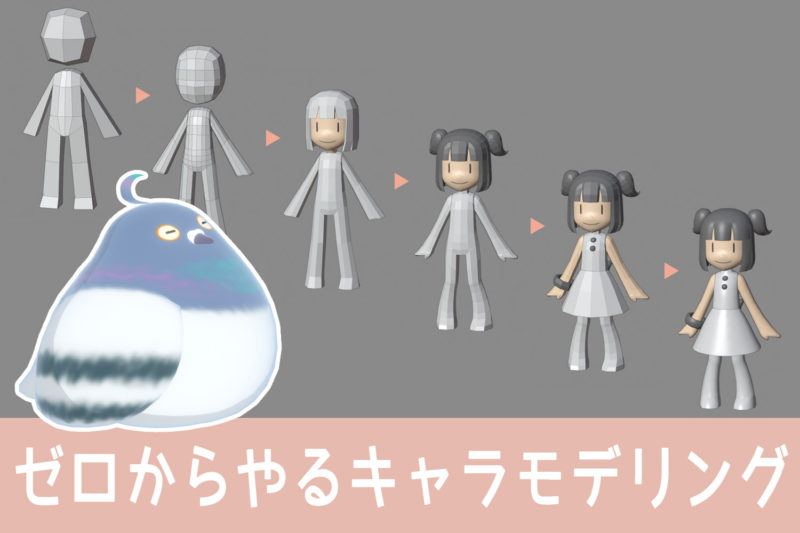
When creating 3D models of characters for work, there are not many opportunities to create them completely from scratch.
Character models are often created from an elemental body (a basic model of an unclothed human figure) that is appropriated, so the model is usually created from some base.
But everyone wants to create their own character model from scratch at least once.
In this article, I will introduce how we modeled a character from scratch using this model of explanations, and we will also write about the “thinking” and “points” when modeling.
The 3D character model of explanations is basically created using only polygon extrusion, polygon cutting, & vertex movement. In addition, UV expansion/Textures will not be dealt with in this article.
Although this character model is simple in construction, I believe that the modeling ideas and points presented in the article can be applied to any character model.
- Make A-Pose at standing (no animation planned)
- Ultra-simple model, a texture is a color only
- Eyes, nose, and mouth are drawn on the texture to represent
- 2950 polygons in the finished model
Interested in modeling characters, I encourage you to read this book.
If you simply want to see someone else’s modeling, Please jump quickly to 4 points to keep in mind when modeling a character.
■ 2021.4.14-7.20 ■
I’ve started a series of videos of Toha modeling a character while watching the blog → Finished!
I’ve also speaken a supplement to the blog with details that I didn’t write about, so please take a look at it as well 🙂
I’ve compiled a list of tweets of completed explanatory Setschan models that everyone has created while looking at blogs and YouTube – there are so many different Setschan models with their unique arrangements, it’s amazing! I’m sure you’ll be impressed with the variety and originality of the models!
- Their own way of making 3D models, No right or wrong
- Iron Rule of polygon modeling “Start with few vertices”
- 4 Points to keep in mind when modeling characters
- Character is all about the face, Good face becomes fun to make!
- Summary: Everyone has their own way of Modeling, but the Way of Thinking can be utilized
Their own way of making 3D models, No right or wrong
First of all, I would like to tell you something. It is.
There is no right or wrong way to do modeling.
If there are 10 3DCG artists, there are 10 different ways of modeling. There is no such thing as which one is right and which one is wrong.
Just that each person has their own way of doing things, that’s all.
There are many modeling columns on the website of Autodesk, a major player in the 3DCG industry, but
In this column, we will discuss how to create a plate polygon that traces the centerline of the character and adds thickness, and how to create a polygon that is thick enough to be used in a character.

In another column, the method is to make it by extrusion and cutting from a cubic object.

I think either way is fine.
Anything that is easy for the person to do and makes a good-looking 3D model is fine.
The only way to find a way that works for you is to try different ways of doing things yourself.
Especially when you are just starting to make 3D models, you may wonder “Am I doing things the right way? Am I doing something really inefficient? How are other people doing it?”
It is helpful to look at various modeling methods of others to help alleviate this concern.
There are many different ways of modeling in the world that suit different people.
I think it is a good idea to first learn about the various modeling methods and then try them out to see which one works best for you.
The content of this article has consistently been the Toha style of modeling.
We hope you will see this as one of the many ways to create a character model.
Iron Rule of polygon modeling “Start with few vertices”
I said that there is no right or wrong way to do modeling. But,
There is a “way of thinking” that says it is easier to create a beautiful 3D model in this way as possible.
A particularly important concept in polygon modeling is to “start with few vertices”.
The reason why this is important is that polygon modeling is “the more vertices, the more annoying”.
As a bit of an example, look at the 3D model below.

When trying to make a shuriken-like shape from a square object, which is more troublesome, A or B?
I think B is more of a pain in the neck.
If there are a lot of vertices to move, you simply need to move your hands a lot, and the more vertices you have, the more likely the object’s shape will be wobbly.
3DCG software such as Maya and Blender can move multiple vertices at once.
Lattice, FFD, bends, soft selection, proportional editing… there are many things.
With these convenience functions, you can move vertices reasonably cleanly even if the number of vertices is large. But still, the simplest and easiest way is to have a small number of vertices to move.
Most people who draw drawings or illustrations will first draw a bite line.
They roughly draw the size of the head and the lines of the body, and then gradually draw in the details. I think the majority of people take this approach because it is easier to draw and less prone to backtracking.
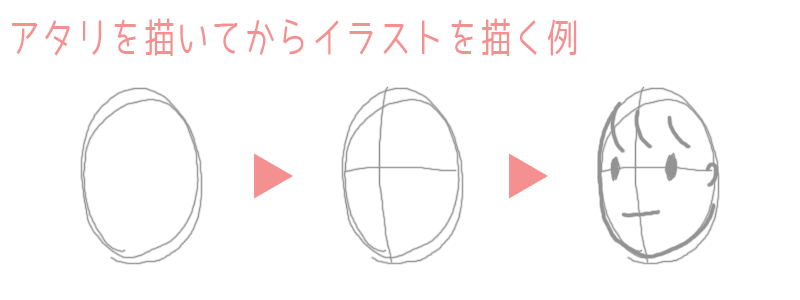
The process of creating a 3D model can be thought of in the same way as drawing or illustration.
First, take a rough shape with a few vertices, then gradually build up the details. In this way, you can keep the overall balance and reduce the number of backward revisions.
I am a pain in the neck, I start by taking a shape with fewer vertices at first anyway.
Other ideas about polygon modeling are useful to know.
This story is about What Low Poly Teaches Us – Each Polygon is Really Everything Meaningful! in the article.
If you want, you can see the different kinds of meanings polygons can have Just look at the part.

4 Points to keep in mind when modeling characters
There are 4 key points that Toha will keep in mind when modeling a character.
- Proportion
- Volume
- Silhouette
- Detail
I think it will be a little easier to create character models if we hold them down from the top.
From now on, we will look at the 4 points while creating a model of a character from scratch.
(1) “Proportion” related to the first impression of the 3D model
The first thing to keep in mind is “Proportion”.
Proportions are the character’s head height, style, and posture. It applies to the size of the head, the position of the hips, and the length of the arms and legs.
It is very troublesome to correct any misalignments later, and it also affects the final appearance of the 3D model, so we want to make sure we get it right.
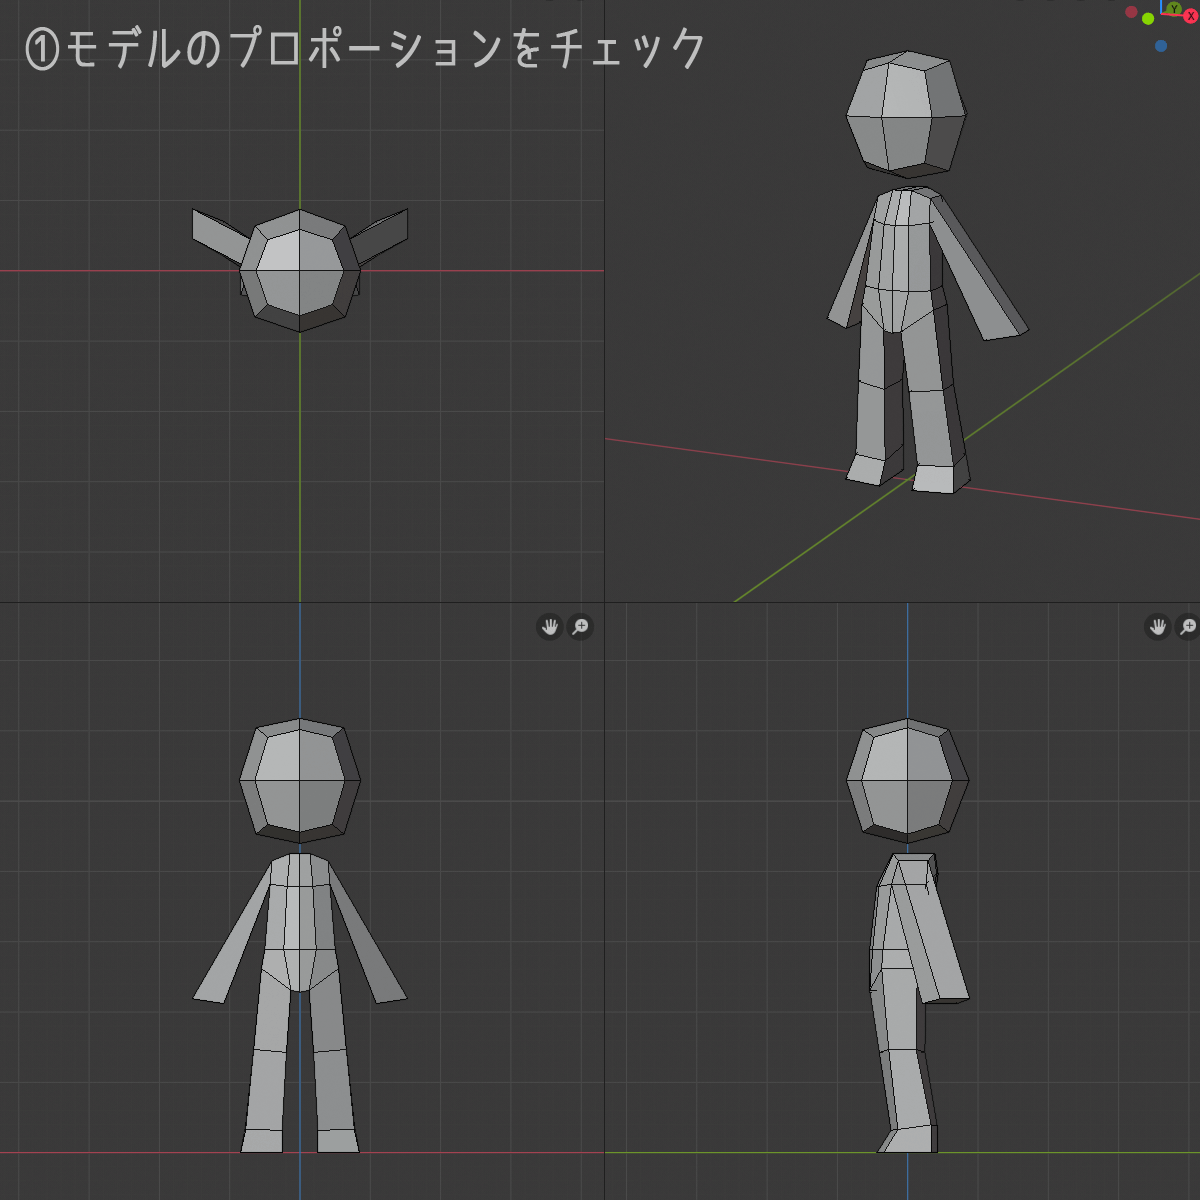
Let’s try actual modeling.
All we do is extrude, cut, and move vertices of polygons, but we use the mirror (symmetry) feature as needed for symmetrical modeling.
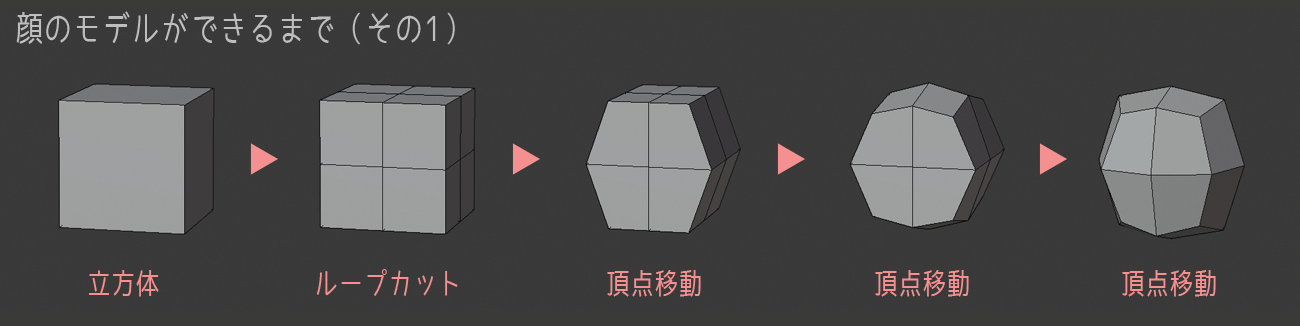
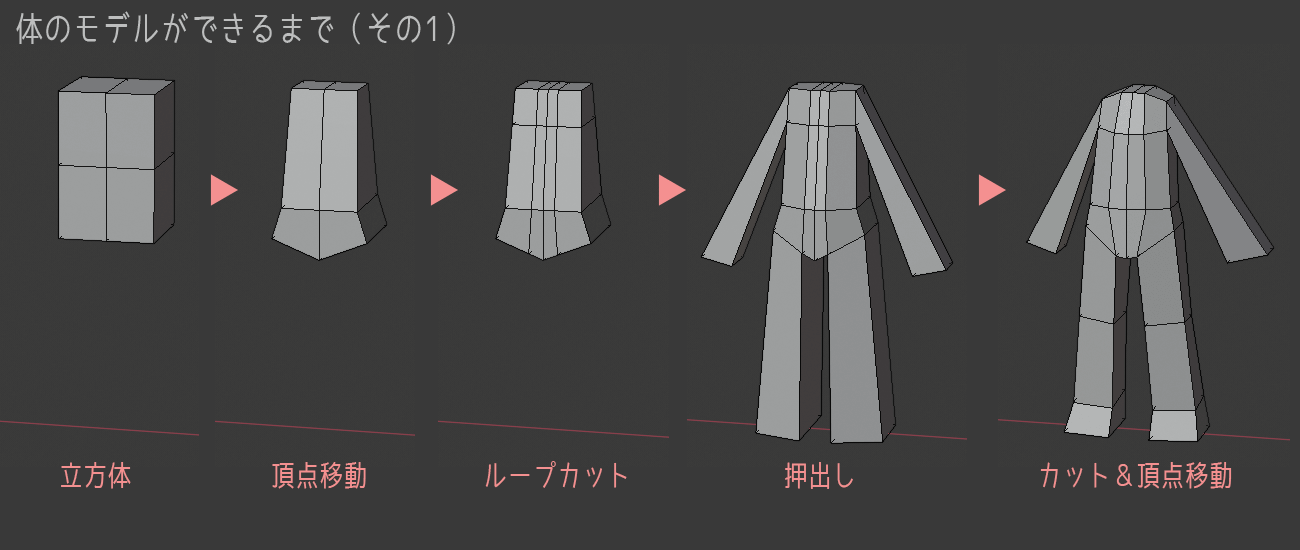
Character modeling at Toha starts with a cube of almost anything.
First is the face. Cut the cube and move the vertices.
Next is the body. Cut the cube and push out the limbs. Cut the hips and knees.
I did it.
I do not place a guide image in the viewport when modeling a character, but rather, I create the character by looking at the character picture displayed off-screen in the 3DCG software.
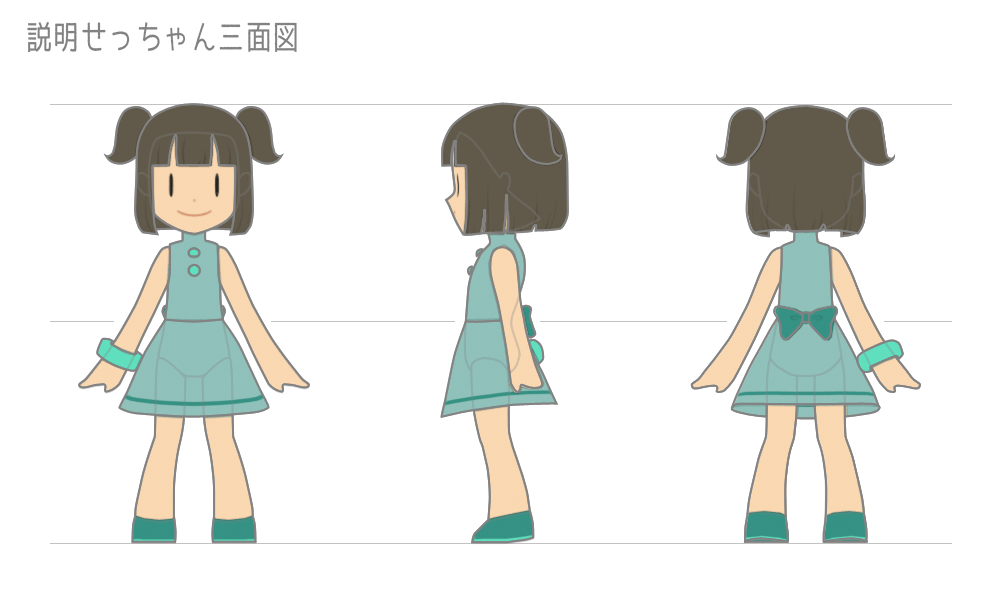
*For reasons not to put guide images, Character Model Necessary Blueprint? – Not Recommend Modeling Relies on Blueprints.
Compare the low-poly model with the character drawing to check that the proportions are approximately correct.
If the proportions of the final model are off (for example, if the head is too big, the torso or hands are too long, or the legs are too short) the first impression when you see that character model is “Hmm?”.
I don’t know what it is, but the whole thing feels strange, the balance feels a little odd.
When a quick look at a character’s 3D model gives this impression, it may be a good idea to modify the proportions.
Here, it is OK for now, and we will move on.
The recommended way to check the proportions of a 3D model is to draw back and look.
More details are in the article 3D Model Creation Tips. You can also read it here if you like.
(2) “Volume” is a major 3D element of the 3D model
As expected, the image is too crunchy, so we cut polygons to adjust the shape.
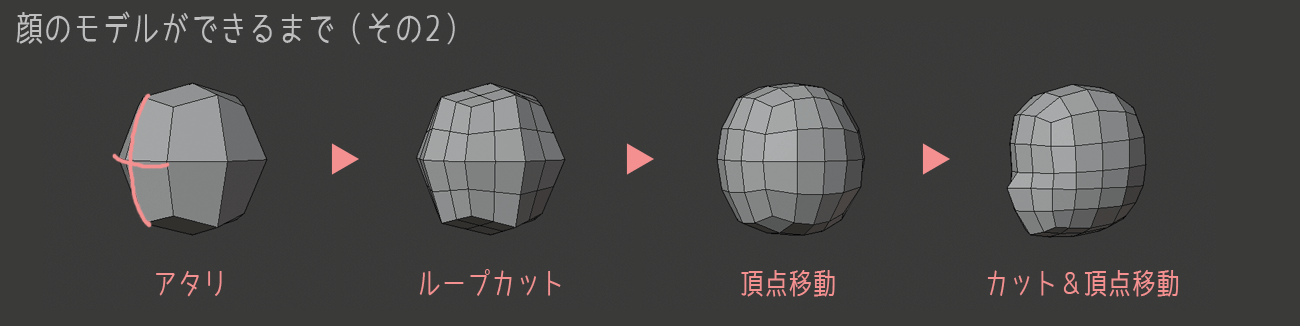
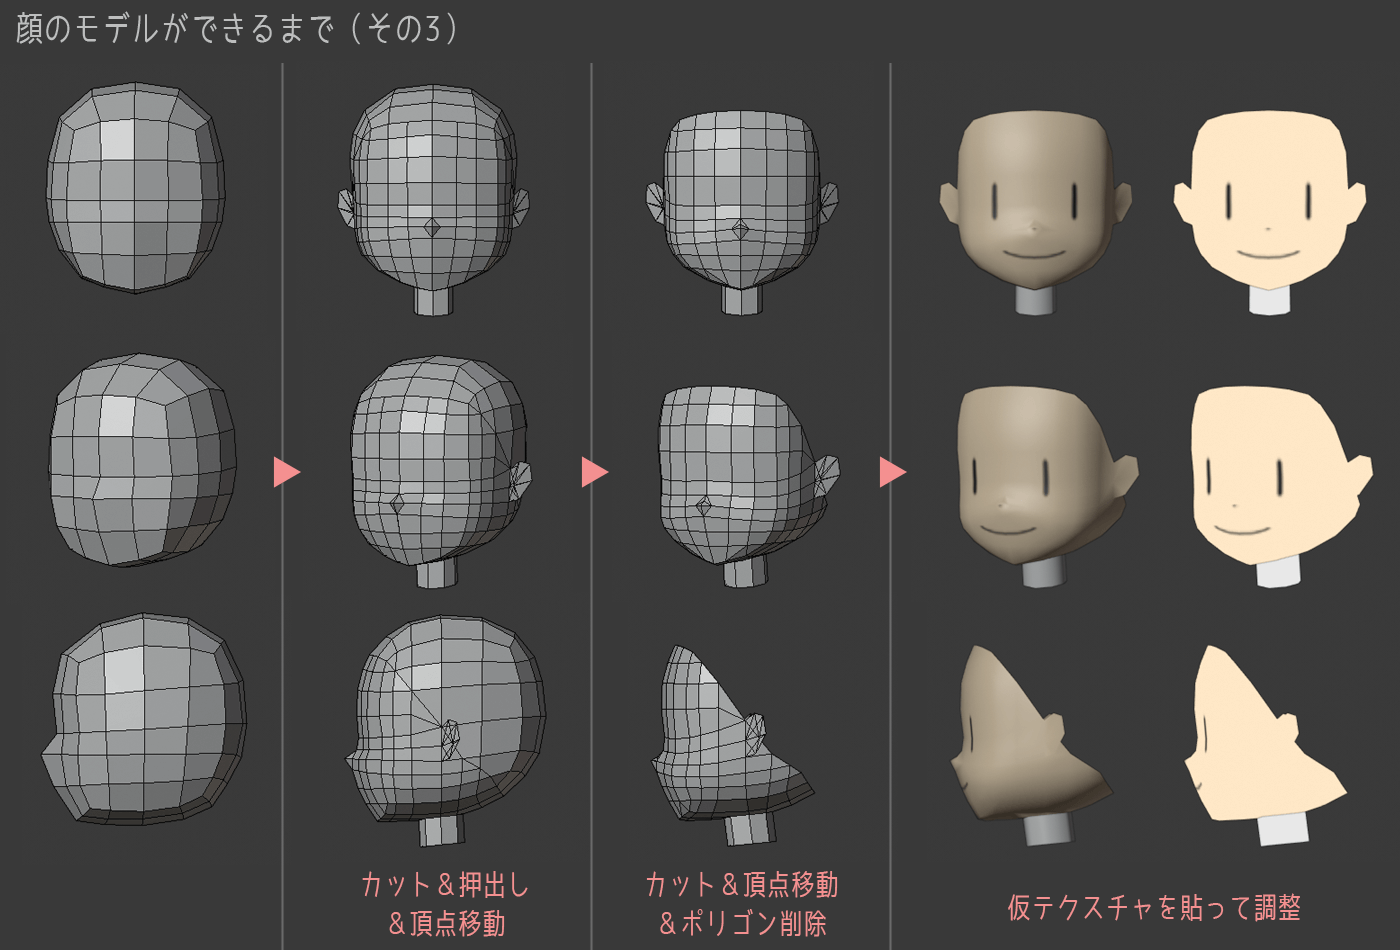
First, the face. Since it is difficult to imagine the face without knowing the position of the nose, cut the polygons and move the vertices so that the nose can be created.
Since the body has square prismatic arms and legs like a robot, cut polygons to make them cylindrical and move the vertices.
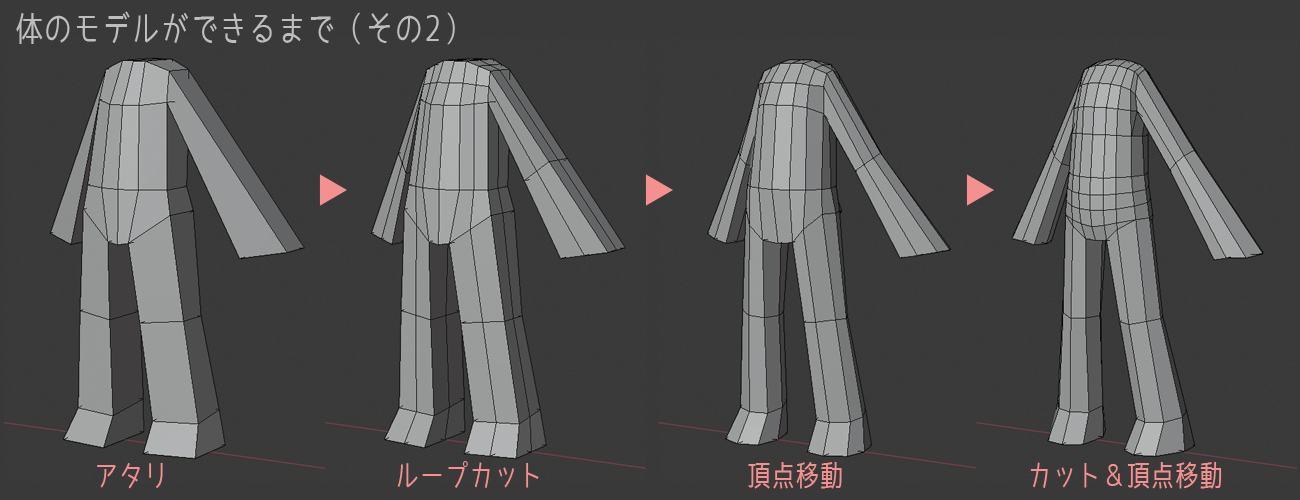
I did it.
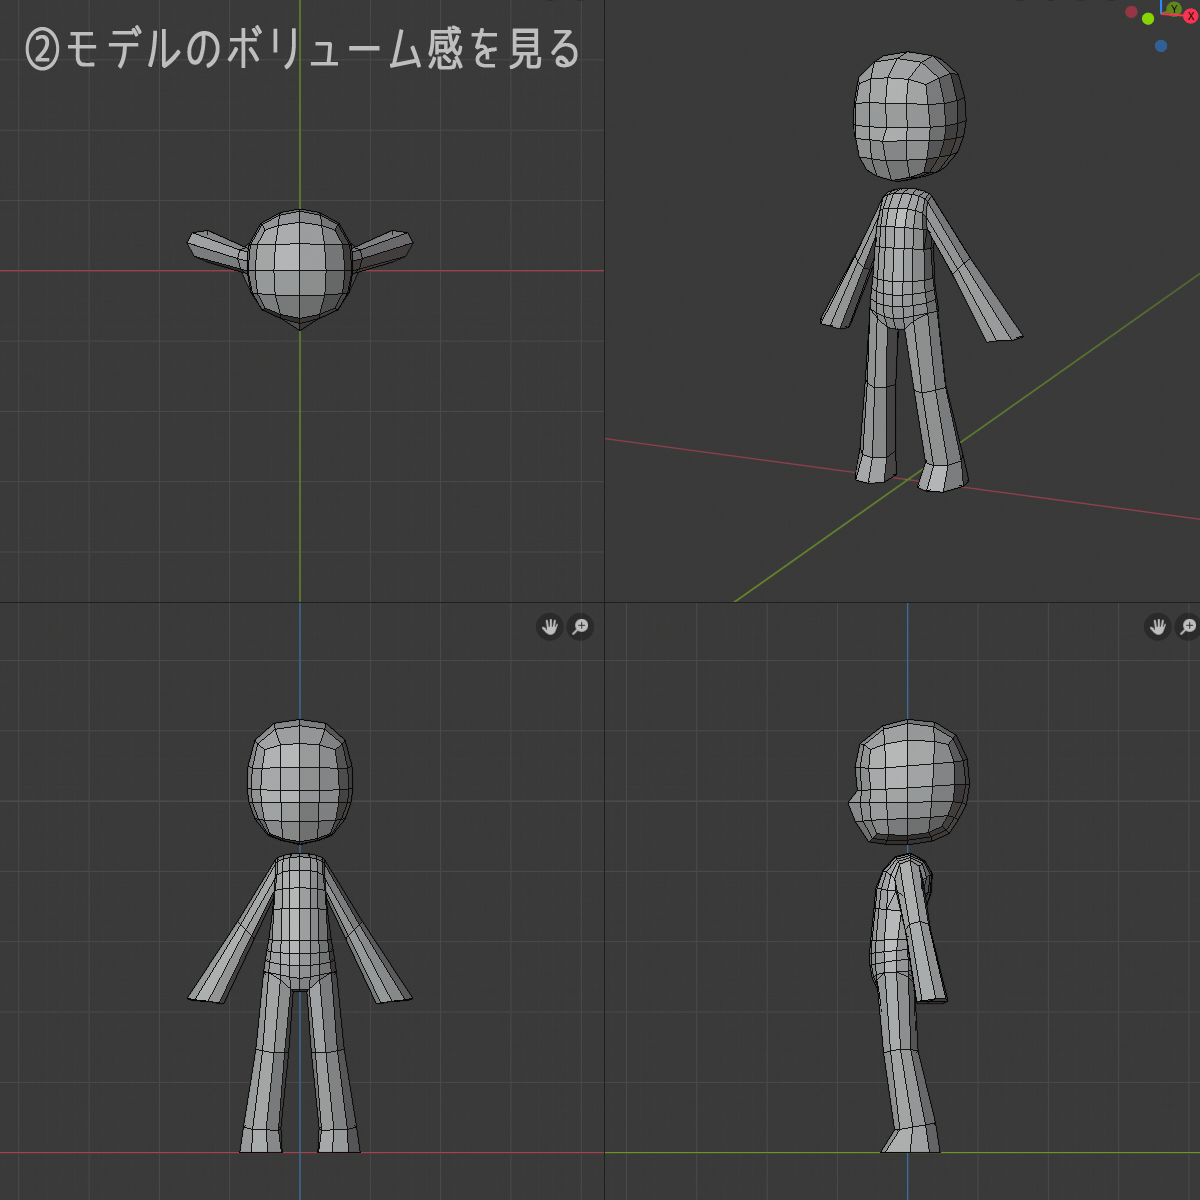
The next concern here is “Volume”.
The 3D model is 3D, so it has a three-dimensional volume.
For example, the thickness of the arms and legs may differ considerably when viewed from the front and the side. The shape of the head, for example, may look good from the front or an angle, but when viewed from above, it may look strangely square.
We want the volume to be three-dimensional compelling from any direction in 360 degrees.
This sense of volume is one of the reasons why 3D models are 3D, and can only be expressed through three-dimensional modeling.
Even character models with the same head height have different volumes depending on whether they have a full or slim body.
How to create the volume of the costume and hair is also an important element of the character model.
The 3D model of this character features a bit of volume in the feet.
Let’s assume this is OK for now, and go on to the next.
(3) “Silhouette” of 3D models that only polygons can create
Once here, check the “Silhouette” of the 3D model.
In most 3DCG software, if you select flat in Lighting, you can see only the silhouette of the object without its three-dimensional effect.
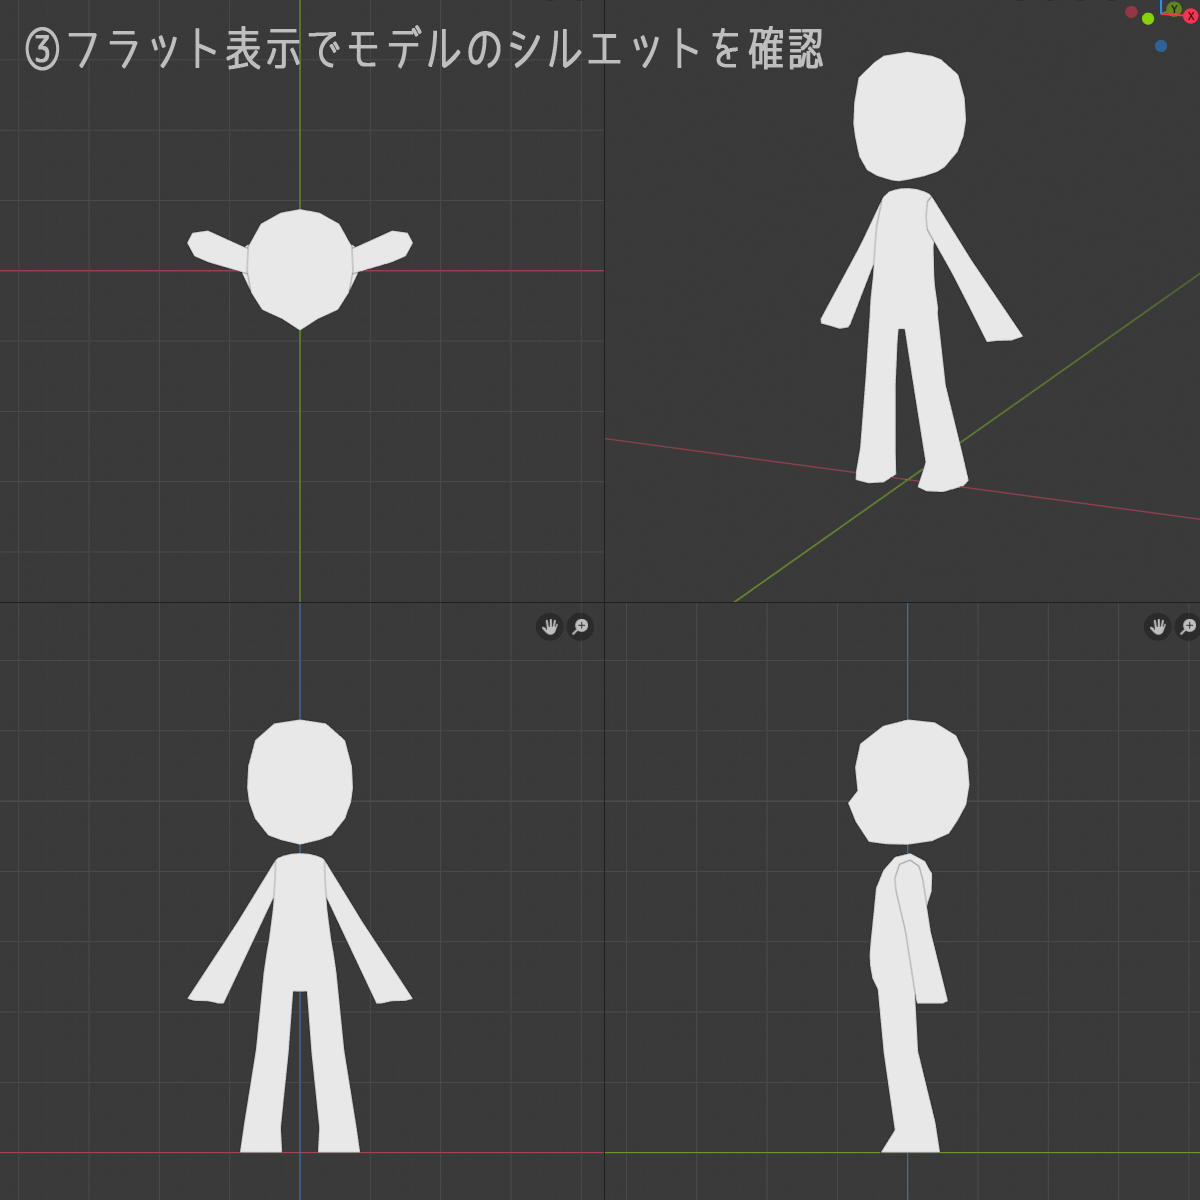
*For Blender, you can be displayed flat where 3D view shading.

In the silhouetted state, it is easier to see the overall balance of the model and the angularity of the edges than before. Now, the cracking of the head is quite noticeable.
In a 3D model made of polygons, only polygons can shape the silhouette.
It is possible to make the surface of a 3D model look uneven by drawing a three-dimensional effect into the color texture or by using a special texture called a normal map. However, since these textures are only pasted onto polygons, they cannot change the silhouette of the model itself.
If you want to create bumps and dips as silhouettes, the only way is to create them with polygons.
Smoothing the edges of silhouettes is also something that can only be done with polygons.
This model in the process of creation has a noticeably crunchy head. To eliminate this, it is necessary to increase the number of polygons and adjust the model so that it looks smooth.
*For more information, see Polygons are flat and You can’t create a “curved surface” by collecting polygons.
The idea that “silhouettes can only be created with polygons” is a very important one, especially when creating 3D models for games with a limited polygon count, for example.
It is an indicator to determine how far to use polygons and how far to use textures.
The features of a character that are important from the silhouette point of view are created with polygons, and the parts that do not affect the silhouette so much are done with textures. In this way, the areas where you want to prioritize the use of polygons will naturally be decided.
So far.
- Proportion
- Volume
- Silhouette
We have seen that these three are checked many times while modeling the character.
Since it is time-consuming to make major changes to the proportions later, the proportions are roughly determined at the beginning, but adjustments are made even during the production process.
Volume and silhouette are looked at each time the face, hair, clothing, and ornaments are made.
In character polygon modeling, “start with a few vertices” is the basic approach, and then gradually create detailed models by rotating in a circle from (1) to (2) to (3), which seems to be the most comfortable approach for Toha.
(4) “Detail” that raises the quality of 3D models to the next level
Once the 3D model is in good shape, we will work on the details of the 3D model. It will be a “Detail” part.
I always make the head (face and hair) and then proceed with the body modeling after I am somewhat satisfied with the results. Since the head will be discussed later, let’s look at the details of the body first.
Cut the polygons of the body and move the vertices to create a nice silhouette.
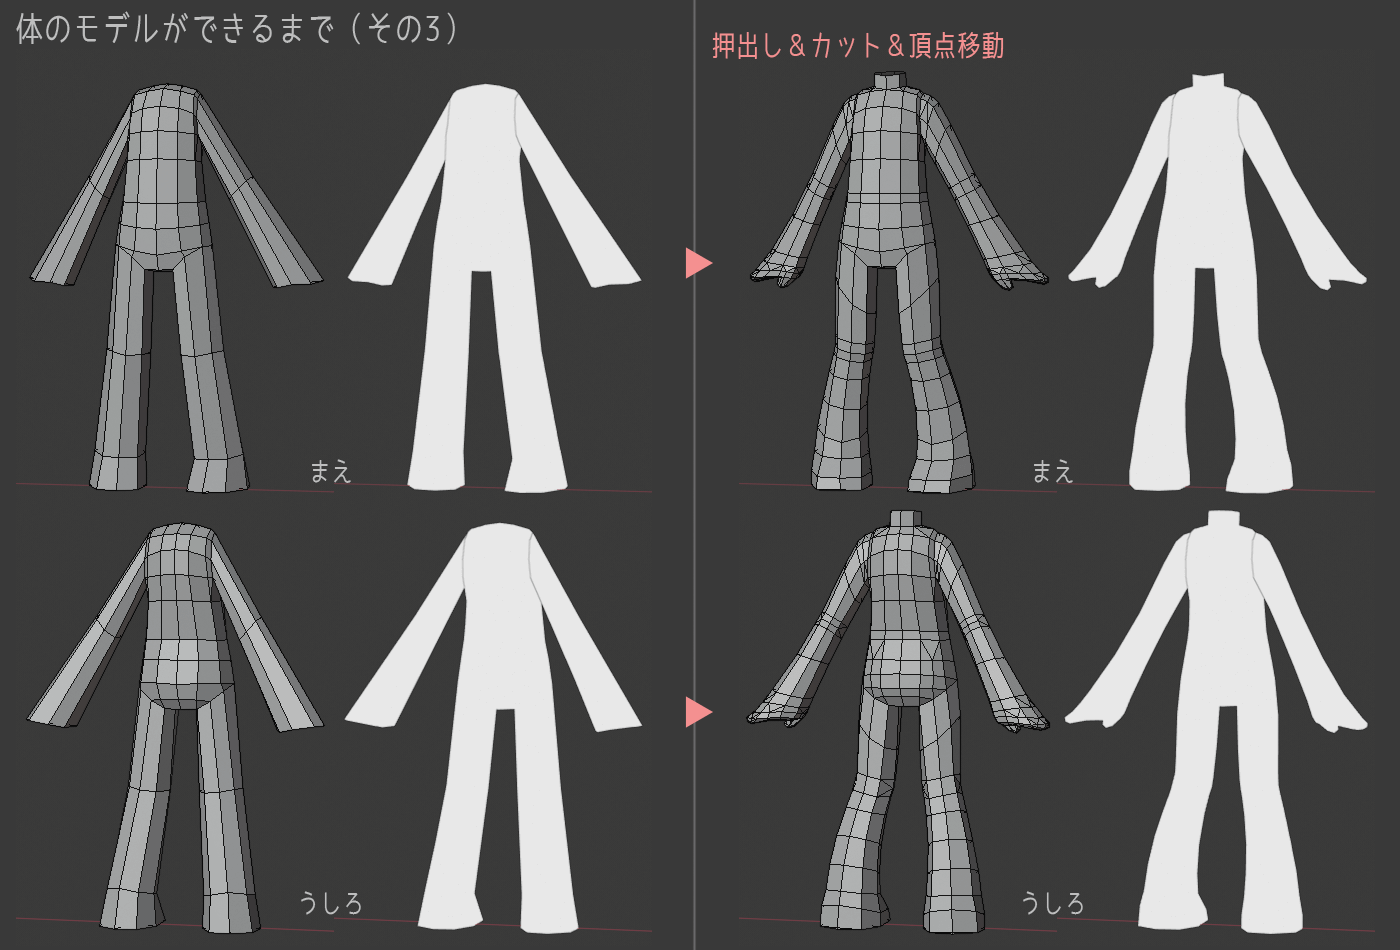
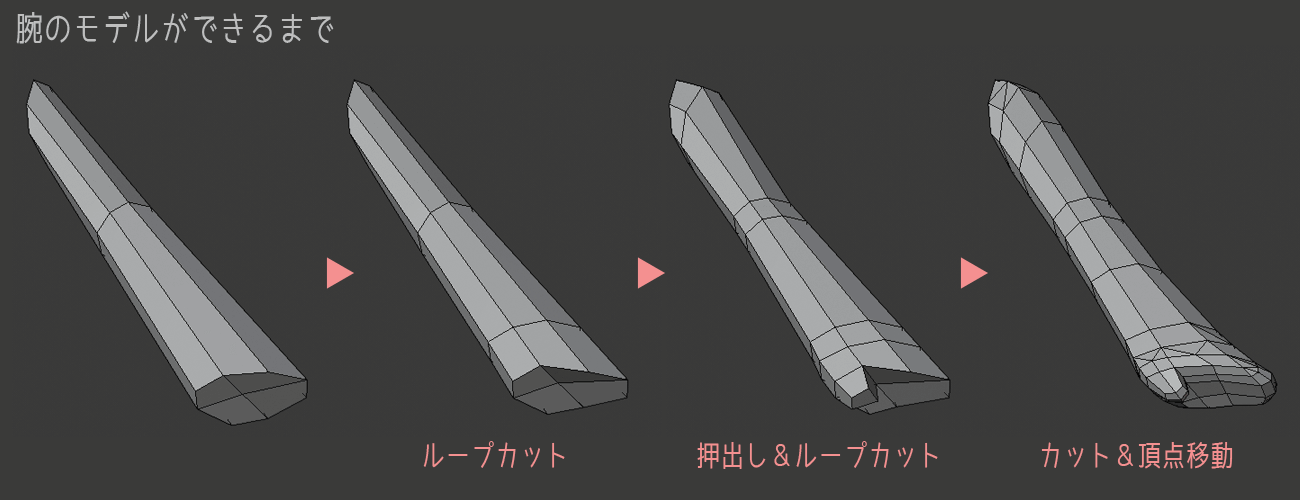
The arms and hands are also created by cutting polygons, extruding, and moving vertices.
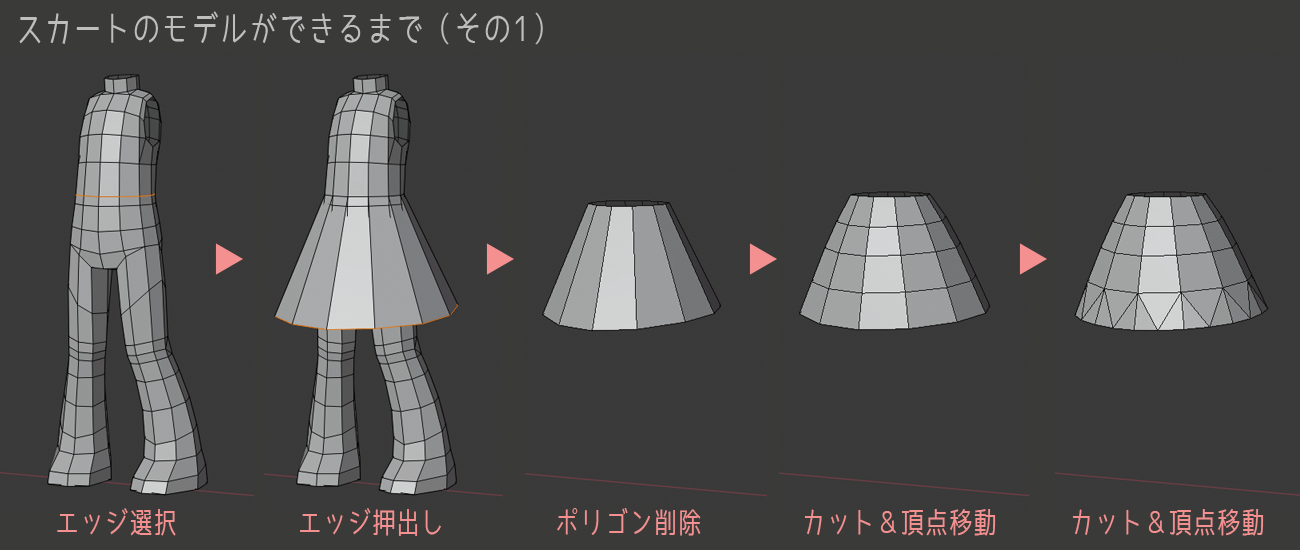
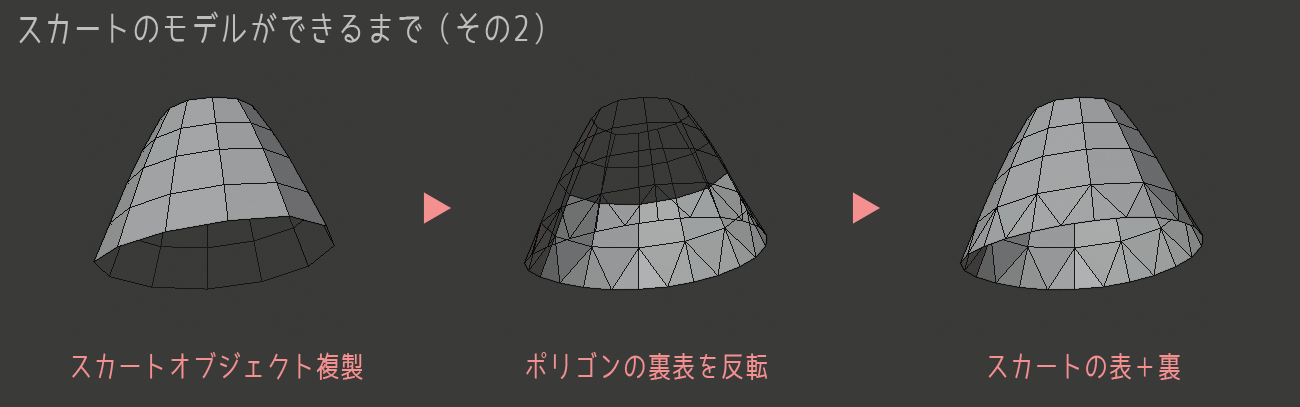
The skirt is created by duplicating the body model and extruding polygons from the waist edge. To make the hemline look smooth, increase the polygons only at the hem by cutting and adjusting.
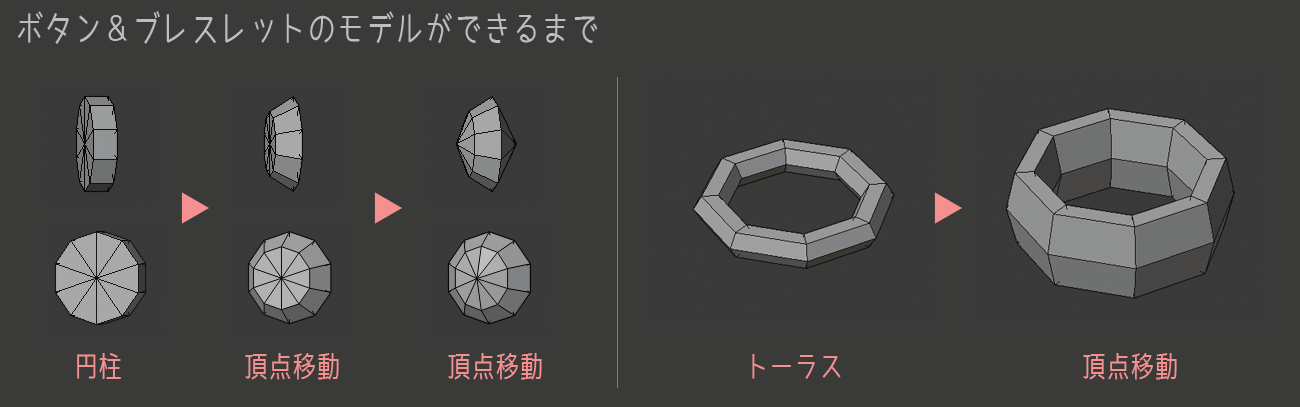
Buttons are created from cylinder objects and bracelets are created from torus objects.
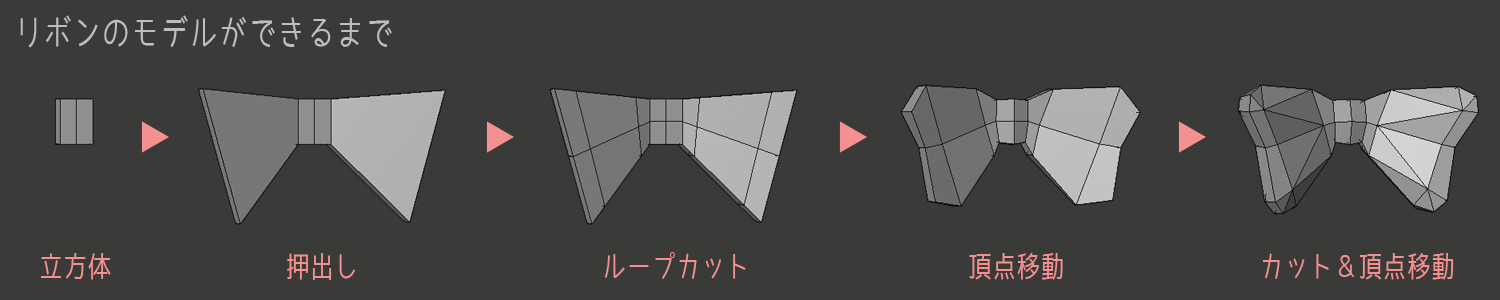
Ribbons are created from cube objects by extruding, cutting, and moving vertices.
The backside of the skirt is created by duplicating the skirt object and then flipping the polygons inside out.
I did it.
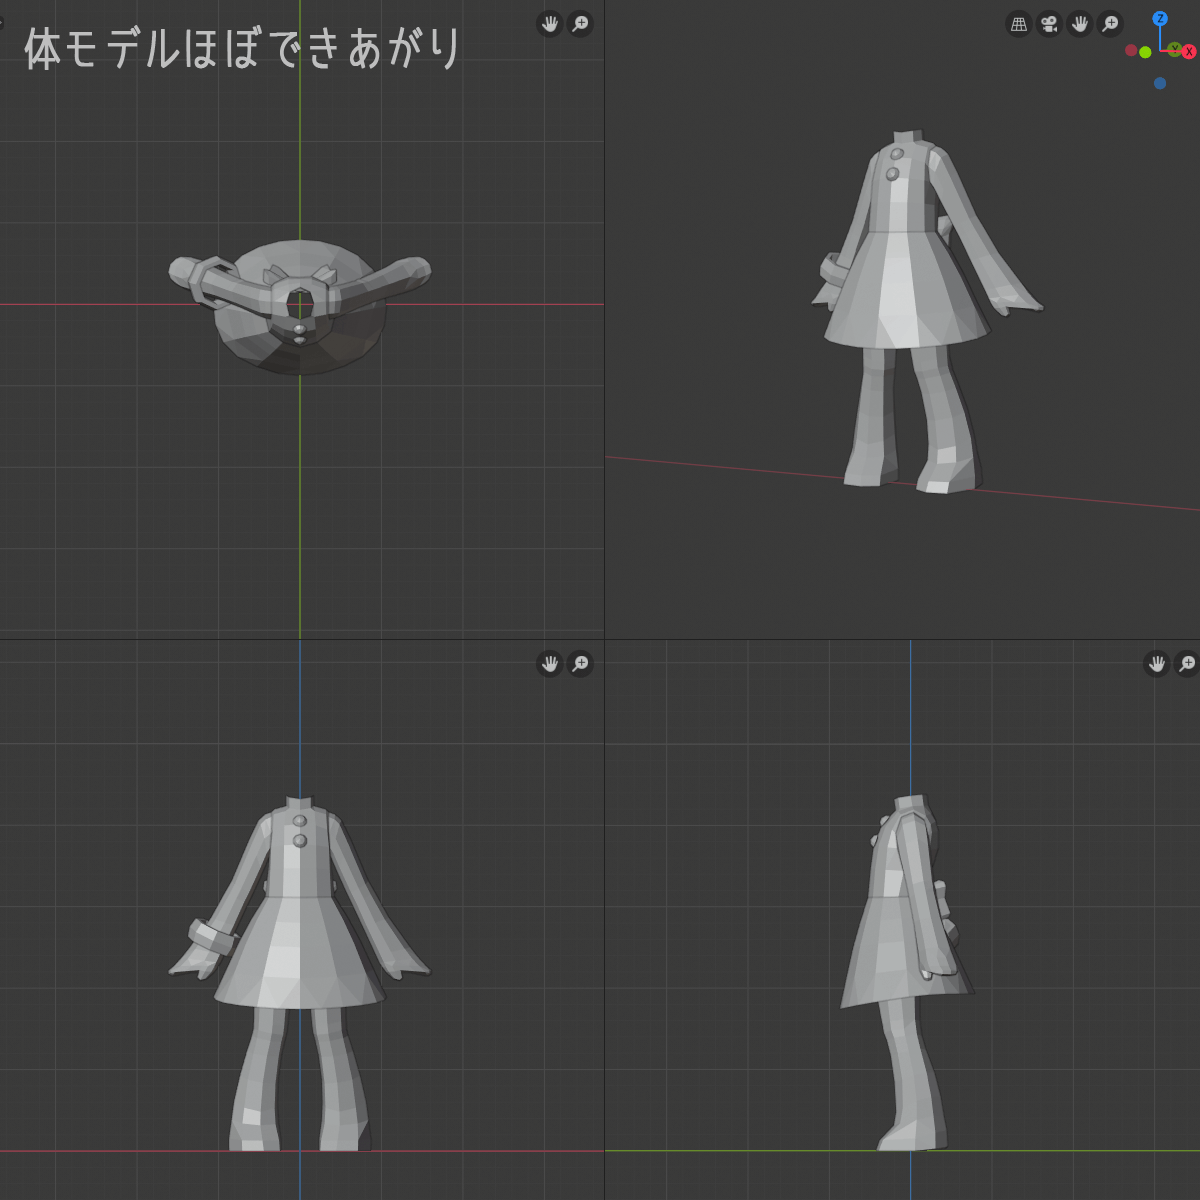
This character model is simple, so I did not go into too much detail when it comes to creating details. The lines of the legs and feet are the parts that I pay particular attention to.
Other design features include three-dimensional buttons and ribbons to prevent the silhouette from becoming too simple, and bracelets on the arms to reduce the sense of symmetry.
The detailing of character models is the area in which each person’s attention to detail comes out the most.
The quality of the 3D model will improve as the details are carefully crafted.
However, if you are obsessed with the entire body from the tips of your feet to the top of your head, you may be too obsessed with the endless possibilities and may not be able to complete your model.
It might be better to prioritize the areas that you are particular about or to set some time boundaries.
The detailing should be done only after you are satisfied with the proportions and volume of the model.
Even if the details are carefully crafted, if the proportions, volume, and other aspects of the 3D model that relate to the “quick impression” are not good enough, the overall impression may not be good enough.
If the “quick impression” of the character model looks good, and if the “details” look good when you take a closer look, then the character model will look great!
Character is all about the face, Good face becomes fun to make!
The most important part of a character’s 3D model is the face.
No matter how stunning the proportions, how attractive the volume and silhouette are, or how wonderful the detailing is, if the face is not cute/cool, it will look disappointing.
Although there are genres such as “Busakawa”. But basically, everyone’s ideal of a character model created in 3DCG is cute/cool.
The face is still important.
That is why modeling the face and hair is particularly difficult, but I think it is an area where you can take your time and focus until you are satisfied with the result, in my opinion.
Once the character’s face is nice and ready, it becomes more fun to make the model.
So, Toha always makes the face and hair models first.
Oh~ the face is so cute/cool~, and then the body model is made.
I really could write an article just on face and hair, but I will write it here as if I could have made it without hesitation.
*I have written an article about hair only, though it’s a completely different character.

The face is also detailed by looking at the volume and silhouette. It is difficult to create a face without looking at the position of the eyes and mouth, so a temporary texture is applied and adjusted. We are particular about the contours.
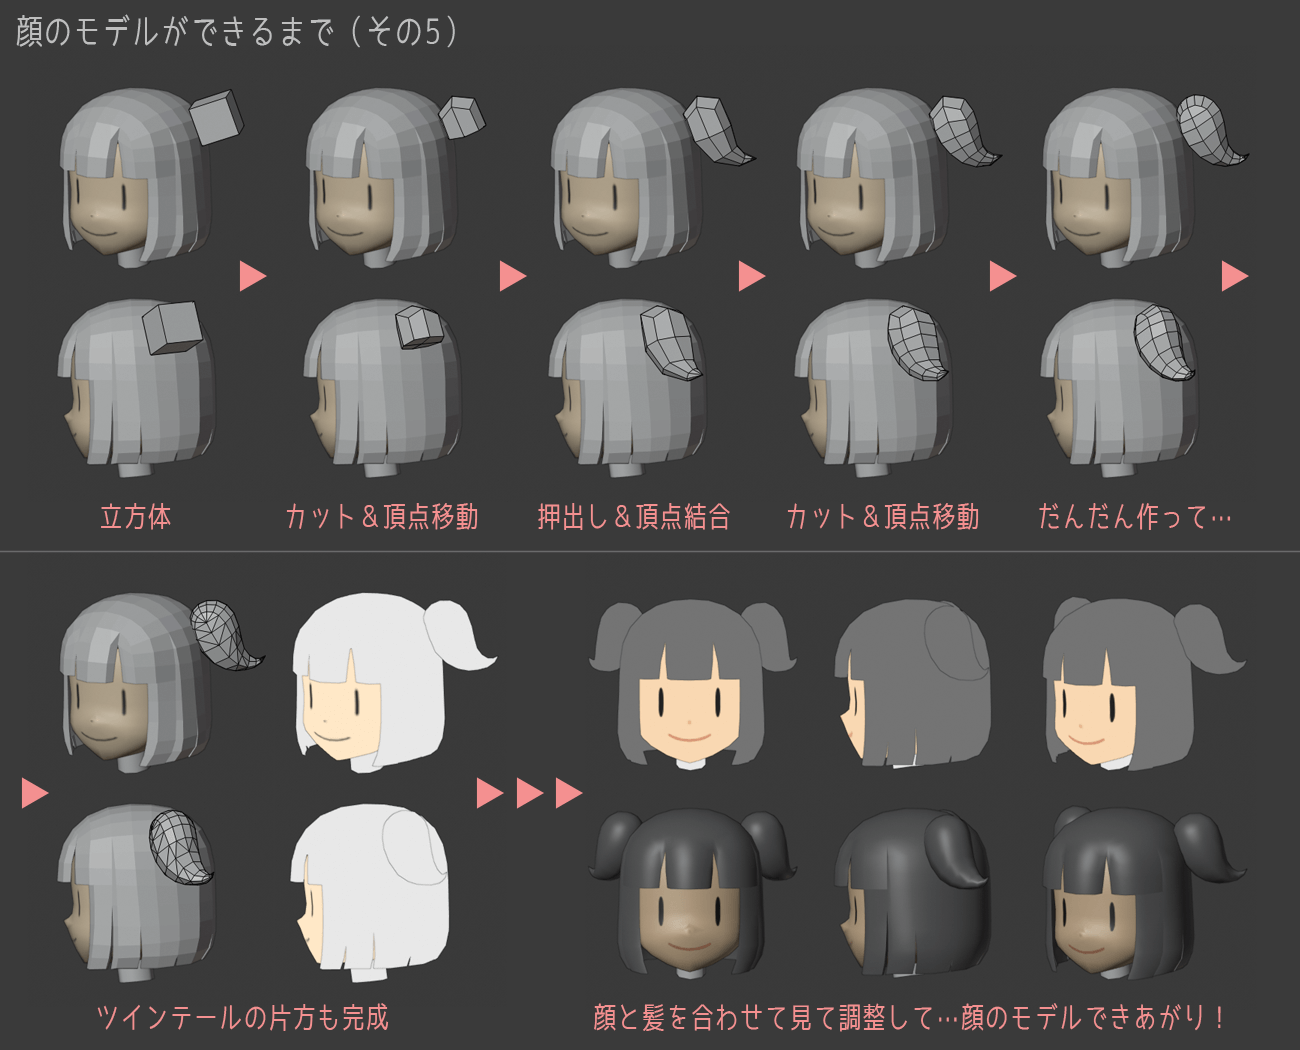
Once you are satisfied with the face to some extent, create the hair. It is made by extrusion, cutting, and vertex movement from the cube.
For ease of modeling, hair objects can be separated in front of and behind the ears. (We will attach them later.) Adjust the silhouette of the hair with care so that it is soft and fluffy.

Twin tails are made on one side and copied. Extrude from the cube. The vertices of the hair ends are joined.
Once the hair model is created, the face is adjusted again, looking at both the face and the hair. Ideally, the face model should look good without the hair, but it will be modified to look even better with the hair included.
Finally, the polygons are smoothed and the modeling is now complete.
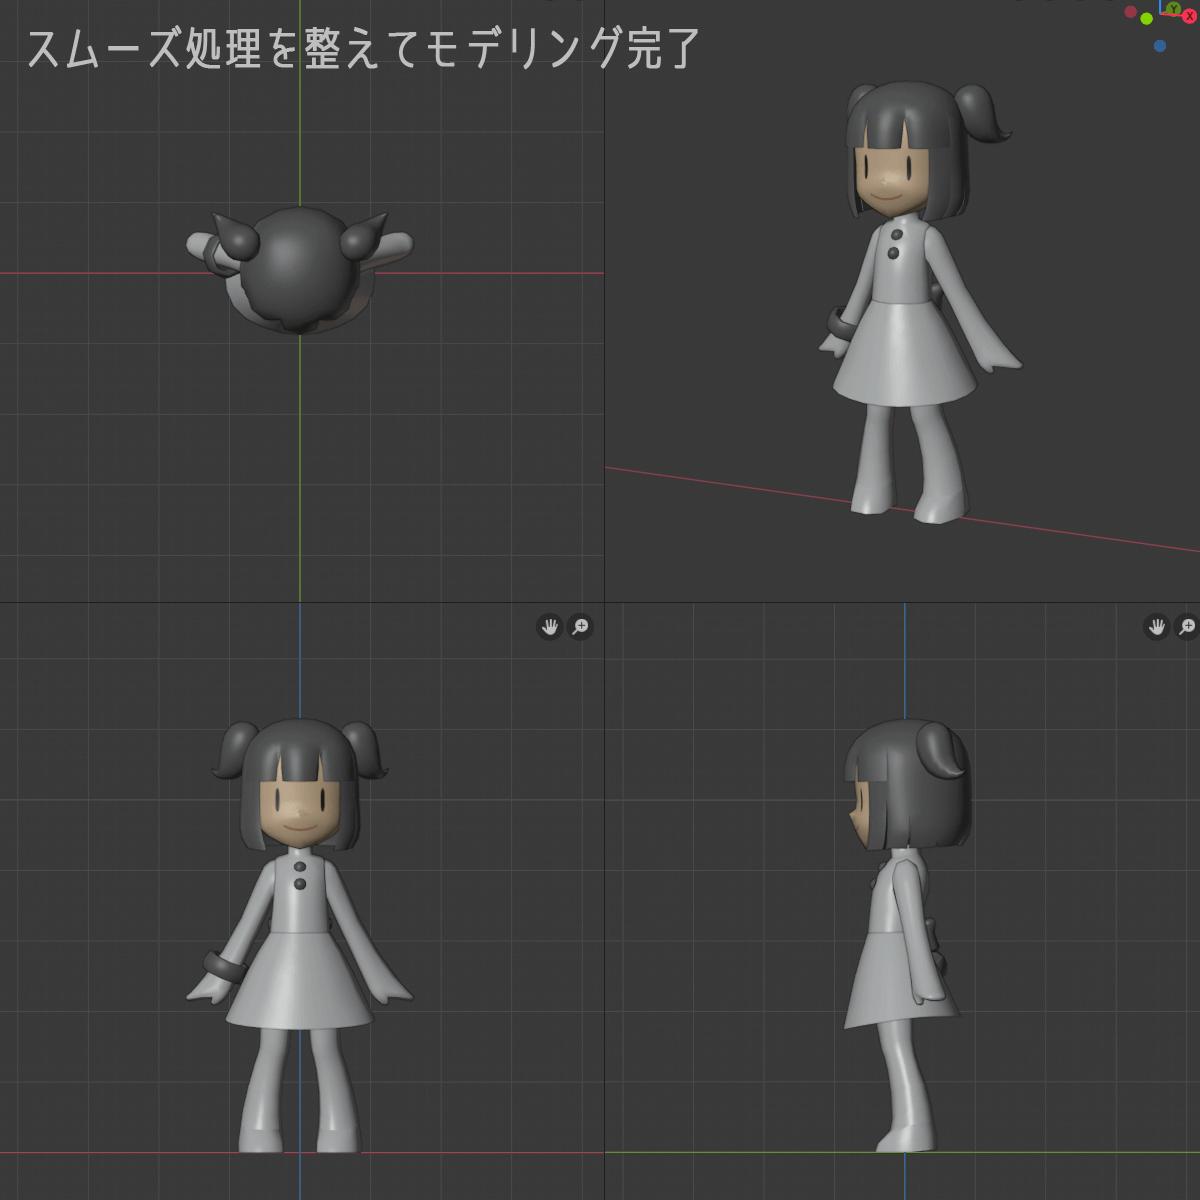
*Smooth processing in Blender You can find out how to adjust it here~.
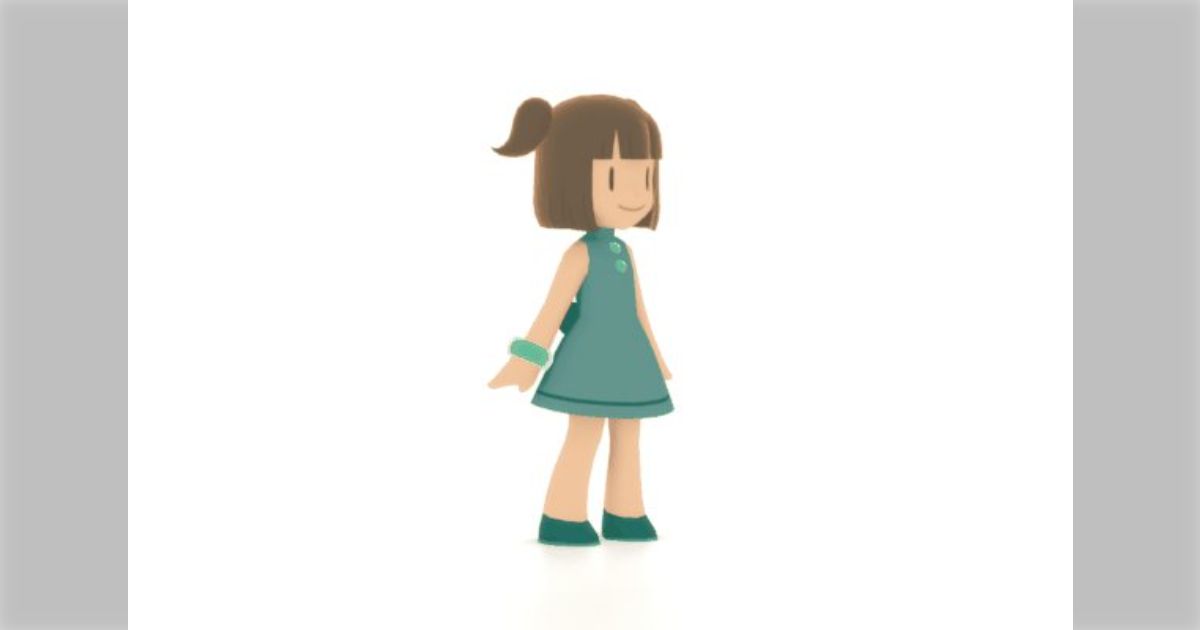
This article will not deal with UVs and textures, but here is what it will look like when the textures are complete as well.
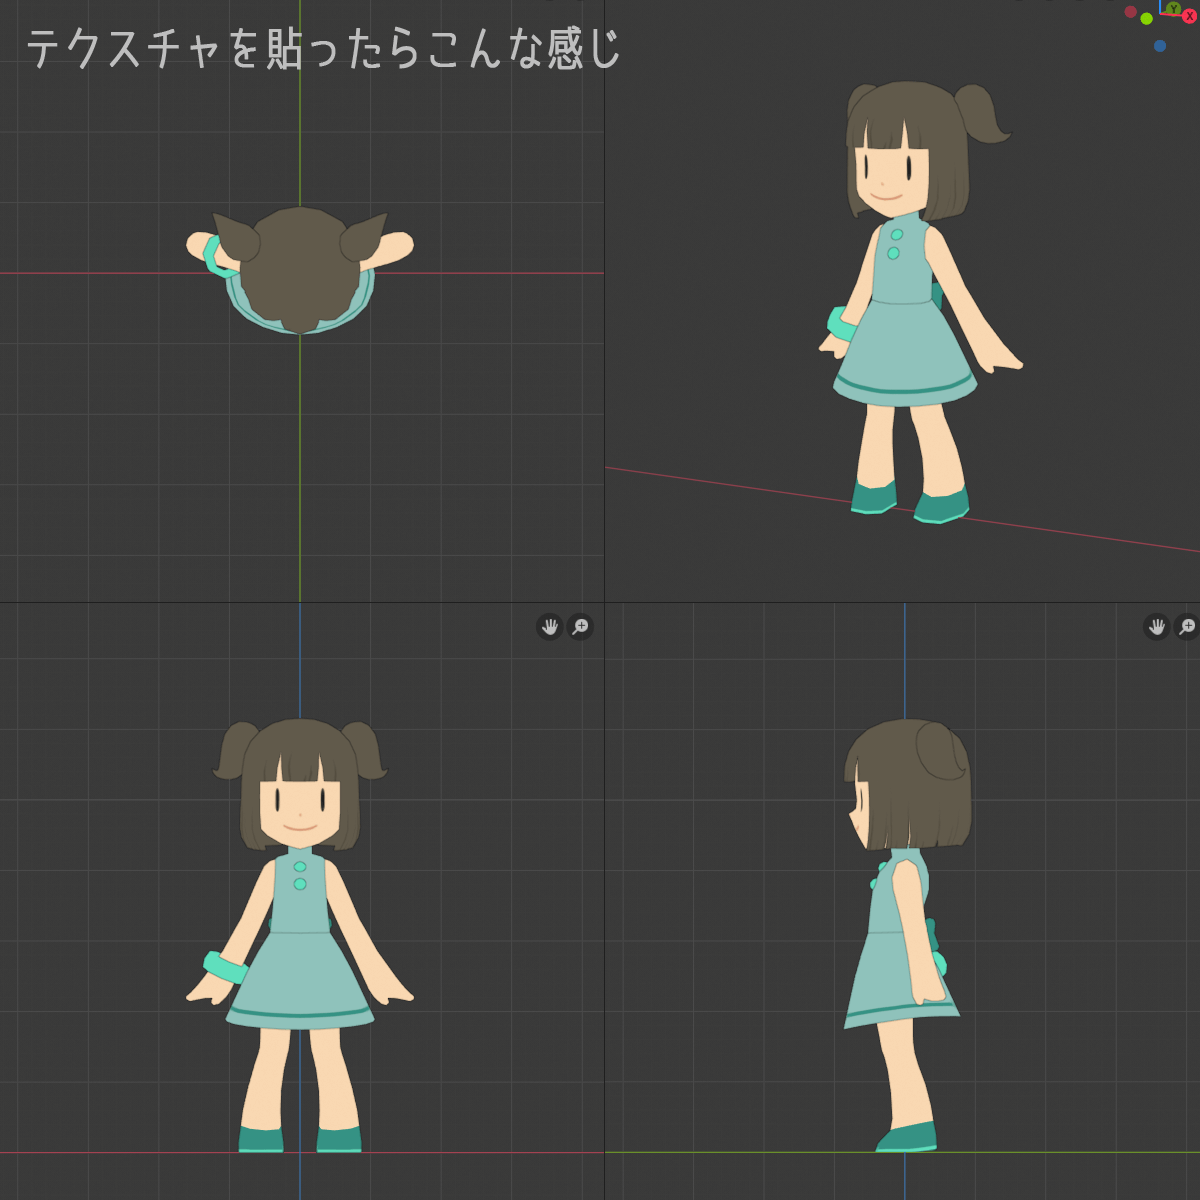
It’s done!
Ara-san, who referred us to Toha’s modeling article, wrote in NOTE about making his first low-poly character model.
I think it will be very helpful for those who want to try modeling from now on! Please take a look!

Summary: Everyone has their own way of Modeling, but the Way of Thinking can be utilized

I’ve tried to show you how we model a character from scratch.
I think some things are different from my way – or this part was the same way, etc.
The content of this article is just one example of character modeling, but the ideas and points can be used in other ways.
While the polygonal modeling of characters is based on “creating from a small number of vertices”, the following four points of the 3D model may make it a little easier to create.
- Proportion
- Volume
- Silhouette
- Detail
Of course, everyone has their own way of modeling.
You can try different ways of doing things until you find the right one, and even after you find the right one, you can try different ways of doing things to find a better way.
I hope that one thing or another in this article will be of help to someone.
If you want to try modeling characters in Blender, please refer to this article~.
Also, when making a 3D model, it is important to gather lots of Documents before making it!

And, if you are going to try modeling in earnest, I recommend making notes of your work.

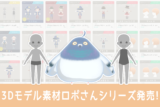
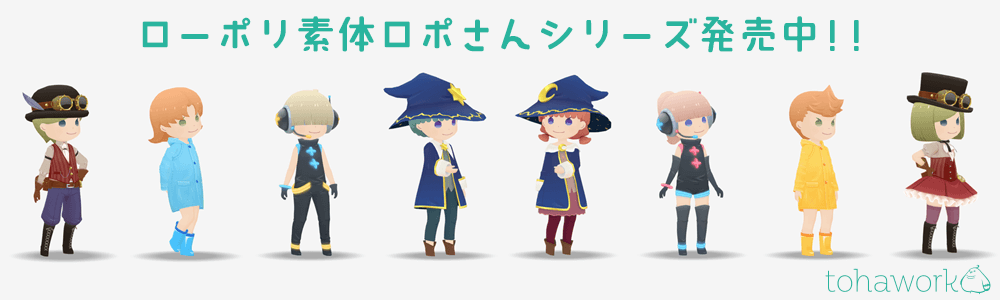
Created based on the model which is described in this article,
Low-poly character Lopo-san series is now available at BOOTH “Toha’s shop”!

As a material model for game production or as a reference model for practicing character modeling, I recommend this 3D character model to you at all costs.
I also wrote an article explaining Lopo-san series, so please take a look at it~!
By all means!
- Coments - コメント一覧